• Welcome to ClassicBroncos! - You are currently viewing the forums as a GUEST. To take advantage of all the site features, please take a moment to register. It's fast, simple and absolutely free. So please join our community today!
    If you have problems registering or can't log into your account, please contact Admin.

SpareParts Cage Build

77broncodriver

Full Member
Joined
Nov 21, 2009
Messages
344
I purchased a kit form SpareParts a couple months ago and have been slowly getting it put together during my spare time. I thought I would post some pictures for you guys to see how it goes together if anyone else is going this route.

My first advice would be to start with a level surface. I thought my garage was flat, but after welding the main hoops together I noticed they were off a little bit and have been fighting that the rest of the way!


PIC #1
The main tubes that run the length of the bronco are cut in half for shipping, then have to be welded together with a smaller tube that slips inside of them.

PIC #2
Here is the main sections tacked together. Definitely get a friend to help. I did it by myself and had a hard time getting it all together with straps and in the right spots.

PIC #3
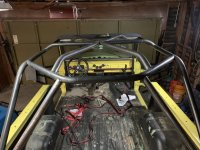
Here is the top X section tacked on. Id recommend starting with the middle tube instead of the front one since you know where the middle one needs to be (right at the joint on the main tubes running the length of the bronco).

The hardest part for me was to get the X tubes to fit without big gaps in the notches. It could have been a number of reasons, most likely my fault but I had to do some grinding on the notches to make them fit nicely.

PIC #4
This is where I left off today. The main cage, other than the gussets is together and now taken out of the bronco and onto the floor. I am going to set up a frame on the ground out of 2x4's and level it so I can make sure that all the bars going to the floor are the same lengths and it is all square.

Hopefully I will get it as close to perfect as I can tomorrow!

Evan
 

Attachments

  • Z0NGssJASFO7v5HzkEJLFg.jpg
    Z0NGssJASFO7v5HzkEJLFg.jpg
    123.1 KB · Views: 216
  • cWa5PpmgTuWVbHppWLKCYg.jpg
    cWa5PpmgTuWVbHppWLKCYg.jpg
    118.2 KB · Views: 244
  • DKRurZSER36FwhxTU+GqDQ.jpg
    DKRurZSER36FwhxTU+GqDQ.jpg
    128.4 KB · Views: 253
  • K7T9qppdT8+S4X10cTfDog.jpg
    K7T9qppdT8+S4X10cTfDog.jpg
    122.3 KB · Views: 253

langester

Contributor
MASTER OF MADNESS
Joined
Mar 2, 2013
Messages
2,660
Looking good! I really like that style of cage!
 

Boss Hugg

Contributor
Bronco Guru
Joined
Jun 8, 2010
Messages
2,145
WOW! I just unpackaged mine the day before yesterday. I'm working toward a time-lapse on it, but we'll see about the end quality/quantity of video I get. I'm hoping to convince my 7 year old to help, but we'll have to see how that goes. He hasn't caught the bug to fix stuff yet.
 

Boss Hugg

Contributor
Bronco Guru
Joined
Jun 8, 2010
Messages
2,145
I'm wondering if

1) I need to weld the slug into the main tubes around the end of the tubes and then grind the weld to pull the tubes together as much as possible, then weld the tubes together...

or 2) weld just in the rosette and then weld the tube ends to each other only.

If I can get away with only doing the rosette weld, it lets me tack everything together to keep from the misalignment of the main tubes as you encountered.
 

Boss Hugg

Contributor
Bronco Guru
Joined
Jun 8, 2010
Messages
2,145
Hopefully I will get it as close to perfect as I can tomorrow!


Can you give me a measurement from the top of the quarter panel to the bottom of the joint of the main tubes? I’m working with a nonconventional mounting system that sticks up above the floor. I need to adjust for that at some point.

6ccaedf501ea0b6a27dfeb361b5d60dc.jpg


49e7a0bcb964840d320869f507282b56.jpg


Sent from my iPhone using Tapatalk
 
OP
OP
77broncodriver

77broncodriver

Full Member
Joined
Nov 21, 2009
Messages
344
Can you give me a measurement from the top of the quarter panel to the bottom of the joint of the main tubes? I’m working with a nonconventional mounting system that sticks up above the floor. I need to adjust for that at some point.

6ccaedf501ea0b6a27dfeb361b5d60dc.jpg


49e7a0bcb964840d320869f507282b56.jpg


Sent from my iPhone using Tapatalk


I beveled the 2 tubes then put them together, welded the rosettes, then welded around the tubes in the bevel. Probably should have just tacked the bevel then made sure it was straight before welding up the rosettes but if you have a flat garage floor you shouldn’t have an issue.

I took it out before I saw your question for the measurement but from the bottom of the mounting plate to the bottom of the main tube it is 38-3/4” and then the measurement from the floor to the top of the quarter panel is 19-1/4”.


Sent from my iPhone using Tapatalk
 
OP
OP
77broncodriver

77broncodriver

Full Member
Joined
Nov 21, 2009
Messages
344
Here is a picture of where I left off today before running out of welding wire. Just the gussets and grab handles need to be welded on then it’s ready to be painted!

Started stripping my old bedliner off after and now noticing how much of the floor is held together with bondo (planned to strip it and spray raptor liner). Might need to just throw the carpet back in till I find some time to do some new floor boards. Hopefully getting it ready enough to do some snow wheeling before the snow melts!

e90cf388cae3d2eed4dff248b13a4520.jpg


Sent from my iPhone using Tapatalk
 

EFI Guy

Sponsor/Vendor
TheEFIguy@gmail
Joined
Apr 14, 2013
Messages
1,054
Loc.
BFE
Looks great! I finally picked mine up a couple of weeks ago so I'm sure I'll be coming back to this thread when assembly time comes.
 

GWBronco

Full Member
Joined
Mar 25, 2006
Messages
209
The cages are great. I did one last year with a couple of changes but they are great.
 
OP
OP
77broncodriver

77broncodriver

Full Member
Joined
Nov 21, 2009
Messages
344
After moving I finally got the cage mostly done. I still need to add a bar behind the front seats for the harnesses.

The only real adjustments I needed to do other than notch fitting was the front 4 body mounts. I ended up making my own because the ones that came with the kit weren't big enough to bolt around the body supports under the floor. The ones that came with it would mean the bolts would be going through the hollow body supports and would deform them when being tightened.

Does anyone have their cage painted to match the body color? Specifically yellow? I wonder if that would be a little too much.

Anyway, here's how it looks with a quick coat of spray paint on it.
 

Attachments

  • IMG_0539.jpg
    IMG_0539.jpg
    104.1 KB · Views: 71
  • IMG_0540.jpg
    IMG_0540.jpg
    86.2 KB · Views: 72
  • IMG_0541.jpg
    IMG_0541.jpg
    68.1 KB · Views: 59
  • IMG_0542.jpg
    IMG_0542.jpg
    100.8 KB · Views: 73

EFI Guy

Sponsor/Vendor
TheEFIguy@gmail
Joined
Apr 14, 2013
Messages
1,054
Loc.
BFE
That looks great! I think the yellow would be too much personally, the contrast between the two looks great.
 

Cortez

Bronco Guru
Joined
Jan 29, 2009
Messages
1,193
Yeah stick with black or grey it looks awesome- nice work 77.
 
OP
OP
77broncodriver

77broncodriver

Full Member
Joined
Nov 21, 2009
Messages
344
I am looking for some advice for a bikini top option for this cage. I used my old non family cage bikini top since I finished the cage but it ended up getting torn to pieces because of the way the back flapped in the wind.

I am worried that if I get a family cage bikini the back will still flap since the back of the cage is not a square so there wont be even pressure.

Does anyone else with this cage have any recommendations?

Thanks
 

SpareParts

Bronco Guru
Joined
Nov 13, 2004
Messages
5,592
This thread just showed up in my “similar threads”. Sorry, I’m not on CB much anymore with all the other platforms. Looks like it’s all together and glad others were there to answer questions for you. I know Adam has his installed, Gary was working on it, but it’s been a while.

We are still selling them, just been busy and haven’t advertised lately. Here’s a link to the lastest ad.

 
Top