


Community
Message Forum
Photo Gallery
Event Calendar
Book Reviews
Bronco Wallpaper
Bronco FAQ
Link Back to CB!
Photo Gallery
Event Calendar
Book Reviews
Bronco Wallpaper
Bronco FAQ
Link Back to CB!
Buy / Sell


Bronco Tech
3 Arm Wiper Setup
Fix Motor Mount
Roll Cage Braces
Throttle Body 65mm
Wheel Alignment
Heat Riser Replacement
Vent Window Repair
Center Console Mount
Straighten Bumper
Ford 6R80 6 spd
More Tech...
Fix Motor Mount
Roll Cage Braces
Throttle Body 65mm
Wheel Alignment
Heat Riser Replacement
Vent Window Repair
Center Console Mount
Straighten Bumper
Ford 6R80 6 spd
More Tech...

Install the app
-
Welcome to ClassicBroncos! - You are currently viewing the forums as a GUEST. To take advantage of all the site features, please take a moment to register. It's fast, simple and absolutely free. So please join our community today!If you have problems registering or can't log into your account, please contact Admin.
You are using an out of date browser. It may not display this or other websites correctly.
You should upgrade or use an alternative browser.
You should upgrade or use an alternative browser.
Finally starting the (Reassembly) '66 Frame-off!***Back from Paint***
- Thread starter jim3326
- Start date
Bigboggin68
New Member
Awesome job so far. Frame looks great! Is that the silver with black spatter? It looks similar to the powder coated extended radius arms that I got from Bronco graveyard.
OP
OP
jim3326
Bronco Guru
I'm gonna paint it some shade of a light blue. I got this pic from another thread and thought it look sweet.
The frame paint is called Silver Vein but yea it is kinda black spatter.
I should have test fit the engine before I got it painted, replaced the engine towers and had to cut the holes longer. Got the fuel and brake lines attached, gonna have to get the axles painted so I can swap out the old ones before the body goes on, it should be done getting Line-X'd.
Jim W.
Attachments

Boy that frame and body seem like their in great condition for a 66.Finally got started on the '66 frame-off. Replacing the 289-HEF-d20 with 5.0-435-Atlas 4 (maybe) or I may just keep the d20. Replacing the stock d30 & small bearing rear with d44 w/soft locker and large bearing rear w/soft locker and disc brakes. We gonna have some fun now;D
OP
OP
jim3326
Bronco Guru
Boy that frame and body seem like their in great condition for a 66.
Takes water to rust these things out which nowadays seems to be in REAL short supply here in the southwest. It had the cancer in the usual places, rockers were rotted, driver door post, kick panel, both sides of inner fender lap at the cowl, floor pans, lower tailgate and the lap joint at the front upper corner of the inner fender.
The body bolts mostly came out in 2 pieces, 3 of the 8 are in 1 piece, still unusable, but I'm putting a 1" BL anyway.
Still poking myself in the eye with this damn d44, what a PITA.
Jim W.
G's Baja Bronco
Bronco Guru
nice progress, like to see a frame off. I been doing mine for 1.5 years and am still exited! 
OP
OP
jim3326
Bronco Guru
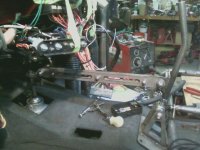
Little more done the past couple of weeks, engine, tranny, transfer case, fuel and brake lines. Still sitting on the old axles, I have the 9" built but need to paint it and still arguing with the d44.
Jim W.
Jim W.
Attachments


OP
OP
jim3326
Bronco Guru
Got the body back from Line-X yesterday and welded up the two into one SS exhaust. Waiting on the ball n socket collector to finish it off. Got the d44 put together, going to try to paint the front and rear axles this weekend so I can put them on before I 'HAVE TO' take the body out of the truck.
I think it's (body) about twice as heavy now but it sure is quiet and solid sounding.
Jim W.
I think it's (body) about twice as heavy now but it sure is quiet and solid sounding.
Jim W.
Attachments


OP
OP
jim3326
Bronco Guru

OP
OP
jim3326
Bronco Guru
Just been doin a little each day. After figuring out the radius arms I got coated were bent, I'll have to wait to put the D44 until I set it on stands and remove the D30.
Got the wiring installed on the engine and Cannon plugs put on.
Radiator shroud made and modified upper hose fit up.
Decided I'm going to put an idler on the A/C-PS belt, don't have enough contact area.
Got the wiring run in the engine bay and to the rear, now I have to tackle the underdash mess.
Have to finish getting the A/C mounting figured out and get the 2 hoses reworked, have the bulkhead fitting installed.
Here's a little porn to help explain;D
Jim W.
Attachments
-
 Shroud.jpg71.6 KB · Views: 236
 -
 DSC00348.jpg199.2 KB · Views: 235
 -
 DSC00346.jpg150.6 KB · Views: 236
 -
 DSC00345.jpg111 KB · Views: 227
 -
 DSC00342.jpg99.2 KB · Views: 241
 -
 DSC00340.jpg123.6 KB · Views: 233
 -
 DSC00334.jpg128.7 KB · Views: 232
 -
 DSC00309.jpg153.2 KB · Views: 242
 -
 DSC00353.jpg161.7 KB · Views: 215
 -
 Water hose.jpg85.2 KB · Views: 225
 -
 Remote oil.jpg61.3 KB · Views: 210
G's Baja Bronco
Bronco Guru
looking good! Enjoy the Build!
OP
OP
jim3326
Bronco Guru


OP
OP
jim3326
Bronco Guru

OP
OP
jim3326
Bronco Guru

OP
OP
jim3326
Bronco Guru
;D;D;DYea Hoo;D;D;D
After arguing with all the rewiring and replumbing I got a spark to her today! She lit up like she had been sitting for a couple of weeks, let it crank over a dozen times, advance the dizzy a little, 2 more turns then VROOM! Idles smoothly, restarts easily, bring it to temp (have to find out what thermo is in it, got to 216 then shut it off) then notice the little drip, drip. Damn, radiator tank to core is leaking on the bottom of course. I'll get some Bars Leaks tomorrow and see if that solves it for now but I'm still 'happier than a slinkey on an escalator'.
Jim W.
OP
OP
jim3326
Bronco Guru
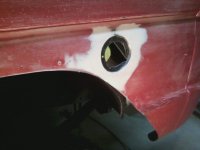
Got a little more done, d44 w/disc brakes 4340 axles and Detroit locker assembled and installed. Welded, warped and bondoed rear quarter for the gascap recess%) Getting the cage put together, Gearbanger fitted and got the dash back from the coater.
Have to get the cage coated and installed before I can put the dash back in but I think I want to paint the truck before I put the carpet in which has to go in before the cage. Talk about a logistical nightmare%)
Jim W.
Have to get the cage coated and installed before I can put the dash back in but I think I want to paint the truck before I put the carpet in which has to go in before the cage. Talk about a logistical nightmare%)
Jim W.
Attachments


OP
OP
jim3326
Bronco Guru


broncoitis
Bronco Guru
- Joined
- Jul 23, 2010
- Messages
- 4,449
Lookin Good Jim! Keep it up and gonna have to keep an eye on this one as it come together! ;D
On a side note, I was looking at you fuel pump and accumulator and wondering if that is gonna clear the body when you put it back on the frame. I am also running a 1 inch body lift and don't remember there being all that much room. Lookin really nice though!
On a side note, I was looking at you fuel pump and accumulator and wondering if that is gonna clear the body when you put it back on the frame. I am also running a 1 inch body lift and don't remember there being all that much room. Lookin really nice though!
Similar threads
- Replies
- 12
- Views
- 826
- Replies
- 26
- Views
- 4K
- Replies
- 31
- Views
- 4K