• Just a reminder that you won't be able to start new posts or reply to existings posts in the Archive forum.

    This is where all the old posts go so they can still be used for reference and searched.
  • Welcome to ClassicBroncos! - You are currently viewing the forums as a GUEST. To take advantage of all the site features, please take a moment to register. It's fast, simple and absolutely free. So please join our community today!
    If you have problems registering or can't log into your account, please contact Admin.

Intro/build thread

kaknblz

Jr. Member
Joined
Jun 13, 2008
Messages
141
Loc.
Reno, Nv
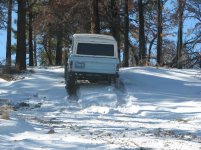
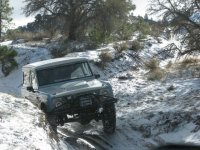
Since Ive asked so many questions on here for the EFI build, I thought I should become a contributor and post up some pics. Here's a quick rundown.
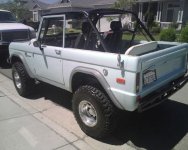
1976 Bronco Sport
Fairly new forged 306 (carbed when I got it)
Edlebrock aluminum heads
NP 435/D20
all new D44 up front with a Detroit
BB 9" rear with Detroit
4:56 gears
Wild Horse drive shafts
BFG 33's when I got it
Now has 35" x terrains
3.5" suspension lift
2" Body lift
Full cage w/custom seats
Protofab bumpers
Warn winch
AGR hydro assist

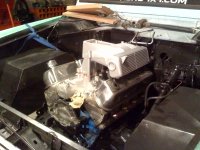
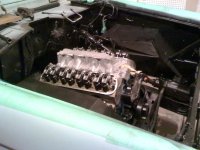
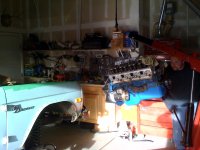
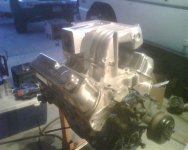
Now im in the middle of doing the fuel injection swap using the existing motor. So far I have collected quite a few parts from many different cars. Im using the upper and lower intake from a 96 explorer and the front dress from a 93 f150 (if it fits right). Computer is an A9l and the harness will probably be from RJM. Her are some pics before I started hacking on it and ill post more as I go.
 

Attachments

  • IMG00090.jpg
    IMG00090.jpg
    45.2 KB · Views: 67
  • IMG00261.jpg
    IMG00261.jpg
    91.9 KB · Views: 21
  • IMG00258.jpg
    IMG00258.jpg
    91.8 KB · Views: 18
  • IMG00257.jpg
    IMG00257.jpg
    90.2 KB · Views: 27
  • IMG00099.jpg
    IMG00099.jpg
    49.9 KB · Views: 26
  • IMG00096.jpg
    IMG00096.jpg
    42.6 KB · Views: 41
  • IMG00093.jpg
    IMG00093.jpg
    52.1 KB · Views: 38
  • IMG00091.jpg
    IMG00091.jpg
    45.4 KB · Views: 27
OP
OP
kaknblz

kaknblz

Jr. Member
Joined
Jun 13, 2008
Messages
141
Loc.
Reno, Nv
Her are some pics of the progress so far.
 

Attachments

  • IMG00284.jpg
    IMG00284.jpg
    98.9 KB · Views: 17
  • IMG00281.jpg
    IMG00281.jpg
    89.3 KB · Views: 19
  • IMG00280.jpg
    IMG00280.jpg
    69.5 KB · Views: 14
  • IMG00279.jpg
    IMG00279.jpg
    95.4 KB · Views: 24
  • IMG00088.jpg
    IMG00088.jpg
    62.7 KB · Views: 19
  • IMG00085.jpg
    IMG00085.jpg
    72.5 KB · Views: 31
  • IMG00083.jpg
    IMG00083.jpg
    75.2 KB · Views: 36
  • IMG00057.jpg
    IMG00057.jpg
    83.4 KB · Views: 31
  • IMG00324.jpg
    IMG00324.jpg
    90.4 KB · Views: 33
  • IMG00323.jpg
    IMG00323.jpg
    104.7 KB · Views: 26
  • IMG00322.jpg
    IMG00322.jpg
    91.9 KB · Views: 16
OP
OP
kaknblz

kaknblz

Jr. Member
Joined
Jun 13, 2008
Messages
141
Loc.
Reno, Nv
More

Right before the tear down.
 

Attachments

  • IMG_2019.JPG
    IMG_2019.JPG
    90.5 KB · Views: 26
  • IMG_2008.JPG
    IMG_2008.JPG
    74.4 KB · Views: 22
  • IMG_2007.JPG
    IMG_2007.JPG
    79 KB · Views: 26
  • IMG_2003.JPG
    IMG_2003.JPG
    67.2 KB · Views: 27
  • IMG_1993.JPG
    IMG_1993.JPG
    84.3 KB · Views: 34
  • IMG_1992.JPG
    IMG_1992.JPG
    87.9 KB · Views: 23

744x4

Sr. Member
Joined
May 31, 2006
Messages
611
Loc.
Taylors,SC
Great looking truck.Man that WP sticks out there.Sure you have enough room for the radiator.My stang serp setup is so close I had to reuse the stock spacer and cut the ends out of it as I couldnt find one thin enough.The Explorer ft dress is the thinnest but the T-bird/Cougar is a close second.The stang stuff is in 3rd place.The Exploder stuff requires a new ft cover though.
 
OP
OP
kaknblz

kaknblz

Jr. Member
Joined
Jun 13, 2008
Messages
141
Loc.
Reno, Nv
Great looking truck.Man that WP sticks out there.Sure you have enough room for the radiator.My stang serp setup is so close I had to reuse the stock spacer and cut the ends out of it as I couldnt find one thin enough.The Explorer ft dress is the thinnest but the T-bird/Cougar is a close second.The stang stuff is in 3rd place.The Exploder stuff requires a new ft cover though.


Thanks guys. Ya I was wondering about the wp also. Its not bolted on yet but it looks like I wont be able to use the f150 serp stuff. I have almost all the stuff for a 93 t-bird setup just need to run to the pick n pull yard today for an ac bracket. With any luck the motor will be back in this weekend. Then all I will need is the harness.
 
OP
OP
kaknblz

kaknblz

Jr. Member
Joined
Jun 13, 2008
Messages
141
Loc.
Reno, Nv
I used 1/8" 2x6. They work great. I will be attaching them to the cage and frame in the near future.
 
OP
OP
kaknblz

kaknblz

Jr. Member
Joined
Jun 13, 2008
Messages
141
Loc.
Reno, Nv
Got the motor back in over the weekend and started measuring for a fan. Looks like I have about 3.5" between the wp shaft and radiator. I want to run the Taurus fan so my plan is to cut the core support this weekend and move it towards the grill a few inches. I already have a fiberglass hood with pins so I dont need the latch. I think the f-150 setup will work nicely and Ill even have on board air. What is everyone using for radiator hoses? as a starting point at least. I am now waiting on my wiring harness to get here and I still need to un bolt the stock throttle linkage.
 

Attachments

  • photo2.jpg
    photo2.jpg
    165.8 KB · Views: 29
  • photo.jpg
    photo.jpg
    179.6 KB · Views: 23
  • photo3.jpg
    photo3.jpg
    148.4 KB · Views: 13
  • photo4.jpg
    photo4.jpg
    164 KB · Views: 10
  • photo5.jpg
    photo5.jpg
    137.9 KB · Views: 11
OP
OP
kaknblz

kaknblz

Jr. Member
Joined
Jun 13, 2008
Messages
141
Loc.
Reno, Nv
Well its slow going but the project is almost done. Ive got the wiring harness in and the upper intake is bolted on. All I have left to do now is mount the exhaust, dip the dizzy and install fuel lines. Should have it running soon. Im very happy with the way the Taurus fan install went. It took a while but the end product came out nice. I ended up sectioning the Taurus fan shroud and re attaching using a 2 part plastic epoxy. Then I mounted it to the Summit universal aluminum radiator using some steel brackets I made. Looks like it should cool pretty well.
 

Attachments

  • bronco 011.jpg
    bronco 011.jpg
    107.5 KB · Views: 16
  • bronco 010.jpg
    bronco 010.jpg
    77.9 KB · Views: 11
  • bronco 012.jpg
    bronco 012.jpg
    146.9 KB · Views: 15
  • bronco 009.jpg
    bronco 009.jpg
    137.1 KB · Views: 17
  • bronco 008.jpg
    bronco 008.jpg
    72 KB · Views: 9
  • bronco 007.jpg
    bronco 007.jpg
    66.5 KB · Views: 10
  • bronco 006.jpg
    bronco 006.jpg
    86.4 KB · Views: 11
  • bronco 005.jpg
    bronco 005.jpg
    123.2 KB · Views: 10
OP
OP
kaknblz

kaknblz

Jr. Member
Joined
Jun 13, 2008
Messages
141
Loc.
Reno, Nv

Attachments

  • DSC00076.JPG
    DSC00076.JPG
    85.7 KB · Views: 15
  • DSC00075.JPG
    DSC00075.JPG
    72.5 KB · Views: 10
  • DSC00074.JPG
    DSC00074.JPG
    64.3 KB · Views: 11
  • DSC00073.JPG
    DSC00073.JPG
    77.6 KB · Views: 13
  • DSC00071.JPG
    DSC00071.JPG
    81.7 KB · Views: 6
  • DSC00078.JPG
    DSC00078.JPG
    42.4 KB · Views: 13
Top