• Welcome to ClassicBroncos! - You are currently viewing the forums as a GUEST. To take advantage of all the site features, please take a moment to register. It's fast, simple and absolutely free. So please join our community today!
    If you have problems registering or can't log into your account, please contact Admin.

Finally going to paint today.

trailerjack

Contributor
Bronco Guru
Joined
Sep 5, 2013
Messages
1,392
Loc.
Central Texas
So I held off forever on posting a build thread, because every time I did, something came up. So, I waited all the way until I got to paint to start my build thread. Here we go.

1968, 302, Automatic, Power Steering, disc brakes on front, 2.5 inch suspension, 1 Inch body lift.

This is for the wife, and she chose light jade....yeah I am the guy looking for all the Jade interior stuff.

Still a long way to go, and may be doing a re-wire and some other upgrades, because this one isn't going anywhere.

Lots of people to thank on this forum, you know who you are.
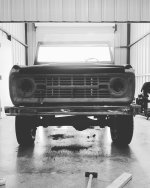
Here are some pics.
 

Attachments

  • IMG_3540.jpg
    IMG_3540.jpg
    134.3 KB · Views: 163
  • IMG_3541.jpg
    IMG_3541.jpg
    123.6 KB · Views: 167
  • IMG_3539.jpg
    IMG_3539.jpg
    137.7 KB · Views: 160
  • IMG_3542.jpg
    IMG_3542.jpg
    109.2 KB · Views: 166
  • IMG_3543.jpg
    IMG_3543.jpg
    129.6 KB · Views: 166
  • IMG_3544.jpg
    IMG_3544.jpg
    123.8 KB · Views: 180

AZ73

Contributor
Bronco Guru
Joined
Mar 28, 2012
Messages
3,542
Congrats! It's a big step. Then after wiring it's all easy %)
 
OP
OP
trailerjack

trailerjack

Contributor
Bronco Guru
Joined
Sep 5, 2013
Messages
1,392
Loc.
Central Texas
I don't blame ya.. Hope it turns out awesome

I know, even now I am afraid that I just jinxed myself.

Congrats! It's a big step. Then after wiring it's all easy %)

Yeah, I toyed around with leaving the wiring as is, but man, might as well do it right.

Great milestone! Keep us posted with pics of progress while at paint. We love pictures!

Will do. Getting media blasted soon, some metal repair and we will see how it goes.

This the part where it makes that turn and you can see it coming together!

Yessir, honestly driving it on that trailer and watching it leave my shop was a big moment. Still a lot of work to do, but man I am glad its progressing.

HUGE step! congrats. you are in the home stretch...

I hope so.
 

68Broncoz

Contributor
Sr. Member
Joined
Dec 12, 2017
Messages
405
Mine came back from paint a couple months ago. In the middle of wiring and putting all the new parts on that have in my garage for a long time. I agree it is a big step in process.
 
OP
OP
trailerjack

trailerjack

Contributor
Bronco Guru
Joined
Sep 5, 2013
Messages
1,392
Loc.
Central Texas
So things have been happening, it doesn't look like much, but I promise we are getting closer!
 

Attachments

  • part0.jpg
    part0.jpg
    88.4 KB · Views: 103
  • part01.jpg
    part01.jpg
    93 KB · Views: 96
  • part02.jpg
    part02.jpg
    76.5 KB · Views: 99
  • part03.jpg
    part03.jpg
    85.9 KB · Views: 103
OP
OP
trailerjack

trailerjack

Contributor
Bronco Guru
Joined
Sep 5, 2013
Messages
1,392
Loc.
Central Texas
Update, things got slowed down to a crawl due to COVID, but trying to get it done by May. Hope to have some pics up soon.
 
OP
OP
trailerjack

trailerjack

Contributor
Bronco Guru
Joined
Sep 5, 2013
Messages
1,392
Loc.
Central Texas
So here we are. This bronco is still unpainted but it's a good thing. I have redone many things on it over the past year and a half after realizing it had the potential to be a better build.

Here is what has been done so far
- Frame sanded and painted
- 31 spline traction lock rear axle
- rebuilt transfer case
- Edelbrock performer carb, cam, intake
- HEI distributor
- Wild horses hood shocks
- redid the floor pans
- Flowkooler water pump
- March aluminum pulleys
- aluminum radiator - now has a leak, unsure what is going on there
- wild horses headers
- James Duff exhaust with 40 series flowmasters
- Dana 44 front axle with disc break conversion - need to update to power disc
- 4x4x2 power steering conversion
- Ididit steering column - which is now back out of the truck because
- I pulled the dash and wiring and am doing painless harness
- Borgeson steering joints
- ruffstuff heim joint steering
- removed / replaced windshield frame, welded in steel plate underneath with bolts so can bolt in windhshield frame
- new doors and internals
- new fenders and quarterpanels
- New hood
- new tailgate

To Do
- weld in reinforcement on hood to prevent cracking
- Raptor liner dark green interior
- Rewire with painless harness
- seam seal a few areas
- new oil dipstick
- assess and fix oil leak....only leaks when its running? rear main?
- re-do rear quarter panel inserts...fronts are done and look amazing
- paint wheels
- diagnose radiator leak
- fan spacer is too big and its pretty close to the rad (not hitting it but close), need to move it back
- paint power steering box
- Test fit and drill holes for trim
- probably lots of other little things
...and then we go back to paint

The best thing about COVID was that it made me take a look at this bronco, which was also a bad thing about COVID.....I had too much time to start picking at things
 
OP
OP
trailerjack

trailerjack

Contributor
Bronco Guru
Joined
Sep 5, 2013
Messages
1,392
Loc.
Central Texas
Some random pics
 

Attachments

  • CFFF5C9E-4988-48DE-A42B-A825C894AAD5.jpeg
    CFFF5C9E-4988-48DE-A42B-A825C894AAD5.jpeg
    169.6 KB · Views: 24
  • E444C36D-1D63-4746-AE17-4CB336A266AE.jpeg
    E444C36D-1D63-4746-AE17-4CB336A266AE.jpeg
    161.1 KB · Views: 23
  • 0A663D12-C2AD-4D25-B5E6-795A6406901E.jpeg
    0A663D12-C2AD-4D25-B5E6-795A6406901E.jpeg
    269.6 KB · Views: 24
OP
OP
trailerjack

trailerjack

Contributor
Bronco Guru
Joined
Sep 5, 2013
Messages
1,392
Loc.
Central Texas
Making slow progress. Painless wiring in, dash painted. Interior tinted raptor liner. Prepping door Jams and about to start the painting process. Tons of little things have been done too but it’s too much to list.
 

Attachments

  • IMG_2520.jpeg
    IMG_2520.jpeg
    181.1 KB · Views: 28
  • IMG_2516.jpeg
    IMG_2516.jpeg
    167.5 KB · Views: 29
  • IMG_2515.jpeg
    IMG_2515.jpeg
    215 KB · Views: 29
  • 71339362159__C8452B06-D1B0-495E-9359-595E8B15B4AF.jpeg
    71339362159__C8452B06-D1B0-495E-9359-595E8B15B4AF.jpeg
    106.3 KB · Views: 30
  • IMG_2504.jpeg
    IMG_2504.jpeg
    192.1 KB · Views: 27
  • IMG_2381.jpeg
    IMG_2381.jpeg
    129.4 KB · Views: 27
  • IMG_2380.jpeg
    IMG_2380.jpeg
    131.1 KB · Views: 27
  • IMG_1788.jpeg
    IMG_1788.jpeg
    245.4 KB · Views: 31

Ether

Contributor
Jr. Member
Joined
Jan 30, 2007
Messages
274
Loc.
Tulsa
Tell me about your top plan with that roll bar? Soft top/bikini only? Unique


Sent from my iPhone using Tapatalk
 
OP
OP
trailerjack

trailerjack

Contributor
Bronco Guru
Joined
Sep 5, 2013
Messages
1,392
Loc.
Central Texas
Tell me about your top plan with that roll bar? Soft top/bikini only? Unique


Sent from my iPhone using Tapatalk
Bikini during the summer. Hard top during the winter. Bolts directly through to the frame. I’m making a few more roll bars like this for my next one let me know if you’re interested or want the dimensions. Sleeved for rear and for 3 point seat belts.
 

Attachments

  • IMG_2557.jpeg
    IMG_2557.jpeg
    187.2 KB · Views: 24
  • IMG_2556.jpeg
    IMG_2556.jpeg
    208.5 KB · Views: 21
Top