Sweet! Looks like maybe you are going to get into the restoration business...


Community
Message Forum
Photo Gallery
Event Calendar
Book Reviews
Bronco Wallpaper
Bronco FAQ
Link Back to CB!
Photo Gallery
Event Calendar
Book Reviews
Bronco Wallpaper
Bronco FAQ
Link Back to CB!
Buy / Sell


Bronco Tech
3 Arm Wiper Setup
Fix Motor Mount
Roll Cage Braces
Throttle Body 65mm
Wheel Alignment
Heat Riser Replacement
Vent Window Repair
Center Console Mount
Straighten Bumper
Ford 6R80 6 spd
More Tech...
Fix Motor Mount
Roll Cage Braces
Throttle Body 65mm
Wheel Alignment
Heat Riser Replacement
Vent Window Repair
Center Console Mount
Straighten Bumper
Ford 6R80 6 spd
More Tech...

Install the app
-
Welcome to ClassicBroncos! - You are currently viewing the forums as a GUEST. To take advantage of all the site features, please take a moment to register. It's fast, simple and absolutely free. So please join our community today!If you have problems registering or can't log into your account, please contact Admin.
You are using an out of date browser. It may not display this or other websites correctly.
You should upgrade or use an alternative browser.
You should upgrade or use an alternative browser.
"Lil Rusty" My second Bronco
- Thread starter brianstrange
- Start date
brianstrange
Bronco Guru
- Joined
- Nov 22, 2011
- Messages
- 1,626
WOW!!! Nice work Brian, there's an led light at the end of the tunnel lol
- Joined
- Nov 12, 2011
- Messages
- 1,321
Wait... are you telling me I could get paid to work on Broncos??!!Sweet! Looks like maybe you are going to get into the restoration business...
 ;D
;DWe'll see, but could be a while... Hmm, i'm going on five years with mine, and it wasn't even rusty! Shhh... don't tell Brian that!:-XGREAT WORK!! let us see how this turns out! going to able to use that cowl piece?
there seems to be a lot of light shining through the sheet metal.WOW!!! Nice work Brian, there's an led light at the end of the tunnel lol
;D;DNo, just welding good clean metal to good clean metal. then I focus on sealing it all up with a good seam sealer. I used a two part SEM product on this.Are you using a burn through primer on the seams?
Going to be helping my neighbor put some floor board patches in a Triumph TR3 and I'm busy taking notes.
Wait... are you telling me I could get paid to work on Broncos??!!
Well you might have to find a different group of friends first since we are all "frugal" New Englanders! (That should be read as cheap @$$ bastids! ;D)
brianstrange
Bronco Guru
- Joined
- Nov 22, 2011
- Messages
- 1,626
Well you might have to find a different group of friends first since we are all "frugal" New Englanders! (That should be read as cheap @$$ bastids! ;D)
That's an honest man right there!
brianstrange
Bronco Guru
- Joined
- Nov 22, 2011
- Messages
- 1,626
So you're saying there's some clean metal on lil' Rusty? Well, I'll be damned!No, just welding good clean metal to good clean metal.
honest, not too pretty but honest! :-*
As I always say tasker "fatboy's momma may have had ugly kids, but she did not have stupid ones!" ;D
- Joined
- Sep 26, 2013
- Messages
- 2,394
Well you might have to find a different group of friends first since we are all "frugal" New Englanders! (That should be read as cheap @$$ bastids! ;D)
Hey, hey, hey, I resemble that remark...........
Nice work as always, B!
- Joined
- Nov 12, 2011
- Messages
- 1,321
So you're saying there's some clean metal on lil' Rusty? Well, I'll be damned!
Well... there was, but I think I've about used it all up!;D;D
I started on the drivers side pan. didn't get as lucky with the welding of the big nut to the body mount bolt. bolt was rotted and snapped off. but... I was able to thread on and weld a nut to the bottom of the bolt sticking out underneath and back it out that way. so you are good to go with the old bushings!
Attachments


- Joined
- Nov 12, 2011
- Messages
- 1,321
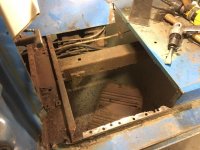
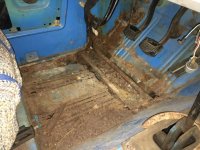
So here's the progress on the driver's side floor pan.
First, what I had to start with, and after removing the rotted metal. then fitting the new pan after trimming it down some along with the vertical piece I made for the front of the seat platform.
First, what I had to start with, and after removing the rotted metal. then fitting the new pan after trimming it down some along with the vertical piece I made for the front of the seat platform.
Attachments
-
 IMG_8078.jpg104.3 KB · Views: 39
 -
 IMG_8077.jpg93.1 KB · Views: 41
 -
 IMG_8075.jpg98 KB · Views: 36
 -
 IMG_8074.jpg92.8 KB · Views: 36
 -
 IMG_8070.jpg101.9 KB · Views: 36
 -
 IMG_8069.jpg103.9 KB · Views: 35
 -
 IMG_7903.jpg123.2 KB · Views: 35
 -
 IMG_7897.jpg121.2 KB · Views: 37
 -
 IMG_8079.jpg109.3 KB · Views: 40
 -
 IMG_8080.jpg88.3 KB · Views: 42
- Joined
- Nov 12, 2011
- Messages
- 1,321
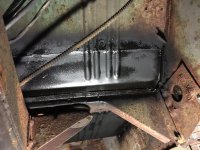
...here it is welded in and then after grinding the welds down. Tomorrow I'll apply the seam sealer and prime it.
Just realized I forgot to show how I had to rebuild the little support ring around the body mount bolt hole inside the floor channel support rail on this side before I sealed it all up. oh well, it's in there though so the bolt won't suck the pan down to the bottom of the channel.
Just realized I forgot to show how I had to rebuild the little support ring around the body mount bolt hole inside the floor channel support rail on this side before I sealed it all up. oh well, it's in there though so the bolt won't suck the pan down to the bottom of the channel.
Attachments


Last edited:
brianstrange
Bronco Guru
- Joined
- Nov 22, 2011
- Messages
- 1,626
Sweet! You are my Holy Knight~
- Joined
- Nov 12, 2011
- Messages
- 1,321
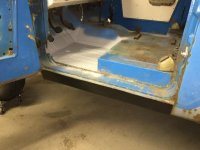
And... floor pans are done.
now to just wait for the other rusty metal to fully disintegrate and fall off.;D%);D
now to just wait for the other rusty metal to fully disintegrate and fall off.;D%);D
Attachments
-
 IMG_8109.jpg77.4 KB · Views: 40
 -
 IMG_8102.jpg61.2 KB · Views: 39
 -
 IMG_8101.jpg85.2 KB · Views: 38
 -
 IMG_8100.jpg104.3 KB · Views: 46
 -
 IMG_8112.jpg64.1 KB · Views: 42
 -
 IMG_8098.jpg66.9 KB · Views: 37
 -
 IMG_8097.jpg58.6 KB · Views: 38
 -
 IMG_8096.jpg52.6 KB · Views: 42
 -
 IMG_8110.jpg119.3 KB · Views: 45
 -
 IMG_8111.jpg139.6 KB · Views: 41
- Joined
- Nov 12, 2011
- Messages
- 1,321
How about some teaser pics with the replacement lower rocker skins temporarily stuck in place... makes her look a lil better on the outside anyway.;D
Attachments


Migs, did you make the rockers or are they bought parts? Looking good either way!
brianstrange
Bronco Guru
- Joined
- Nov 22, 2011
- Messages
- 1,626
Migs, did you make the rockers or are they bought parts? Looking good either way!
Pete, I bought the lower rockers from Toms. They are the OEM Lower sections, $45 each.
Similar threads
- Replies
- 2
- Views
- 992