• Welcome to ClassicBroncos! - You are currently viewing the forums as a GUEST. To take advantage of all the site features, please take a moment to register. It's fast, simple and absolutely free. So please join our community today!
    If you have problems registering or can't log into your account, please contact Admin.

Frame off 1/2 inch

joshua

Contributor
Sr. Member
Joined
Jun 5, 2007
Messages
1,154
Did the X measurement. Got 153 and 1/8 by 153 1/2 Which I think 153 is already off being to long. But anyway it’s about a 1/2 inch out of square. To far to work with?

It’s never going to be a super nice bronco. I plan to drive the wheels off and the frame has a couple of dents that I’m not interested in fixing to make it pretty.

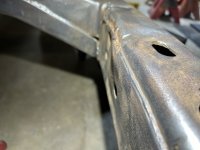
It was definitely in a wreck on the front drivers side. With 3 shims in the hood to make it it line up.

I would like to eventually patch most of the rust and have a decent looking truck. Question is can I work with this? Or is there not enough fudging to pull it off being that far off.
 

.94 OR

Contributor
Bronco Guru
Joined
Jul 5, 2009
Messages
1,713
Realistically you are only 1/4" off. If you could pull one corner from zero, it would only take 1/4" to bring the other side down to the 1/4" value.
Still, not ideal, but not as drastic.
 
OP
OP
joshua

joshua

Contributor
Sr. Member
Joined
Jun 5, 2007
Messages
1,154
So you’re saying if it was you, you would try to bring it at least a quarter inch back into square?

I’m thinking tree, chains, and the hobo freight 12k winch then? I have the frame off and torn down.
 

Attachments

  • image.jpg
    image.jpg
    288.3 KB · Views: 25

Yeller

Contributor
Bronco Guru
Joined
Mar 27, 2012
Messages
6,032
Loc.
Rogers County Oklahoma
Large ratchet strap and a big hammer, like a sledge hammer. May take a few pulls but pull the long side of the x and use the strap to pull it. Thump each corner of the crossmember, release and see where it is at. Repeat until it’s square. Don’t have to get crazy with the hammer, just a good thump to shock the metal.
 

hunter1

Contributor
Jr. Member
Joined
Feb 2, 2013
Messages
264
Loc.
Maryville, Tn
Drilled and anchored threaded eyebolts into my driveway, used come alongs, jacks, torch, and a tractor to straighten my son's 97 F150 frame Hunt's truck.jpg after he ran up a bank and into a tree. Really jacked on the passenger side, back and up. Got it aligned afterward, better than it was before.
 

hunter1

Contributor
Jr. Member
Joined
Feb 2, 2013
Messages
264
Loc.
Maryville, Tn
About 2” up and a little pushed back. Ended up cutting a relief in the frame to pull it back out.
 

Timmy390

Contributor
Bronco Guru
Joined
Jan 1, 2011
Messages
5,626
Loc.
Conway, AR
Drilled and anchored threaded eyebolts into my driveway, used come alongs, jacks, torch, and a tractor to straighten my son's 97 F150 frame View attachment 924118 after he ran up a bank and into a tree. Really jacked on the passenger side, back and up. Got it aligned afterward, better than it was before.
I did something similar when fixing my daughters car. Buddy had a 2 post lift so we did some rigging and used "lift power" to move things around. It was outside on a level slab. Went well.

Tim
 

.94 OR

Contributor
Bronco Guru
Joined
Jul 5, 2009
Messages
1,713
With frame already stripped, this should just be a slow and steady exercise as described above.
Is the frame twisted at all, or just shifted on a flat plane?
 
OP
OP
joshua

joshua

Contributor
Sr. Member
Joined
Jun 5, 2007
Messages
1,154
It’s really difficult to tell. My floor is so uneven.

I plan on shimming some long levels on the floor to plum. Then doing my best to level the frame. Then measuring from the top of the levels on the floor to the frame rails.

P.O. Whacked off the drivers most forward body mount to directly weld on a galaxy power steering box. So that corner of the body would bounce up and down when vehicle was driving. Mounted to nothing. Has correct box and home made mount now made by me. But definitely can’t be a point of measurement.

I’ll post some pictures on the set up to measure the frame. Hopefully getting some opinions if this would be a viable way to see where the frame is at.
 
OP
OP
joshua

joshua

Contributor
Sr. Member
Joined
Jun 5, 2007
Messages
1,154
So I realized my brilliant plan to see if both rails are at the same altitude with one another. Probably won’t work. I’ll show what I came up with in the picture.

I figured I would level the frame side to side. Then run level a long level off the floor running right under the one on the rails. I would then measure the distance between the level on top to the one on the floor to see if they came out the same. Sure as S they did!

But of course they did. Both levels were level. How could they not be the same distance apart dummy. I did however place the level in a ton of spots across the frame rails. Laid nice and flat on rails and showed level everywhere. EXCEPT on the front 2 rails just ahead of the cross member. Cross member shows level and maybe 2 inches ahead of it as well.

Now I really don’t know if the front 2 rails are really off. Or it’s just because they both have dents in them from god knows what. I don’t have a bumper to place in it either to try and go off that. Well I have 2 home brewed ones. One that came on the truck when I bought it. And one from another member on here.

I don’t trust the one that came with the truck at all. And I’m not 100% on the one a member made either. As I have no clue if his rails were straight either. But looks to be a good quality job.

I also don’t know if simply leveling the rails and moving the level around to different locations width wise proves that the rails a parallel to each other. Like I said it laid nice and flat on both rails. It makes sense to me that would be the case. But idk. And if that’s not the case, what’s the process to figure that out.

I did look on google for generic routes for this problem. Put they all centered around leveling the flat portion of the frame. Which, as far as I can tell we don’t have a long flat part.

If you have any opinions or suggestions on this please lmk.
 

Attachments

  • IMG_4559.jpeg
    IMG_4559.jpeg
    238.3 KB · Views: 20
  • IMG_4560.jpeg
    IMG_4560.jpeg
    179.2 KB · Views: 21
  • IMG_4561.jpeg
    IMG_4561.jpeg
    131.5 KB · Views: 20
  • IMG_4562.jpeg
    IMG_4562.jpeg
    126.4 KB · Views: 20
  • IMG_4564.jpeg
    IMG_4564.jpeg
    232.9 KB · Views: 20

LHardin

Jr. Member
Joined
Oct 24, 2022
Messages
108
So you’re saying if it was you, you would try to bring it at least a quarter inch back into square?

I’m thinking tree, chains, and the hobo freight 12k winch then? I have the frame off and torn down.
If your frame is definitely not square "Horizontally", it's probably bot square "Vertically". I bought a laser lever and four jack stands (same make model and MFGR date/box advertising) set to the same height using a line level and verified that everything was square. Once I verified that everything was square, I took measurements with a Plumb bob to make my jig so I could build a new tub.
 

Broncobowsher

Total hack
Joined
Jun 4, 2002
Messages
34,947
Double check where you hook the tape measure. I've seen stuff that was called "bad" when it was good. The only thing bad was inaccurate measuring.
You really need to watch that the hook point and the measuring point are truely mirror images.
Also try multiple measuring points. Try and figure out if it is a corner that is off, or the whole frame is racked. That will dictate the plan of attack.
Add in the factory build had a lot of tolerance, you may be chasing something that isn't fixable.
 
OP
OP
joshua

joshua

Contributor
Sr. Member
Joined
Jun 5, 2007
Messages
1,154
Double check where you hook the tape measure. I've seen stuff that was called "bad" when it was good. The only thing bad was inaccurate measuring.
You really need to watch that the hook point and the measuring point are truely mirror images.
Also try multiple measuring points. Try and figure out if it is a corner that is off, or the whole frame is racked. That will dictate the plan of attack.
Add in the factory build had a lot of tolerance, you may be chasing something that isn't fixable.
This is exactly what I’m afraid of. I’ll play around with measuring. But on this one I’m not super concerned with perfect body gaps. I have another frame that measures true. But I’d like to build the nice bronco on that, which will probably never happen honestly. But the frame is also worth a small savings account if needed.

Thus the reason I really don’t want to use that one and its title. Then I would basically be giving up a bronco. I’m learning body work on this current one. So there’s no way it’s gonna be great. Let alone perfect.
 
OP
OP
joshua

joshua

Contributor
Sr. Member
Joined
Jun 5, 2007
Messages
1,154
Well after tons of time with the tape. I have actually figured out that the frame appears to be square from the front cross member back. The front stubby rails are a 1/2 different in altitude.

I’m kinda thinking the drivers might be a little high. And the passenger is really low. Driver side has a dent on the top shown in first picture (not my weld or fab job) And the passenger has a nasty dent on the bottom. I’m thinking the either the frame split, or they cut a relief cut to get it not even close back in square. Second pic is the passenger weld “repair”

I really don’t mind using a bunch of shims on this. And I believe shims could work do the passenger being the larger problem and it being so low. But I would like a bumper that’s not out a half inch.

Best bet floor anchors in the driveway? Relief cut and weld? Or just make a custom bumper. But I don’t have a pipe bender, or pipe, and definitely without pipe bending skills. Frame is upside down btw.

Lmk your opinions, experiences.

Thanks
 

Attachments

  • IMG_4570.jpeg
    IMG_4570.jpeg
    161.8 KB · Views: 12
  • IMG_4569.jpeg
    IMG_4569.jpeg
    200 KB · Views: 12

Yeller

Contributor
Bronco Guru
Joined
Mar 27, 2012
Messages
6,032
Loc.
Rogers County Oklahoma
I’d fix the frame horn by whatever means necessary so the bumper is straight, it shouldn’t take too much effort compared to a custom bumper to make it look reasonably well.
 
OP
OP
joshua

joshua

Contributor
Sr. Member
Joined
Jun 5, 2007
Messages
1,154
Ya I’ll have to come up with a plan. I should probably make it clear that it’s the rail sections ahead of the front cross member. Not just the frame horns that receive the bumper.

So moving that section of rail up a half inch would in turn move the passenger side body mount up as well. Lots to think about. And I thought I could just clean up the frame, throw the body on and cruise.

This was supposed to be quick 😂
 
Top