• Welcome to ClassicBroncos! - You are currently viewing the forums as a GUEST. To take advantage of all the site features, please take a moment to register. It's fast, simple and absolutely free. So please join our community today!
    If you have problems registering or can't log into your account, please contact Admin.

Boss Man Sam's Build Thread

OP
OP
svastano

svastano

Contributor
Bronco Guru
Joined
Apr 8, 2017
Messages
1,319
Loc.
Pulaski, PA
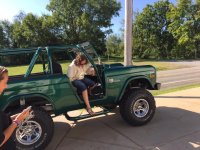
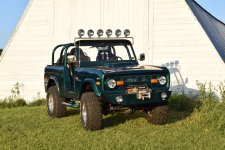
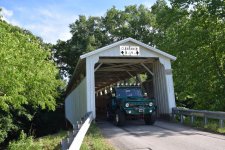
A couple of photos from today going to church. Oldest daughter was driving. I was taking our SD and a trailer to my mom's on the way. So good to have it done enough to drive it. Top fully off is so fun! Lot's of thumbs up but so many people driving me crazy saying " I like your jeep!" GRRRRR Almost 150 miles on the new motor.... So far so good!
 

Attachments

  • To church 1.jpg
    To church 1.jpg
    111.9 KB · Views: 109
  • To church 2.jpg
    To church 2.jpg
    95.2 KB · Views: 134
OP
OP
svastano

svastano

Contributor
Bronco Guru
Joined
Apr 8, 2017
Messages
1,319
Loc.
Pulaski, PA
Playing with the camera today... Waiting for the photo contest for the calendar!
 

Attachments

  • DSC_0580.jpg
    DSC_0580.jpg
    140.6 KB · Views: 55
  • DSC_0578.jpg
    DSC_0578.jpg
    166.9 KB · Views: 63
  • DSC_0575.jpg
    DSC_0575.jpg
    203.9 KB · Views: 64
  • DSC_0571.jpg
    DSC_0571.jpg
    126.9 KB · Views: 56
  • DSC_0566.jpg
    DSC_0566.jpg
    118.6 KB · Views: 57
OP
OP
svastano

svastano

Contributor
Bronco Guru
Joined
Apr 8, 2017
Messages
1,319
Loc.
Pulaski, PA
Well finally got to adding the light bar and lights! Love the look of the old school and I decided I really didn't like the red covers so they are in the basement. Also went for a ride around the block tonight with the wife. I have never in my life just went for a ride I always had a reason but with the Bronco I just love to drive it!
 

Attachments

  • DSC_0153.jpg
    DSC_0153.jpg
    184.4 KB · Views: 36
  • DSC_0152.jpg
    DSC_0152.jpg
    68.1 KB · Views: 28
  • DSC_0145.jpg
    DSC_0145.jpg
    111.2 KB · Views: 29
  • DSC_0139.jpg
    DSC_0139.jpg
    190.3 KB · Views: 33
  • DSC_0137.jpg
    DSC_0137.jpg
    222.1 KB · Views: 32
  • DSC_0133.jpg
    DSC_0133.jpg
    116.3 KB · Views: 34
  • DSC_0127.jpg
    DSC_0127.jpg
    137.9 KB · Views: 45

txtruk15

Contributor
Sr. Member
Joined
Apr 1, 2017
Messages
749
Loc.
Highland Village, TX
Well finally got to adding the light bar and lights! Love the look of the old school and I decided I really didn't like the red covers so they are in the basement. Also went for a ride around the block tonight with the wife. I have never in my life just went for a ride I always had a reason but with the Bronco I just love to drive it!

awesome - love the look with those lights!
 
OP
OP
svastano

svastano

Contributor
Bronco Guru
Joined
Apr 8, 2017
Messages
1,319
Loc.
Pulaski, PA
Well put it away for the winter. Items I will address closer to spring. Dipstick tube leak, Pull pan and get it fixed. I am contemplating on getting a new harmonic balancer because on mine the readings are so faint it is so hard to tell where my timing is to fine tune it. I have tried white paint, yellow paint stick.... I still need to wire up my USB ports that I installed in the dash. Also I want to at least wire the bumper lights. Right now I am just done with working on it. a bit burnt out from the last year and a half. and if anyone wants to know the cover came from Summit.
 

Attachments

  • Putting to bed for the winter.jpg
    Putting to bed for the winter.jpg
    56.3 KB · Views: 41
OP
OP
svastano

svastano

Contributor
Bronco Guru
Joined
Apr 8, 2017
Messages
1,319
Loc.
Pulaski, PA
Well I was at the garage where the Bronco is stored and noticed antifreeze under it. Looks like it is coming from the plastic OEM overflow bottle. Recommendations on what to replace it with? I have looked at a couple on Amazon and Summit. most have mixed reviews, leaking etc.... Any of our vendors have a nice shiny one that works?
 
OP
OP
svastano

svastano

Contributor
Bronco Guru
Joined
Apr 8, 2017
Messages
1,319
Loc.
Pulaski, PA
Well my upholstery guy is finally working on a custom back seat that matches the front "ProCar" seats that I Purchased from Summit. In hindsight I should have just purchased a set from one of our vendors but I wanted material not vinyl. Here is the bottom cushion. Hope to have the back done this week. I will soon have a full set of Black OEM seats ( covered not OEM material to sell soon so if you are interested let me know.
 

Attachments

  • Rear Seat Bottom.jpg
    Rear Seat Bottom.jpg
    72.4 KB · Views: 19

tasker

Contributor
all knowing of nothing
Joined
Jun 2, 2006
Messages
20,785
Loc.
NH
looking great! Hope to see it at the Round Up!
 

sprdv1

Contributor
REBEL
Joined
Mar 8, 2007
Messages
81,756
Fabulous work.. Randy I feel like 2021 could be the year I make it up..

Next step right now is RV Getting closer to that goal
 
OP
OP
svastano

svastano

Contributor
Bronco Guru
Joined
Apr 8, 2017
Messages
1,319
Loc.
Pulaski, PA
I was working on re-vamping my rear bumper since that tire is so heavy. I had to add re-enforcements in the back. All the welding messed up the paint. Re-primered. Hope to get it re-painted this week.
 

Attachments

  • IMG_0687.jpg
    IMG_0687.jpg
    137.5 KB · Views: 46
OP
OP
svastano

svastano

Contributor
Bronco Guru
Joined
Apr 8, 2017
Messages
1,319
Loc.
Pulaski, PA
Cruising around the county yesterday afternoon. Had a ton of fun just driving around. Saw some Jeep guys and they even stopped when I was taking some photos and complimented "Nice Bronco" So far so good on the new rear main seal. Had the tranny puke some tranny fluid but that is the first time it was driven that far in one running. (Maybe out the breather on the C4?)
 

Attachments

  • DSC_0031.jpg
    DSC_0031.jpg
    121.2 KB · Views: 67
  • DSC_0029.jpg
    DSC_0029.jpg
    87.1 KB · Views: 54
  • DSC_0022.jpg
    DSC_0022.jpg
    162.9 KB · Views: 63
  • DSC_0020.jpg
    DSC_0020.jpg
    158.6 KB · Views: 53
  • DSC_0014.jpg
    DSC_0014.jpg
    162.2 KB · Views: 59
OP
OP
svastano

svastano

Contributor
Bronco Guru
Joined
Apr 8, 2017
Messages
1,319
Loc.
Pulaski, PA
1" Stainless tubing, Bought 4 90 Deg Elbows and welded the tabs on for the mount to the windshield frame and light mounts. If I did again I would have purchased the mounts from KC for the lights. When welding the light tabs on it warped the tubing and it was a bear to get strait again! Bought all the material off Amazon for about 20 bucks

Hey svastano. Tell me about your light bar. I made one too. Just wondering how u did yours
 

Crush

Contributor
Bronco Guru
Joined
May 30, 2007
Messages
3,463
Loc.
Greenbottom, WV
When i made mine i was a safety manager for a high purity stainless piling company. I went to the fitting bins and picked out 4 90’s and grabbed a piece of straight. Took it home and cut and marked All the pieces. Then i took it back to the site and had an experienced welder put it all in an orbital welding machine and the welds are damn near invisible without even sanding on them. I could make them go away but i kinda like it like it is. I used the kc Light mounts and it worked out great. I used stainless mounts for suspending the tube from the ceiling but just used the bases. See pics below. i used some industrial high purity stainless so if i had paid for it it would have been alot more expensive than $20 lol
attachment.php

attachment.php

attachment.php

attachment.php
 

Attachments

  • 45F631CD-1AD5-45E3-86FC-B95BAF6FD105.jpg
    45F631CD-1AD5-45E3-86FC-B95BAF6FD105.jpg
    79.2 KB · Views: 182
  • C6F9DF55-4B91-4D8B-B8C1-67E45D47B3F0.jpg
    C6F9DF55-4B91-4D8B-B8C1-67E45D47B3F0.jpg
    86.6 KB · Views: 181
  • C8368F64-562E-46D5-9BE3-AB63EE1C1166.jpg
    C8368F64-562E-46D5-9BE3-AB63EE1C1166.jpg
    86 KB · Views: 185
  • 0BC79EB9-7150-4AEE-9B2C-1DCAD6B92786.jpg
    0BC79EB9-7150-4AEE-9B2C-1DCAD6B92786.jpg
    84.1 KB · Views: 182
OP
OP
svastano

svastano

Contributor
Bronco Guru
Joined
Apr 8, 2017
Messages
1,319
Loc.
Pulaski, PA
This is what I patterned mine after.

When i made mine i was a safety manager for a high purity stainless piling company. I went to the fitting bins and picked out 4 90’s and grabbed a piece of straight. Took it home and cut and marked All the pieces. Then i took it back to the site and had an experienced welder put it all in an orbital welding machine and the welds are damn near invisible without even sanding on them. I could make them go away but i kinda like it like it is. I used the kc Light mounts and it worked out great. I used stainless mounts for suspending the tube from the ceiling but just used the bases. See pics below. i used some industrial high purity stainless so if i had paid for it it would have been alot more expensive than $20 lol
attachment.php

attachment.php

attachment.php

attachment.php
 
OP
OP
svastano

svastano

Contributor
Bronco Guru
Joined
Apr 8, 2017
Messages
1,319
Loc.
Pulaski, PA
Just an update on the 77. Well it always had what I called a very "low" Brake pedal. You would push it down over 1/2 way before you even thought about it starting to stop. Well yesterday I felt ambitious and worked on a couple of things. First being the brakes. I have done the bleed them until you are blue in the face but somewhere on the board here I read about the adjustable rod from the Booster to the master cylinder. Well pulled the 2 nuts off the master cylinder and there she was. It took a Vice grips and a 5/16" socket and I made the rod about 3/8" longer. Put it back together and Wow what a difference! Stops so much better, better pedal fee. So who ever posted that prior Thanks much! Next was the reverse lights were not working and it led me to the Neutral Safety Switch. Again from research on the board I saw how to take it apart and clean the contacts inside it. Worked like a charm. This board is the best! Sorry no photos.....
 

LUBr LuvR

Contributor
Bronco Guru
Joined
Dec 31, 2015
Messages
1,974
That’s what it’s all about......rolling along on a country road and smiles all the way around. You’ve worked hard to get to this point, enjoy!
 
Top