• Welcome to ClassicBroncos! - You are currently viewing the forums as a GUEST. To take advantage of all the site features, please take a moment to register. It's fast, simple and absolutely free. So please join our community today!
    If you have problems registering or can't log into your account, please contact Admin.

Best of both worlds build

Colo77Bronco

Contributor
Sr. Member
Joined
Oct 10, 2004
Messages
612
Loc.
Colorado Springs
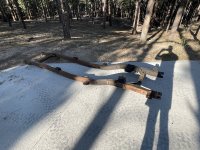
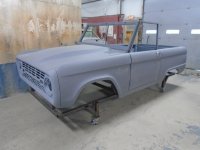
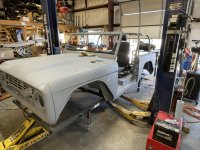
The build has officially gotten underway. I spent the last 6 months breaking everything down and assembling parts. I have included pictures of everything to this point. I started with a very rusted '73 and stripped it down to the frame and then started with 100% new parts. This is my third Bronco build and I decided to do it my way with everything I ever wished my others had. I knew that if I ever had a Velocity or Icon bronco I would not be happy with the stance as the stock axles are entirely too narrow for modern power and speeds. Also cannot understand why anyone would have all of the shop tools to create anything and they leave the stock wheelbase as well. I do plan on using this vehicle as my daily driver and I want to be safe as well as capable off-road so I am stretching the wheelbase to the maximum I can without completely destroying the body and going full width axles. I got a 2007 F350 front axle and a 2011 F350 rear and stripped them down to clean tubes. We will be doing a 3-link front and 4 link rear with boxed trailing arms and aluminum upper links. Going with Coil carriers and bypass shocks. Running Gen3 Coyote with 10r80, Atlas 3.0 and 4.88 gears. 38” tires but opening fender cutouts to keep center of gravity as low as possible. Was going to go with lower gears but advance adapters recommended strongly against it with the low gears already in the 10R80. Up top is a new tub from Rust Belt Broncos and I was very nervous until it arrived. It came seam sealed and in Epoxy primer so that will save quite a bit of time. The interior will be dynamatted, carpeted, Parchment with nice finished panels and going to upholster the interior of the top as well. From inside, it will be very nice with AC, Dakota Digital gauges, and everything I love about my current 2019 Rubicon. Already have remote start set-up, power windows, power door locks and all of the creature comforts. Jordan Townsend in Colorado Springs is doing all of the fabrication and he builds Ultra 4 race suspensions, hardcore off road rigs, and performance race car suspensions. We should be able to dial this thing in to handle beautifully on the highway and very capable offroad. Also, much safer than anything Icon or Velocity make with the narrow Bronco axles and stock wheelbase. Pictures are day 1 through current progress and frame table covered in bronco parts with the frame and axles. Once the age is done the body will be supported enough to get it on the frame table.
 

Attachments

  • IMG_1279.jpeg
    IMG_1279.jpeg
    132.4 KB · Views: 103
  • IMG_1315.jpeg
    IMG_1315.jpeg
    336.1 KB · Views: 96
  • 71815039391__E737E6A8-4696-40BD-B36D-EEC49F0334DE.jpeg
    71815039391__E737E6A8-4696-40BD-B36D-EEC49F0334DE.jpeg
    251 KB · Views: 93
  • Image.jpeg
    Image.jpeg
    127.7 KB · Views: 92
  • IMG_1607.jpeg
    IMG_1607.jpeg
    252.6 KB · Views: 93
  • IMG_1610.jpeg
    IMG_1610.jpeg
    274.8 KB · Views: 103
Last edited:

Scoop

Contributor
Have Bronco, Will Travel
Joined
Feb 1, 2006
Messages
10,623
Loc.
Cuchara, CO
Sounds like a great plan for your build. I did not go full width but I did stretch the wheel base as far as I dared without stretching the body. My goal was 104 inches which I got with the frame stretch and moving the the front forward. It measures about 103 1/2 static on the ground. This is a great wheel base for Colorado and Moab wheeling. Works well for me. What wheel base are you shooting for?
 
OP
OP
Colo77Bronco

Colo77Bronco

Contributor
Sr. Member
Joined
Oct 10, 2004
Messages
612
Loc.
Colorado Springs
Got body mated to the frame with the 2" body lift and set the ride height and wheelbase. Got to 97" and to go any further I would have to really butcher the grill and the rear end. Going to do some major fabrication at the rear frame to keep it this low and get 8" of up travel in the suspension but we have it figured out. The front is going to be a more serious challenge due to the pumpkin on the Super Duty Axles being directly below the driver side frame rail. Going to have to be very creative to get that right.

Decided that instead of the gorilla warblers, which cover these cutouts well, I am going to fabricate some tube fenders skinned with sheet metal. I wish they would make two options of the flares with one being cut to body line but still long enough to go down tot eh bottom. I like the body line cut but them just dying into the body a few inches from the bottom just bugs me.
 

Attachments

  • IMG_1630.jpeg
    IMG_1630.jpeg
    304.6 KB · Views: 93
  • IMG_1631.jpeg
    IMG_1631.jpeg
    269.4 KB · Views: 89

Yeller

Contributor
Bronco Guru
Joined
Mar 27, 2012
Messages
6,032
Loc.
Rogers County Oklahoma
Looking really good!!! The pumpkin clearance issue is why I built a custom chassis for mine, it is a challenge sure. Looking forward to seeing progress.
 
OP
OP
Colo77Bronco

Colo77Bronco

Contributor
Sr. Member
Joined
Oct 10, 2004
Messages
612
Loc.
Colorado Springs
Prelim frame modification plan.

I think adding this width from just behind the transfer case forward until the front body mount will allow the Atlas to clock flat and get the driver side wide enough to clear the pumpkin. Then, going a little higher like Yeller did up front should make everything work I hope.
 

Attachments

  • IMG_1633.jpeg
    IMG_1633.jpeg
    144.3 KB · Views: 52

1969

Contributor
Sr. Member
Joined
Feb 28, 2022
Messages
535
05+ axles are great! Seems like not many people have put them under EB’s.

IMG_1502.jpeg
 
OP
OP
Colo77Bronco

Colo77Bronco

Contributor
Sr. Member
Joined
Oct 10, 2004
Messages
612
Loc.
Colorado Springs
Mine has the front and rear both stretched. Removing and replacing the rear cross member and notching the gas tank for the pumpkin.
 

Madgyver

Bronco Madman
Joined
Jul 30, 2001
Messages
14,701
Mine has the front and rear both stretched. Removing and replacing the rear cross member and notching the gas tank for the pumpkin.
we did it on the Firebronco...
 

Attachments

  • 87983835_10216863613208711_3222453510524108800_o.jpg
    87983835_10216863613208711_3222453510524108800_o.jpg
    256.6 KB · Views: 60
  • 88063996_10216628279085505_2488914413952696320_o.jpg
    88063996_10216628279085505_2488914413952696320_o.jpg
    212.5 KB · Views: 61
  • 95326958_10217211485785308_7997388560107831296_o.jpg
    95326958_10217211485785308_7997388560107831296_o.jpg
    315.9 KB · Views: 62
OP
OP
Colo77Bronco

Colo77Bronco

Contributor
Sr. Member
Joined
Oct 10, 2004
Messages
612
Loc.
Colorado Springs
Figured out with mocking up the rear suspension I am going to be able to rework my rear wheel wells and gain about an extra 12" of interior flat floor width between the wheel wells. That is actually huge for rear cargo options moving forward.

For the frame, elected to keep the frame with standard body mounts tucked up high for the rear from the Atlas back. Just behind the atlas going to widen like the diagram all the way to the front. Going to have a symmetric front width wise but asymmetric rise with passenger side utilizing stock rise with a notch for the axle so I maintain my VIN and then the driver side will have a more significant rise similar to Yeller's custom frame. The frame rails will be out where the old inner fenders were which will actually make my fabrication of inner fender liners easier since a the frame itself will be providing a lot of protection. Working around the steering shaft/box will require some creativity but I think it will be worth it to have low COG and 8' of up travel on 38" tires with the 12" of added width for stability.

Should be very similar capability and stance to what Gordon Bailie builds. If you have not watched the videos posted on his site it is super impressive what those things make look super easy.

Also, decided on final design for trailing arms for the lowers in the rear and stout aluminum for the upper links.
 
OP
OP
Colo77Bronco

Colo77Bronco

Contributor
Sr. Member
Joined
Oct 10, 2004
Messages
612
Loc.
Colorado Springs
Got the frame chopped and putting it back together today with the modifications to make the suspension work.

Got the atlas clocked flat so we had to put a notch in the floor to tuck it up but it made a huge improvement in driveshaft clearance between the 1350 CV joint on the front output of the Atlas and the 10R80 transmission. Widening the frame helps in so many ways.

With the wider frame rails we dropped the Coyote motor 2" from where it would have mounted with the BC Broncos motor mounts so I can clear the Coyote with stock hood and no body lift. Relocating the front crossmember will make things easier with the coyote as well.

We are able to fit 18" rear coilers and 16" front coilovers while maintaining the lower stance. The challenge up front is the combination of coiler and bypass shock take up some real estate so we are still negotiating that.
 
Top