• Just a reminder that you won't be able to start new posts or reply to existings posts in the Archive forum.

    This is where all the old posts go so they can still be used for reference and searched.
  • Welcome to ClassicBroncos! - You are currently viewing the forums as a GUEST. To take advantage of all the site features, please take a moment to register. It's fast, simple and absolutely free. So please join our community today!
    If you have problems registering or can't log into your account, please contact Admin.

A Bronco for My Girl

OP
OP
Past_Miner

Past_Miner

Contributor
Bronco Guru
Joined
Oct 22, 2003
Messages
1,020
I was able to cut the passenger side floor out today. Most of this floor is in great shape but there was some sort of patch riveted where the floor angles up to meet the firewall and it looked like it was a future rust problem in the making so I cut it out.

I marked a 1" wide line all around the floor and marked the rear floor support location. I forgot to mark the front support and then thought I could see it from above and basically cut most of the back flange off. I decided to cut it all off and weld a new one on. I spent a lot of quality time with a spot weld drill and a pry bar today and it cleaned up nice.

Next weekend I will weld the new floor in and pull the body so we can start on the chassis.
 

Attachments

  • DSCF1031 (Custom).JPG
    DSCF1031 (Custom).JPG
    180.4 KB · Views: 37
  • DSCF1044 (Custom).JPG
    DSCF1044 (Custom).JPG
    180.3 KB · Views: 36
  • DSCF1042 (Custom).JPG
    DSCF1042 (Custom).JPG
    170.4 KB · Views: 40
  • DSCF1038 (Custom).JPG
    DSCF1038 (Custom).JPG
    183.7 KB · Views: 38
  • DSCF1037 (Custom).JPG
    DSCF1037 (Custom).JPG
    176.4 KB · Views: 34
  • DSCF1036 (Custom).JPG
    DSCF1036 (Custom).JPG
    178.2 KB · Views: 37
  • DSCF1034 (Custom).JPG
    DSCF1034 (Custom).JPG
    185.1 KB · Views: 35
  • DSCF1032 (Custom).JPG
    DSCF1032 (Custom).JPG
    208.3 KB · Views: 37
  • DSCF1047 (Custom).JPG
    DSCF1047 (Custom).JPG
    182.7 KB · Views: 34
  • DSCF1045 (Custom).JPG
    DSCF1045 (Custom).JPG
    182.6 KB · Views: 39
OP
OP
Past_Miner

Past_Miner

Contributor
Bronco Guru
Joined
Oct 22, 2003
Messages
1,020
I got the floor replaced yesterday after a little work on the replacement panel. This panel isn't the flattest thing I've ever seen right out of the box. It also didn't fit the floor in this bronco at all. Maybe they are all like this or maybe it's this particular truck.

I started by cutting the flanges off the sides of the new panel. My floor was in good enough shape to leave a flange all the way around the opening and I thought it would be easier to put in this way. I did leave the back flange on but I removed the rest of them.

Once I cut the flanges off and made a test fit I found out that the distance from the flange at the back of the panel to the bend for the front of the floor didn't match. The panel was at least 1/2" longer than the space in my floor. I flattened the panel and re-bent it to fit. In hind sight, I would make all of the adjustments at the back of the panel. I think it would end up easier that way. The angled part of the floor was also way too long, at least 2". I just broke a line in it to make another flange at the top of the panel to weld to the firewall.

One more test fit and I marked the hole for the body mount and it was way off from the center of the dimple in the panel too. Some of this was probably from my movement of the break line but it was off from side to side a lot too. I pounded it flat and made a new dimple with a dimple tool I built for our last build. After all of that I was able to line everything up.

I spent a good hour drilling holes in the panel for spot welds. Then I attached the panel with self-tapping screws until I had it where I thought it fit the best. From there it was a lot of welding and grinding and some light work with a torch and body hammer as I went to keep the seams flat. I was a little worried that this floor wouldn't be flat based on all of the jacking around I had to do to make changes but it looks okay after it is all done.
 

Attachments

  • DSCF1068 (Custom).JPG
    DSCF1068 (Custom).JPG
    176.3 KB · Views: 32
  • DSCF1067 (Custom).JPG
    DSCF1067 (Custom).JPG
    154 KB · Views: 33
  • DSCF1066 (Custom).JPG
    DSCF1066 (Custom).JPG
    164 KB · Views: 36
  • DSCF1065 (Custom).JPG
    DSCF1065 (Custom).JPG
    143.6 KB · Views: 34
  • DSCF1060 (Custom).JPG
    DSCF1060 (Custom).JPG
    173.9 KB · Views: 33
  • DSCF1057 (Custom).JPG
    DSCF1057 (Custom).JPG
    153.1 KB · Views: 33
  • DSCF1056 (Custom).JPG
    DSCF1056 (Custom).JPG
    173.5 KB · Views: 34
  • DSCF1055 (Custom).JPG
    DSCF1055 (Custom).JPG
    174 KB · Views: 35
  • DSCF1079 (Custom).JPG
    DSCF1079 (Custom).JPG
    188.9 KB · Views: 50
  • DSCF1075 (Custom).JPG
    DSCF1075 (Custom).JPG
    190.5 KB · Views: 41
  • DSCF1073 (Custom).JPG
    DSCF1073 (Custom).JPG
    179.7 KB · Views: 43
  • DSCF1070 (Custom).JPG
    DSCF1070 (Custom).JPG
    182.1 KB · Views: 39

stupidboy

Contributor
My wifes porn star.
Joined
Dec 29, 2009
Messages
5,789
Loc.
Morrisdale Pa.
Thats crazy that you have to modify a new panel that much to fit!!! Mine was the same way with that pan.
 

kip60

Full Member
Joined
Feb 7, 2015
Messages
238
I agree with the others, nice work. I also had the same issue.

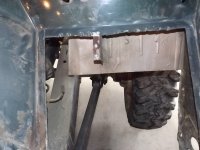
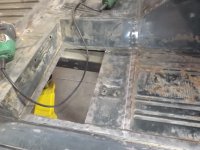
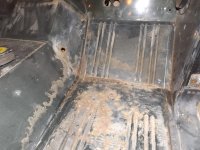
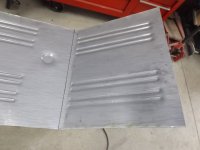
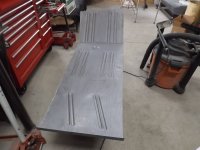
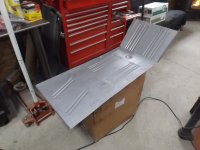
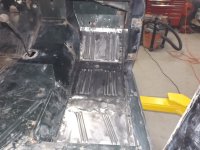
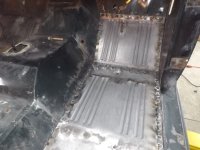
Started trying to custom bend the front bend when I realized that it was really the back of the pan that was off. I think when they are flattened to put in the shipping box, the angle might get a little skewed in the front. Then I discovered that my body mount hit the dimple almost identical to yours. Layed on the floor staring up at the bottom for a while. Decided that it needed to be moved back to clear the stampings and make the floor flatter. Straightened the back flange out and re-bent it at a slightly different angle. The rest of the floor lined up a lot better after that, so I started screwing it all down. Now all I have to do is flatten all the sides, weld in all the previous screw holes, drill all the cross brace plugs, etc, etc, etc,. I'll be watching to see how all this goes, good luck.
 
OP
OP
Past_Miner

Past_Miner

Contributor
Bronco Guru
Joined
Oct 22, 2003
Messages
1,020
Thats crazy that you have to modify a new panel that much to fit!!! Mine was the same way with that pan.

I thought that buying the floors instead of fabbing them like last time would lead to a better looking floor. As it turns out, the ones my son and I built from scratch (rolled beads and all) looked better when we were done.

This one probably saved me about 1 hour of fab time though %)
 

nutter3

Full Member
Joined
Jul 28, 2005
Messages
302
Nice work--and man, you do not mess around. It looks like it will be done in a month!

I spent the summer of '95 in Elko/Spring Creek in my 73 bronco. Good times.
 
OP
OP
Past_Miner

Past_Miner

Contributor
Bronco Guru
Joined
Oct 22, 2003
Messages
1,020
Nice work--and man, you do not mess around. It looks like it will be done in a month!

We'll see, the last one took me 6 1/2 years. I'm hoping I can do a little better this time around.
 
OP
OP
Past_Miner

Past_Miner

Contributor
Bronco Guru
Joined
Oct 22, 2003
Messages
1,020
The weekend was mostly consumed with snow clearing duties around here. I spent all day on Saturday in the driveway just to have 2 feet or so drift back in Sunday morning. I gave up on the driveway and pulled the tub off of the chassis.

Not much to say except it's ready for the chassis work to start.
 

Attachments

  • DSCF1090 (Custom).JPG
    DSCF1090 (Custom).JPG
    186 KB · Views: 36
  • DSCF1091 (Custom).JPG
    DSCF1091 (Custom).JPG
    193.1 KB · Views: 31
  • DSCF1099 (Custom).JPG
    DSCF1099 (Custom).JPG
    179.6 KB · Views: 32
  • DSCF1106 (Custom).JPG
    DSCF1106 (Custom).JPG
    184.7 KB · Views: 39
Top