• Just a reminder that you won't be able to start new posts or reply to existings posts in the Archive forum.

    This is where all the old posts go so they can still be used for reference and searched.
  • Welcome to ClassicBroncos! - You are currently viewing the forums as a GUEST. To take advantage of all the site features, please take a moment to register. It's fast, simple and absolutely free. So please join our community today!
    If you have problems registering or can't log into your account, please contact Admin.

A Bronco for My Girl

Past_Miner

Contributor
Bronco Guru
Joined
Oct 22, 2003
Messages
1,020
It's a new year and time for a new build!

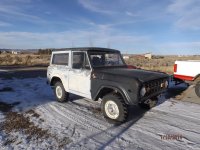
I picked up a '76 wagon a couple of years ago while I was finishing up a build for my son in anticipation of starting one for my daughter. That first build took a couple of extra years to finish so I'm a little behind on this one. Along the way we got distracted with a camper build too so time just got away.

The plan for this one is for a more street friendly daily driver that still has enough capability to get off the road now and then. There will be a few more creature comforts as well.

The basic build will be:

- 3.5" total lift rolling on 33 inch tires
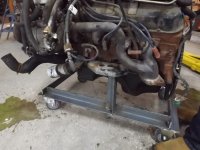
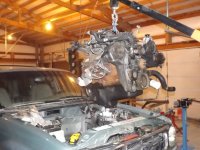
- 1998 Explorer 5.0 with the matching 4R70W and the stock D20
- Four wheel disk brakes powered by hydroboost
- Limited slip front and rear
- Full insulation and carpet to keep things quiet and warm

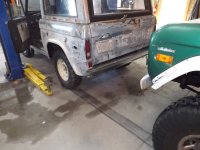
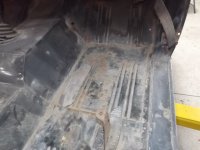
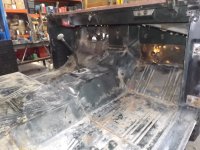
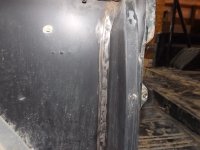
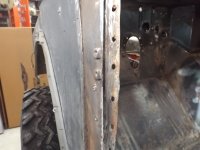
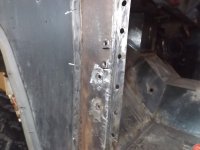
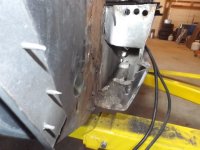
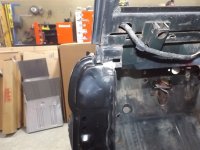
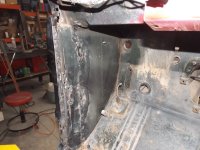
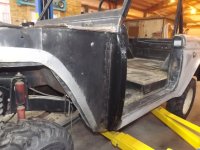
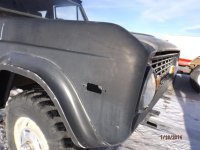
Here are a few shots of the rig when we brought it home. The PO had some ambitions to fill all of the body seams on the whole truck with bondo, so the first order of business will be to reverse that and get the body repaired. The donor is in the driveway too so there will be more to see soon.
 

Attachments

  • DSCF0065.jpg
    DSCF0065.jpg
    113.2 KB · Views: 230
  • DSCF0070.jpg
    DSCF0070.jpg
    123.6 KB · Views: 220
  • DSCF0066.jpg
    DSCF0066.jpg
    74.6 KB · Views: 223
  • DSCF0067.jpg
    DSCF0067.jpg
    60.6 KB · Views: 203
  • DSCF0068.jpg
    DSCF0068.jpg
    93.5 KB · Views: 201
OP
OP
Past_Miner

Past_Miner

Contributor
Bronco Guru
Joined
Oct 22, 2003
Messages
1,020
What is holding those flares on?

I'm pretty sure they are riveted and the heads are smoothed over with bondo. I will take a picture from behind the fender and let you know.
 
OP
OP
Past_Miner

Past_Miner

Contributor
Bronco Guru
Joined
Oct 22, 2003
Messages
1,020
The Donor

My daughter and my youngest son spent a few days with me over the holidays and we started pulling the donor apart. It is a 1998 5.0 Explorer XLT with 166K on the odometer. This thing was extremely cheap at a small dealer in Salt Lake City about a year ago when we picked it up.

Aside from a little rough paint this truck was really too nice to tear apart, but....
 

Attachments

  • DSCF0857 (Custom).JPG
    DSCF0857 (Custom).JPG
    190.8 KB · Views: 136
  • DSCF0861 (Custom).JPG
    DSCF0861 (Custom).JPG
    193 KB · Views: 158
  • DSCF0849 (Custom).JPG
    DSCF0849 (Custom).JPG
    181.4 KB · Views: 137
  • DSCF0847 (Custom).JPG
    DSCF0847 (Custom).JPG
    207.3 KB · Views: 157
  • DSCF0845 (Custom).JPG
    DSCF0845 (Custom).JPG
    201.2 KB · Views: 147
  • DSCF0842 (Custom).JPG
    DSCF0842 (Custom).JPG
    203.5 KB · Views: 149
  • DSCF0829 (Custom).JPG
    DSCF0829 (Custom).JPG
    192.9 KB · Views: 151

sprdv1

Contributor
REBEL
Joined
Mar 8, 2007
Messages
81,756
Nice. Congrats Dad. I know she will appreciate that a lot
 

broncoitis

Bronco Guru
Joined
Jul 23, 2010
Messages
4,449
Looking forward to seeing this progress! Your shop is pretty sweet. ;D
 
OP
OP
Past_Miner

Past_Miner

Contributor
Bronco Guru
Joined
Oct 22, 2003
Messages
1,020
Just for the record, those flares are pop riveted to the fenders and covered in bondo.

There was a little mishap with one of the fenders while trying to get the bronco in the shop.
 

Attachments

  • DSCF0906 (Custom).JPG
    DSCF0906 (Custom).JPG
    162.4 KB · Views: 119
OP
OP
Past_Miner

Past_Miner

Contributor
Bronco Guru
Joined
Oct 22, 2003
Messages
1,020
Sometime between when we parked the Bronco last year and this week the left rear wheel became locked up. We weren't able to drive it at all so we drug it in front of the shop with my Bronco and then pushed it into the bay. The wheel was really locked up. After a couple of hours of messing with the brake drum I was finally able to get it off and found a bunch of broken springs inside. At least it rolls now.
 

Attachments

  • DSCF0920 (Custom).JPG
    DSCF0920 (Custom).JPG
    163.4 KB · Views: 64
  • DSCF0893 (Custom).JPG
    DSCF0893 (Custom).JPG
    179.4 KB · Views: 72
  • DSCF0894 (Custom).JPG
    DSCF0894 (Custom).JPG
    165.7 KB · Views: 61
  • DSCF0872 (Custom).JPG
    DSCF0872 (Custom).JPG
    181.3 KB · Views: 75
OP
OP
Past_Miner

Past_Miner

Contributor
Bronco Guru
Joined
Oct 22, 2003
Messages
1,020
The Tear Down Started Today

Amazingly, almost every bolt came right out without a fight. I only had to cut a few in the driver side front door post. The bondo in the body seams cracked clean too. The fenders have a lot of filler on them but the grill is pristine.
 

Attachments

  • DSCF0929 (Custom).JPG
    DSCF0929 (Custom).JPG
    200.9 KB · Views: 71
  • DSCF0923 (Custom).JPG
    DSCF0923 (Custom).JPG
    214.9 KB · Views: 66
  • DSCF0905 (Custom).JPG
    DSCF0905 (Custom).JPG
    191 KB · Views: 71
  • DSCF0900 (Custom).JPG
    DSCF0900 (Custom).JPG
    168.3 KB · Views: 67
  • DSCF0895 (Custom).JPG
    DSCF0895 (Custom).JPG
    192 KB · Views: 68
  • DSCF0877 (Custom).JPG
    DSCF0877 (Custom).JPG
    208.7 KB · Views: 68
OP
OP
Past_Miner

Past_Miner

Contributor
Bronco Guru
Joined
Oct 22, 2003
Messages
1,020
After getting the grill and fenders off I went around and looked for all of the normal rust spots. The rockers are solid as are the inner fenders. The striker posts are good and the passenger front post is too. The floors are in good shape. The passenger floor panel and the driver side front door post look like the only panels that need replacement. This tub should be fairly easy to clean up.
 

Attachments

  • DSCF0927 (Custom).JPG
    DSCF0927 (Custom).JPG
    183.2 KB · Views: 57
  • DSCF0945 (Custom).JPG
    DSCF0945 (Custom).JPG
    190.3 KB · Views: 62
  • DSCF0934 (Custom).JPG
    DSCF0934 (Custom).JPG
    206 KB · Views: 71
  • DSCF0933 (Custom).JPG
    DSCF0933 (Custom).JPG
    172.4 KB · Views: 59
  • DSCF0932 (Custom).JPG
    DSCF0932 (Custom).JPG
    211.5 KB · Views: 61
  • DSCF0931 (Custom).JPG
    DSCF0931 (Custom).JPG
    170.7 KB · Views: 56
  • DSCF0930 (Custom).JPG
    DSCF0930 (Custom).JPG
    178.3 KB · Views: 58
  • DSCF0928 (Custom).JPG
    DSCF0928 (Custom).JPG
    203.1 KB · Views: 62
  • DSCF0941 (Custom).JPG
    DSCF0941 (Custom).JPG
    163.5 KB · Views: 54
  • DSCF0938 (Custom).JPG
    DSCF0938 (Custom).JPG
    204.9 KB · Views: 57
OP
OP
Past_Miner

Past_Miner

Contributor
Bronco Guru
Joined
Oct 22, 2003
Messages
1,020
I didn't get a lot done last weekend but I was able to finish stripping the tub. This is by far the most complete Bronco I have ever owned. The wiring harness doesn't appear to have been cut into at all. It even has an almost completely intact firewall insulation piece. I've honestly never seen one that wasn't mostly missing. I found a little more rust on the back of the passenger and driver side floors after I peeled up the remnants of the rubber mat. I still think the only pieces I need to replace will be the passenger side floor and the driver side door post. Hopefully I can start on that next weekend.

I got a shipment of new parts that should be more than enough to repair the tub too. I guess there's nothing but lack of motivation stopping me.
 

Attachments

  • DSCF0954 (Custom).JPG
    DSCF0954 (Custom).JPG
    190.5 KB · Views: 53
  • DSCF0957 (Custom).JPG
    DSCF0957 (Custom).JPG
    207.4 KB · Views: 50
  • DSCF0958 (Custom).JPG
    DSCF0958 (Custom).JPG
    192.7 KB · Views: 51
  • DSCF0959 (Custom).JPG
    DSCF0959 (Custom).JPG
    199.6 KB · Views: 52
  • DSCF0963 (Custom).JPG
    DSCF0963 (Custom).JPG
    238.1 KB · Views: 52
  • DSCF0968 (Custom).JPG
    DSCF0968 (Custom).JPG
    166.1 KB · Views: 55
  • DSCF0961 (Custom).JPG
    DSCF0961 (Custom).JPG
    215.4 KB · Views: 49
  • DSCF0972 (Custom).JPG
    DSCF0972 (Custom).JPG
    177.4 KB · Views: 59
  • DSCF0970 (Custom).JPG
    DSCF0970 (Custom).JPG
    190.2 KB · Views: 56
OP
OP
Past_Miner

Past_Miner

Contributor
Bronco Guru
Joined
Oct 22, 2003
Messages
1,020
All men are not created equal! Get-r-done:cool:

Pat, I read this at work yesterday afternoon and I thought "I guess he's right".

So, I tried hard today
 

Attachments

  • DSCF1018 (Custom).JPG
    DSCF1018 (Custom).JPG
    194.2 KB · Views: 43
OP
OP
Past_Miner

Past_Miner

Contributor
Bronco Guru
Joined
Oct 22, 2003
Messages
1,020
I replaced the driver side door post today without removing the rocker panel, which is pretty much pristine. I wasn't sure this was even possible and I will tell everyone now that it really isn't very easy either. I will show you all how I did it just in case it helps anyone else.

I started drilling our spot welds and grinding away on things and I realized that I ruined the last windshield I had by welding too close. So I got out the rope and pulled the glass. I also pulled the wiper motor and mechanism. As I said earlier, I have never had a Bronco this complete. It looks like all of the various brackets and wiring guards for the wiper cover are here too.
 

Attachments

  • DSCF0982 (Custom).JPG
    DSCF0982 (Custom).JPG
    207.3 KB · Views: 60
  • DSCF0984 (Custom).JPG
    DSCF0984 (Custom).JPG
    195.6 KB · Views: 59
OP
OP
Past_Miner

Past_Miner

Contributor
Bronco Guru
Joined
Oct 22, 2003
Messages
1,020
Driver Door Post

I always start these posts by getting out the wire wheel and scrubbing the paint off of the spot welds so I can see them. Maybe its my bad eyesight but it always helps me see them so I can try to get the spot weld drill in the right place.
 

Attachments

  • DSCF0976 (Custom).JPG
    DSCF0976 (Custom).JPG
    182.5 KB · Views: 47
  • DSCF0980 (Custom).JPG
    DSCF0980 (Custom).JPG
    177.7 KB · Views: 49
  • DSCF0981 (Custom).JPG
    DSCF0981 (Custom).JPG
    181.5 KB · Views: 48
OP
OP
Past_Miner

Past_Miner

Contributor
Bronco Guru
Joined
Oct 22, 2003
Messages
1,020
I wasn't sure if the whole post was bad or if I could just replace the front panel. I only considered this because I wasn't sure I could replace the post without also pulling the rocker off so I started by cutting as much of the front panel off as I could. After looking at the bottom section of the back of the post I decided I wanted a complete replacement.

I started drilling spot welds on the flange at the back of the post and at the cowl. I had a very hard time separating the post flange from the kick panel. I was able to spread the pieces apart but not break the welds so got out my grinder with a cutoff wheel to finish cutting out the welds. I got a little carried away and trashed the kick panel so I spent a couple of hours welding that back together.

I also shook the captured nuts for the door straps off during this episode. Luckily, I keep a box of square weld nuts of just about every size around for this sort of thing. McMaster-Carr is our friend.

If you leave the rocker in place you have to cut the post off above the top of the rocker and kind of whittle away at the pieces behind the rocker with cut-off wheels. I spent a lot of time cutting the back of the post from the kick panel behind the rocker. All I can say here is that you need to go slow and keep at it. I finally bought some 6" cut-off wheels and put them on my 4 1/2" grinder. I had to take the guard off (I mean, it was there, really) to fit the wheel. This is my disclaimer: Remove the guard at your own risk. Just because I did it does not mean I condone it. I am not responsible for any injuries anyone else receives from these actions.

For the record, I cut the knuckle on my index finger with that big wheel right through my glove.
 

Attachments

  • DSCF0988 (Custom).JPG
    DSCF0988 (Custom).JPG
    185.1 KB · Views: 52
  • DSCF0989 (Custom).JPG
    DSCF0989 (Custom).JPG
    196 KB · Views: 59
  • DSCF0987 (Custom).JPG
    DSCF0987 (Custom).JPG
    182 KB · Views: 51
  • DSCF0996 (Custom).JPG
    DSCF0996 (Custom).JPG
    166.7 KB · Views: 53
  • DSCF0998 (Custom).JPG
    DSCF0998 (Custom).JPG
    152.6 KB · Views: 48
  • DSCF1002 (Custom).JPG
    DSCF1002 (Custom).JPG
    176.1 KB · Views: 53
Last edited:
OP
OP
Past_Miner

Past_Miner

Contributor
Bronco Guru
Joined
Oct 22, 2003
Messages
1,020
I moved to the front flange after I fixed the kick panel. This one came off a little better and I was able to remove it without much trouble. The rocker was full of dirt and wasp nests. I cleaned it the best I could with a scraper and shop vac. The post is welded to the outer cowl panel at the top front of the post. When I cut the weld I got into the outer cowl panel and had to weld that up too. I didn't take a good picture of the repair but you can kind of see it in the last pic.

It takes a little patience to work the post into position with the rocker in place. You have to spend some time getting the flange on the door side to line up and to get the bottom of the post in the right position in the rocker. I probably spent an hour just tapping the post around and prying the flanges into alignment. I finally got it close to where I wanted it and started mounting it with self-tapping screws. The screws help to get the final tweaks made.
 

Attachments

  • DSCF1012 (Custom).JPG
    DSCF1012 (Custom).JPG
    176.3 KB · Views: 53
  • DSCF1009 (Custom).JPG
    DSCF1009 (Custom).JPG
    173.9 KB · Views: 39
  • DSCF1006 (Custom).JPG
    DSCF1006 (Custom).JPG
    169.5 KB · Views: 41
  • DSCF1005 (Custom).JPG
    DSCF1005 (Custom).JPG
    173.4 KB · Views: 47
  • DSCF1004 (Custom).JPG
    DSCF1004 (Custom).JPG
    179.1 KB · Views: 43
  • DSCF1013 (Custom).JPG
    DSCF1013 (Custom).JPG
    164.9 KB · Views: 43
OP
OP
Past_Miner

Past_Miner

Contributor
Bronco Guru
Joined
Oct 22, 2003
Messages
1,020
I spent a lot of time with my body hammers, self tapping screws and a propane torch flattening out the flanges and making sure the panels are compressed together as much as possible. I drilled holes for spot welds in the post for the front flange and in the kick panel for the back flange. There are a couple of tabs under the cowl that you need to weld.

Once the post was mounted and screwed down I started around the panel and welded all of the holes closed. Then I pulled the screws and welded the screw holes closed. I ground everything flat and went around the whole thing with the body hammers and the torch again to close everything up the best I could. This will all get sealed up with seam sealer after the tub is blasted and primered. For now, it will sit like it is.

The one thing that you can't do when putting the post in without removing the rocker is spot weld the section of flange that is behind the rocker. I plan to drill holes from the back side of the inner rocker with a spot weld drill and pull the flange in with screws after I take the body off and put it on the rotisserie. I will try to remember to take some pictures.
 

Attachments

  • DSCF1014 (Custom).JPG
    DSCF1014 (Custom).JPG
    178 KB · Views: 48
  • DSCF1015 (Custom).JPG
    DSCF1015 (Custom).JPG
    181.8 KB · Views: 45
  • DSCF1016 (Custom).JPG
    DSCF1016 (Custom).JPG
    200.8 KB · Views: 49
  • DSCF1018 (Custom).JPG
    DSCF1018 (Custom).JPG
    194.2 KB · Views: 47
  • DSCF1019 (Custom).JPG
    DSCF1019 (Custom).JPG
    179.7 KB · Views: 49
Last edited:
Top