• Just a reminder that you won't be able to start new posts or reply to existings posts in the Archive forum.

    This is where all the old posts go so they can still be used for reference and searched.
  • Welcome to ClassicBroncos! - You are currently viewing the forums as a GUEST. To take advantage of all the site features, please take a moment to register. It's fast, simple and absolutely free. So please join our community today!
    If you have problems registering or can't log into your account, please contact Admin.

1971 Frame Off Luber Build

OP
OP
N

Numberfool

Full Member
Joined
Sep 8, 2012
Messages
173
Trying to keep the expenses out of the family checkbook has been about as much work as the build. The higher my bronco bills go, the more comments I get about "our old kitchen cabinets" from my better half
 
OP
OP
N

Numberfool

Full Member
Joined
Sep 8, 2012
Messages
173
Received the NV3550 and conversion kit from Toms Bronco Parts.
Very well put together kit and instructions. I deal with alot of different suppliers in my work and must say we have some really good ones in the Bronco community.

Installation was pretty simple since we did it on a bench and not on a bronco body on etc.
Besides the typical drilling and such, only real excitement was the clutch. I bought my motor with a new clutch and pressure plate. The clutch size was wrong... whole Ford flywheel to Jeep clutch I guess. (Anyone wants to pick up a very reasonably priced new CFII clutch and pressure plate, PM me... Ill swing you a kickin deal on something I paid hundreds for and cant return to my speed shop). I cried uncle on it and called Toms for the clutch and pressure plate that I should have just bought from them to start with.

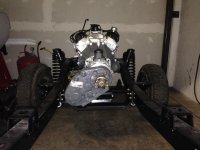
Once we had it all bolted up, we mounted it up on the chassis.... felt real good to see that part together. Simple milestone, but if felt good.

I have a 2.5" SL.... really contemplating whether to put a 1" BL on this when I put the body on. Toms told me its recommended with the NV3550, but since I did the conversion body off, doesnt matter as much now. Could use some feedback from guys who have been here before if you have an opinion. Remember, she will be uncut and I want a clean look with 31"s. Plenty of threads these days on that one going round on the forums.

Also on the NV3550 conversion front, if someone can give me some experienced feedback on twin sticks at this point. I have the little bracket to make the T shift work, but have a "feeling" I should possibly just put twin shifters for the transfer case in? Would I need the bracket if this is the case?

I plan to start body work next week and maybe start mounting gas tank, finish steering box, etc while that is going on.
 

Attachments

  • Photo Oct 11, 1 04 38 PM.jpg
    Photo Oct 11, 1 04 38 PM.jpg
    129 KB · Views: 321
  • Centerforce from Hawaii.jpg
    Centerforce from Hawaii.jpg
    88.6 KB · Views: 284
  • Photo Oct 11, 7 12 57 PM.jpg
    Photo Oct 11, 7 12 57 PM.jpg
    106.8 KB · Views: 335
  • Photo Oct 11, 7 13 07 PM.jpg
    Photo Oct 11, 7 13 07 PM.jpg
    93.8 KB · Views: 320
  • Photo Oct 11, 7 13 21 PM.jpg
    Photo Oct 11, 7 13 21 PM.jpg
    90.7 KB · Views: 325
  • Photo Oct 11, 7 13 30 PM.jpg
    Photo Oct 11, 7 13 30 PM.jpg
    93.9 KB · Views: 325
  • Photo Oct 11, 7 12 41 PM.jpg
    Photo Oct 11, 7 12 41 PM.jpg
    88.6 KB · Views: 307
OP
OP
N

Numberfool

Full Member
Joined
Sep 8, 2012
Messages
173
Got rolling on body work. Was hoping to get started a bit sooner, life happens. The 75' driven by my daughter decided that it was time for the power steering to go out. After a couple weeks of denial that I could repair that unit, I came to grips with buying a new one. Of course that leads to replacing the pump, looking at steering joints.... like everything Bronco, its a slippery slope.

Started making good progress on the body. I am real hopeful on the work on this one, as the sheet metal is dent free.

Rust wise, its way better than what I started with on the 75'. After it was blasted, I had three problem areas: Driver and passenger floor pans, the typical real small path at the drivers vent inlet and I noticed rust debris inside the windshield.

I decided to order a new windshield frame, as it just seemed impossible to know how bad the frame could be in there. Driver and passenger floor pans, although it was light rust, I went with new pans. I used TBP last time for these and was impressed with the quality.

Pics below. You can see the drivers floor pan replaced and ready to weld. Drivers side rear quarter panel is out. Was again very happy with the metal underneath when I peeled it back. No rust, etc. You can see we applied POR-15 up and inside the well. Hope to have the other side off next week and have her back to uncut by the week after.

Will post more pics then. Big thanks to pmader (pippin) up in north CA for taking care of me on the EFI conversion kit. I think I might put the unit you sold me on the 75' first to get my feet wet. For sure I will make sure the fuel lines, return, and exhaust is all setup in advance to add EFI after this build is done.
 

Attachments

  • photo 5.jpg
    photo 5.jpg
    79.4 KB · Views: 373
  • photo 2.jpg
    photo 2.jpg
    76.1 KB · Views: 363
  • photo 3.jpg
    photo 3.jpg
    68.3 KB · Views: 400
  • photo 4.jpg
    photo 4.jpg
    73.8 KB · Views: 371
OP
OP
N

Numberfool

Full Member
Joined
Sep 8, 2012
Messages
173
Finished replacing the floor pans. Lots of welding and grinding to get it clean. Way more time than on the last build, but not due to the quality of the pans. I think its more of the fact that I really am not leaning towards spraying liner on the interior of this one. I really over did it on the last build and want to be more judicious this time. With that in mind, the exposed welds, especially with these pans should be clean.

Very excited to have the right rear quarter panel on. It was one of those simple moments the family doesn't get as excited over... To see her uncut again. Way more work than I thought. You can see from the one pic that we really had to stretch the panel to get the gap right. Basically had to unfold the end a good 1/8th inch to make the gap clean.

Placed a huge WH order and received it next day here in So Cal... Mostly steering parts, twin sticks, new 23 gal tank, headers and other chassis parts. Will hopefully get those rolling on in the next few weeks and will post up pics.

Happy New Year...
se7adura.jpg
zu4ysenu.jpg
guhapyzu.jpg
paby5a8y.jpg
 
OP
OP
N

Numberfool

Full Member
Joined
Sep 8, 2012
Messages
173
any updates?


Been making good progress on the body. Getting ready to set her on the chassis to ensure everything is straight before we pull it for final blocking and paint.

Started the roll bar. It's just tacked in at this point and the rear horizontal supports will be moved to outside edge.

Still sorting out final holes on my firewall and have been going back and forth on hydroboost. It's not going to have bigger than 31"s, so they are a bit of waste and vacuum is just so simple. On the other hand hydro looks better on firewall and stops better.

Love seeing her uncut now.

damu9eme.jpg
yru6u8y3.jpg
 

hammer189

Full Member
Joined
Jan 13, 2013
Messages
339
Loc.
South Atlanta
Here are some pics of my 31" tires with 2 1/2" WH lift, 1" BL and rear axle moved back 1". Wild Horses makes a 1 piece 1" body lift that I wish I had gone with.
 

Attachments

  • IMG_0018.jpg
    IMG_0018.jpg
    91.9 KB · Views: 341
  • IMG_0020.jpg
    IMG_0020.jpg
    67.5 KB · Views: 275
  • IMG_0022.jpg
    IMG_0022.jpg
    90 KB · Views: 266
OP
OP
N

Numberfool

Full Member
Joined
Sep 8, 2012
Messages
173
Finished up on body work after I picked up the hood from Dynacorn (discovered they are a quiet company right here in my own town of Camarillo)

Body looks real nice. Only thing left is final blocking and figuring out what I'll spray underneath it. Leaning towards lizard skin right now. We will see where the wind blows me over the next week.

Made the decision to put the body back on pre-paint and do a rough assembly. Haven't done it that way before, as I just hate the risk of damaging new parts. Ultimately though I determined to do this test so I can do any last fabrication without having to worry about paint and body. To minimize parts risk, I'm only fitting up the rough mechanical. Clutch, brakes, finishing NV3550 conversion and twin sticks, running brake lines and gas lines. Radiator will go in and I will get the power steering sorted out.

Real glad I did. Two items have surfaced. One is the big ass winch the PO had on there for 30 years (its one if the largest winches I've seen on a 4x4.... ) bent the right front frame mount. Just the last 12 inches. Did take offs on the rest, perfect. Put the frame in traction and it righted itself.
Second issue is a minor one, but the quick ratio box I ordered from WH looks to be a real tight fit with fender and radiator. Long snorkus out the side. Need to research that... Maybe I need a bracket or something.

You can see the fender look with it uncut. Those are just shop tires and rims. They are 29's. Planning on likely 31's and personally think the look is right. Its a 2.5" WH suspension lift and 1" body. What do you think? Would really like the very top of the tire to disappear into the fender, but likely won't.

Final picture is for you guys locked up in this weekends snow storm. A nice California evening.

syzu9upe.jpg
a5e8emap.jpg
ga3usene.jpg
y8umerup.jpg
y6yjese3.jpg
5a9udezu.jpg
sy9yzaty.jpg
na3aze7u.jpg
 
OP
OP
N

Numberfool

Full Member
Joined
Sep 8, 2012
Messages
173
Been a while since I did an update, but continuing to make progress.

I had put the body on so I could do a rough assembly. Did the steering, brake, clutch linkage, etc. Got my takeoffs for the exhaust. I hate doing assembly twice, but I also don't like scratching new paint or welding on a final surface. With the tranny conversion, a modern 302 block and aluminum radiator, was real glad I did.

Going for as few of firewall penetrations as possible, so the assembly allowed me to work through which ones could be closed off as well.

From the pictures, you can see I blanked the fresh air and vent. Going with AC for defrost and I am hoping to seal up nice. Got my twin sticks in and oriented, you can see final sheet metal on that tunnel.

Chassis is built up. Brake lines, fuel lines, rebuilt both drive shafts, front and rear diffs, axles, radiator, etc

Pulled the body off for final body work. I will paint the engine bay, interior and do an acoustic spray on the underside. Then put the body back on, final blocking and spray exterior. For those wondering why I am putting the body back on for final paint, I just can't seem to get the body panels to relax the way they do on its frame. I'm on my 2nd jig and gave in. She wants to get painted on her frame, fine, we will do the masking.

asyneby2.jpg
e8uve4yd.jpg
ydeju2eb.jpg
 
OP
OP
N

Numberfool

Full Member
Joined
Sep 8, 2012
Messages
173
Finished up sheet metal work on the tranny tunnel. With the conversion to the NV3550, had to knock a new hole of course. Once I got the twin sticks in, I didn't really care for having to mount the boot at an angle for it, so new mount and sheet metal for that can be seen in picture below.

Also finished up the final firewall clean up and also painted and mounted the 23 gal tank. Hoping for another week or two of body work, then spray the underside and engine bay.

Thanks for reading.


2epabyju.jpg
ytuganem.jpg
4a4evuby.jpg
my7epa5e.jpg
 

Ohio Bronco 21

Bronco Guru
Joined
Dec 5, 2006
Messages
4,194
Loc.
Cleveland
Nice work. I like the stance. I had used the WH 1inch 1 part body lift before, great Item ( I will always go with it hence forth). Cant wait to see her done.
 

MyOriginal66

Bronco Guru
Joined
Aug 11, 2009
Messages
2,071
Looks great! The one thing i wish I had done when I cleaned up my firewall was relocating my wiring harness holes. If you run your engine harness either from behind the engine or low along the frame, it really cleans up the engine compartment. Not sure if you want to go that far, but It's the one thing I would have done differently on my lubr. Now I'm looking at ways of running it inside the fender like FOOSE did.
 

nathan.hall1

Sr. Member
Joined
Feb 3, 2006
Messages
556
Loc.
Central Washington
. You can see the fender look with it uncut. Those are just shop tires and rims. They are 29's. Planning on likely 31's and personally think the look is right. Its a 2.5" WH suspension lift and 1" body. What do you think? Would really like the very top of the tire to disappear into the fender, but likely won't.

I have the same lift 2.5 suspension 1 inch body I went with 33s and love it


I did have to move axle back an inch to keep from rubbing but theY tuck in pretty good...
 

MyOriginal66

Bronco Guru
Joined
Aug 11, 2009
Messages
2,071
Yeah, now you really have me thinking about whether I should just weld up those electrical holes and keep my options open. I can always knock new holes where I want them.

Just read up on your build thread. Impressive work. Don't blame you for holding off on the Coyote. That would have added some serious time the build.

I'm up in Ventura County - Camarillo. Bronco is being done in space I have set aside in my shop. If you are ever up this direction from LA feel free to stop by and take a look.

I'm not out that way often, but I'll definitely take you up on it!

Thanks for the compliment, it's coming along but your build is equally as impressive and you actually have the time to work on it! Coyote or not, my build is taking much longer than anticipated since I've been working out of town so much.

Your attention to detail is spot on, which is why I brought up the wiring. It makes a huge visual impact when it's out of sight.
 

MyOriginal66

Bronco Guru
Joined
Aug 11, 2009
Messages
2,071
I have the same lift 2.5 suspension 1 inch body I went with 33s and love it


I did have to move axle back an inch to keep from rubbing but theY tuck in pretty good...

I think 3.5" or 2.5" SL and 33's like above is the perfect stance. JMO

If you go on Nick's Trix sight he has a couple LUBR's on 33's with no BL and 2.5" SL.
They tuck nicely!!!
 

Krawlin5

Full Member
Joined
Nov 6, 2011
Messages
161
How does Nick get them to tuck so good? I have 2'' suspension and 2'' body and might doesnt tuck well at all. I have actually pushed the fender out some on the front edge. I plan on moving axle back and inch have offset spring perches need to lenght driveshaft.Is Nick limiting up travel if so I my need to lower my bump stops. Running 33x10.5 x15 on ford f150 rims.
 
Top