• Welcome to ClassicBroncos! - You are currently viewing the forums as a GUEST. To take advantage of all the site features, please take a moment to register. It's fast, simple and absolutely free. So please join our community today!
    If you have problems registering or can't log into your account, please contact Admin.

What am I doing wrong...see picture.

Rmally

Full Member
Joined
Mar 11, 2013
Messages
166
Loc.
Knoxville, TN
New pictures at end of post....Reviving my question since I have new pictures.

Trying to get my shif pattern correct as 1st and Reverse are switched.
 
Last edited:

AZ73

Contributor
Bronco Guru
Joined
Mar 28, 2012
Messages
3,542
You can't pull that unless you take apart your transmission. It comes out from the inside, and I don't think that's your problem. I'm thinking the plate (#20) was put on pointing down instead of up. I looked at your pictures on your other thread and it looks like your #20 is pointed down. That would cause your 1 and R to be backwards. It should point the same direction of #22. I enclosed a pix of my linkage, but I have a column shift.
 

Attachments

  • rsz_img_4999.jpg
    rsz_img_4999.jpg
    204.4 KB · Views: 176
Last edited:

Bronco Junkie

So Cal Broncos
Joined
Feb 29, 2012
Messages
3,233
X2..those come out from the inside. Mine are leaking right now and I want to replace but I need to R&R the transmission.
 
OP
OP
Rmally

Rmally

Full Member
Joined
Mar 11, 2013
Messages
166
Loc.
Knoxville, TN
Thank you very much for the info.....I was thinking all along the tab had to be reversed not the plate.

I will give that a try, again many thanks.
 
OP
OP
Rmally

Rmally

Full Member
Joined
Mar 11, 2013
Messages
166
Loc.
Knoxville, TN
Well, it wont work by having it switched as the linkage arm binds. There just isn't enough room to "flip" the tab so that its pointing up. Does this make sense or am I still missing something.

I assume thats why it was set-up this way when I got it. Would new linkage correct this?

Would the fact that its a floor shifter cause it not to work in the traditional pattern of
R 2
1 3

Very frustrating for something that should be a pretty easy fix.

Thoughts?
 

AZ73

Contributor
Bronco Guru
Joined
Mar 28, 2012
Messages
3,542
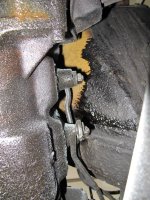
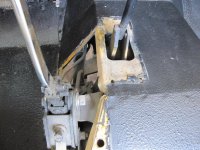
Well short of being there we're just guessing. Generally if the linkage is coming from the front, as in a column shifter, the tabs point down. From the rear, the tabs point up. both linkage arms (that go from the trans to the shifter) should connect to the tabs from the TRANSMISSION side, with the tip pointing AWAY from the trans. The 1/R tab isn't flat, it's S shaped, and should S TOWARDS the transmission. See your picture in your first post. Maybe it's just the wrong shifter which is why the PO put it on wrong to begin with, just to make it work. Although your diagram looks like it's the right one. Make sure you adjust the linkage where it connects to the shifter to see if you can get some more room between them. Or try posting a picture of the whole set-up. It also looks like you have the correct linkage for each tab, but check. According to the diagram, the one for 2/3 has a slight S just behind where it connects to the tab. The 1/R is straight there.
 
Last edited:

dclack

Sr. Member
Joined
Feb 16, 2012
Messages
401
Well, it wont work by having it switched as the linkage arm binds.

Where is it binding? You might need to cut the tunnel hole a little larger. You shouldn't have any issues if it is installed as shown in the Hurst diagram. We really need some pics of your actual setup.

You could also just install a 1" body lift for the extra clearance.
 

Ranchtruck

Sr. Member
Joined
Feb 7, 2008
Messages
766
Here's your pic from underneath of the linkage:
attachment.php


See how both the arms are pointing down in AZ73's picture? That's the column shift way. For floor shift, both the arms have to point up.

The hole in the floor for a floor shifter can end up pretty big and the cross body brace channel gets cut too. That's why the fiberglass shifter base cover is so big, it has to cover over a massive hole in the transmission tunnel.
 

AZ73

Contributor
Bronco Guru
Joined
Mar 28, 2012
Messages
3,542
The only way you're going to get clearance is a body lift or cut a larger hole in the floor. PO probably didn't want to do that so they lived with 1/R backwards. Here's and example of the Hurst kit from TBP.

http://www.tomsbroncoparts.com/prod...d-bronco-new?gclid=CLjRqb-j37YCFadxQgodBE4A9g

See how it comes with a new tunnel cover to give you the room. That's the piece you're missing. But you can just make one out of a piece of sheet metal. They sell 1 square foot pieces at Home Depot. You can use a cut-off wheel to cut the hole in the tunnel, and to cut your new piece. Cut the SMALLEST hole you can get away with because it's tough to add more material if you make it too big. If you don't have a welder, use 3/4 inch #8 sheet metal screws to attach your new cover. I prefer the hex head ones more than the phillips head.

Here's a pix with one installed

http://classicbroncos.com/forums/showthread.php?t=161553&highlight=hurst+speed+install
 
Last edited:
OP
OP
Rmally

Rmally

Full Member
Joined
Mar 11, 2013
Messages
166
Loc.
Knoxville, TN
Thanks for all the assistance.

Heres a few more pictures.......in picture 4 can you see where the linkage would bind or basically not fit. Is that where you would need to cut to make this work? Thats why I couldn't flip the tab, there was just no room for the linkage arm.

Thanks again.
 

Attachments

  • 1.jpg
    1.jpg
    184.6 KB · Views: 48
  • 2.jpg
    2.jpg
    85.1 KB · Views: 46
  • 3.jpg
    3.jpg
    273.8 KB · Views: 45
  • 4.jpg
    4.jpg
    77.3 KB · Views: 58

AZ73

Contributor
Bronco Guru
Joined
Mar 28, 2012
Messages
3,542
It seems to me the PO just put the new cover on the tunnel without cutting underneath it. Take the cover off that's bolted to your tunnel, and cut your tunnel to give you the room, then screw the cover back on. Limit how much you cut from the floor cross brace, only as much as you need. Again, less is better as you can always take a little more off. Too much at once and it's tough to repair.
 
OP
OP
Rmally

Rmally

Full Member
Joined
Mar 11, 2013
Messages
166
Loc.
Knoxville, TN
Ok.....so I got the covers off and here's what I have.

Does it look like I need to do some cutting to make this switch?

Thanks for any help.

Randy
 

Attachments

  • shifter 005.jpg
    shifter 005.jpg
    66.1 KB · Views: 34
  • shifter 007.jpg
    shifter 007.jpg
    178.9 KB · Views: 39
  • shifter 008.jpg
    shifter 008.jpg
    134.1 KB · Views: 38
  • shifter 001.jpg
    shifter 001.jpg
    96.8 KB · Views: 41
  • shifter 003.jpg
    shifter 003.jpg
    125 KB · Views: 46

thegreatjustino

Contributor
Red Head Grease Monkey
Joined
Jan 23, 2002
Messages
15,716
Loc.
Stockton, CA
You need the tab facing down flipped up like I show in my pictures in the post above yours. You should not have to cut anything to do this. In my pics, I have a 3" body lift, but the floor shift conversion was done long before the body lift and worked fine with stock body mounts.
 
OP
OP
Rmally

Rmally

Full Member
Joined
Mar 11, 2013
Messages
166
Loc.
Knoxville, TN
OK, earlier when I tried before the covers were off the rod would bind when I flipped the tab. I will get back out there and try it again....maybe I can see better with the covers off.
 
OP
OP
Rmally

Rmally

Full Member
Joined
Mar 11, 2013
Messages
166
Loc.
Knoxville, TN
Hmmm, still wont work.

Could I have the wrong linkage?

Here's a picture of my problem. No matter how I turn or move it, it will simply not go that way because it hits the body and will hit the other linkage bar.

Am I hosed?
 

Attachments

  • 1.JPG
    1.JPG
    236.4 KB · Views: 27
  • 2.JPG
    2.JPG
    143.1 KB · Views: 25

Viperwolf1

Contributor
electron whisperer
Joined
Aug 23, 2007
Messages
24,326
It seems to me the PO just put the new cover on the tunnel without cutting underneath it. Take the cover off that's bolted to your tunnel, and cut your tunnel to give you the room, then screw the cover back on. Limit how much you cut from the floor cross brace, only as much as you need. Again, less is better as you can always take a little more off. Too much at once and it's tough to repair.

You didn't read this.
 
OP
OP
Rmally

Rmally

Full Member
Joined
Mar 11, 2013
Messages
166
Loc.
Knoxville, TN
Viperwolf1,

I did read this but thinking I'm not speaking the same language....;D

I thought you meant removing the shifter cover from the cabin....are you talking about underneath the rig?

Is this what I need to cut? See pic.......if so it will have to go back pretty far, do they make a cover that will surround it?

I admit it, I'm a 47 year old rookie mechanic.
 

Attachments

  • 1.JPG
    1.JPG
    180.2 KB · Views: 25
  • 2.JPG
    2.JPG
    111.8 KB · Views: 21
  • 3.JPG
    3.JPG
    189.9 KB · Views: 20

Viperwolf1

Contributor
electron whisperer
Joined
Aug 23, 2007
Messages
24,326
Yes, that brace is in the way. Either trim the brace (not floor sheet) or think about doing a body lift.
 
Top