• Welcome to ClassicBroncos! - You are currently viewing the forums as a GUEST. To take advantage of all the site features, please take a moment to register. It's fast, simple and absolutely free. So please join our community today!
    If you have problems registering or can't log into your account, please contact Admin.

Pebbles: 1 Family Mostly Stock 68 Build

OP
OP
chuckyb

chuckyb

Contributor
Sr. Member
Joined
Oct 25, 2016
Messages
941
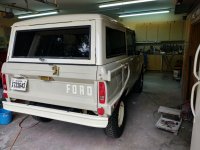
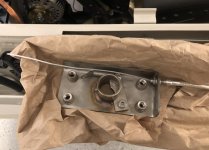
BC Bronco SS Remote Hood Latch

As mentioned, the AC condenser placement required either major cutting of the radiator core, or getting rid of the factory hood latch. I opted to get rid of the factory hood latch. I read positive feedback on the BC Broncos hood latch and gave them a call. As it turns out they were just developing a stainless steel version and I think I may have got the first one. They also have developed a release handle that matches the factory knobs. I had a hard time finding pictures of the remote latch so I have posted some here.

This is a little tricky to install. I had to remove the inner cable from the housing in order to install it through the dash. Then it was a real pain to “rethread”. The grill needed to come off to install and I needed to cut out the piece of sheet metal that retains the factory nuts that are used for the factory latch. The grill needed to be reinstalled loosely in order to feed the cable into the latch and secure it. Very close quarters with the condenser and safety catch but everything fits - barely. It took a bit of adjustment to line everything up but it works great. As you can see, I tried to keep with the factory look by installing the release above the choke and throttle cables.

Overall this is a real nice piece that I would recommend. BC Broncos was great to work with and figured out a solution for me when I explained I wanted to install it in the dash. They normally provide an underdash bracket and also thought that I may be the first one installing into the dash.

Next up is to troubleshoot some light and blinker issues and move on to getting the rest of the AC installed.
 

Attachments

  • 6721F456-AD34-409E-BEF7-10246E08D87D.jpg
    6721F456-AD34-409E-BEF7-10246E08D87D.jpg
    105.6 KB · Views: 77
  • 68AED81C-7339-429E-AD8F-FB8570D3B5EF.jpg
    68AED81C-7339-429E-AD8F-FB8570D3B5EF.jpg
    76.7 KB · Views: 75
  • F04F6138-EA4C-4F5C-9F90-B59319BE78F3.jpg
    F04F6138-EA4C-4F5C-9F90-B59319BE78F3.jpg
    58.3 KB · Views: 78
  • E84F4096-CBA3-4D6F-9E44-059C64CE2F0B.jpg
    E84F4096-CBA3-4D6F-9E44-059C64CE2F0B.jpg
    56.1 KB · Views: 79
  • 900FA05A-3493-471C-91B3-2896F7B56038.jpg
    900FA05A-3493-471C-91B3-2896F7B56038.jpg
    79 KB · Views: 100
OP
OP
chuckyb

chuckyb

Contributor
Sr. Member
Joined
Oct 25, 2016
Messages
941
Off the jack stands

I’ve gotten all the Centech gremlins gone and the AC installed. Brakes are also done. Wheels have been powder coated and new BFG AT 30 x 9.5. Steering column is all rebuilt and linkage for 3 speed and transfer case is done. It seems about ready to start although I still do have work to do on the Rancho Overdrive. Next step is to get some exhaust underneath.
 

Attachments

  • 0CDCE806-6BE3-44A1-BFD4-DF0EAD9D6457.jpg
    0CDCE806-6BE3-44A1-BFD4-DF0EAD9D6457.jpg
    99.8 KB · Views: 129
  • F96EFB9C-ADF3-4C41-A014-7A39FE7C00B8.jpg
    F96EFB9C-ADF3-4C41-A014-7A39FE7C00B8.jpg
    117.5 KB · Views: 132
  • 7DF54F47-D9B4-41E9-81E7-1EDB80C18586.jpg
    7DF54F47-D9B4-41E9-81E7-1EDB80C18586.jpg
    81.8 KB · Views: 118
  • 2072C09E-F3BA-4648-9B67-1B2F4EB5022F.jpg
    2072C09E-F3BA-4648-9B67-1B2F4EB5022F.jpg
    98.1 KB · Views: 95
  • FA2AF479-7075-4775-A3CC-DBA0393721F7.jpg
    FA2AF479-7075-4775-A3CC-DBA0393721F7.jpg
    85.9 KB · Views: 97
  • 7ACFB615-3A06-4A23-87F2-17A04D843067.jpg
    7ACFB615-3A06-4A23-87F2-17A04D843067.jpg
    140.6 KB · Views: 109
  • 0FAF1F29-0D15-4F6C-AF4F-4D91E7E5339C.jpg
    0FAF1F29-0D15-4F6C-AF4F-4D91E7E5339C.jpg
    115.1 KB · Views: 127
OP
OP
chuckyb

chuckyb

Contributor
Sr. Member
Joined
Oct 25, 2016
Messages
941
289 Heat Riser

Thank you Super Dave and Pebble Beige Brother Greenbug. I also meant to post pics for the folks running 289’s and needing to replace a missing heat riser. I purchased the 67 Mustang kind from one of the Mustang vendors. It did not fit right on my 289 with stock exhaust and air cleaner.

After closer examination of my shop manual I found another on eBay that DID fit. It was sold as a 66 Mustang part but I suspect this is incorrect. Anyway, the blasted one on the left of the pic is correct and fits perfectly. It has noticeably much less of a bend as it routes upward toward the air cleaner. Hopefully this helps someone out.
 

Attachments

  • 58CB0660-B814-4FE6-86D3-0EEA465929C2.jpg
    58CB0660-B814-4FE6-86D3-0EEA465929C2.jpg
    75.9 KB · Views: 54
  • 696C7743-BAE2-4F2C-87A4-7697517E1575.jpg
    696C7743-BAE2-4F2C-87A4-7697517E1575.jpg
    107.5 KB · Views: 43
OP
OP
chuckyb

chuckyb

Contributor
Sr. Member
Joined
Oct 25, 2016
Messages
941
She runs!

We trailered her over to our favorite local mechanic who specializes in exhaust. He’s a Vietnam vet and it’s a family business and it’s always been the plan to bring it to him at this point in the project. He installed the exhaust system and installed the Sears Muzzler muffler that my grandfather bought but never installed. Per his recommendation, I had him install a catalytic converter. There were two 78-79 Broncos at the shop that day so Pebbles had good company.

We trailered her back same day which was Friday before Father’s Day. My Dad came over on Father’s Day and along with my son, we started her up. It would initially start but not stay running. We determined that I had missed connecting one of the Centech ignition wires to the coil. After we got that straightened out, it ran nicely and we followed the engine break-in procedure. This was first start in 20 years so to have it be a family event probably best Father’s Day ever. Seems to be a little louder than I had hoped - maybe it’s the Muzzler.

I’ve run into some complications with the Rancho Overdrive, specifically with the pinion angle, more details on that on my Rancho thread here.

https://classicbroncos.com/forums/showthread.php?p=3295227#post3295227

Unfortunately, alignment machine was broken at the exhaust specialist so currently have her at another local place getting the alignment set and also giving it a good lookover for safety’s sake to see what else I may have missed with my amateur work. Next step is to get her back to the body man for windows, weather stripping, paint touch ups etc.
 

Attachments

  • 266E96BB-29C9-4FD6-8C7D-7E2204FF4CEC.jpg
    266E96BB-29C9-4FD6-8C7D-7E2204FF4CEC.jpg
    47.7 KB · Views: 64
  • FD0859E0-500F-4EB6-B564-8033E0EF2441.jpg
    FD0859E0-500F-4EB6-B564-8033E0EF2441.jpg
    80.1 KB · Views: 78
  • 950F6167-147E-4753-A0D5-A3091518F6DC.jpg
    950F6167-147E-4753-A0D5-A3091518F6DC.jpg
    67.3 KB · Views: 79
  • 754AE44F-BE35-42AC-9014-4095AC9F9C0F.jpg
    754AE44F-BE35-42AC-9014-4095AC9F9C0F.jpg
    145.2 KB · Views: 70
  • D31749FB-4C18-4257-A6CE-039D7CB3B02F.jpg
    D31749FB-4C18-4257-A6CE-039D7CB3B02F.jpg
    117.2 KB · Views: 66
OP
OP
chuckyb

chuckyb

Contributor
Sr. Member
Joined
Oct 25, 2016
Messages
941
Alignment Report

Hi all, how happy should I be with my alignment report? I did not look at it closely til I got home, but feeling like the final measurements should be more symmetrical. Turns out I had a broken PCV valve, it is running quieter now. The AC charged, now just need some windows and insulation to keep the cold air in :)
 

Attachments

  • 24BC34B0-EDA3-4BAD-9747-6C514B1798E0.jpg
    24BC34B0-EDA3-4BAD-9747-6C514B1798E0.jpg
    107.1 KB · Views: 31

lgdpt

Sr. Member
Joined
Sep 1, 2012
Messages
396
Nice Chuck! You are so close!

Im almost done with my wiring. Slowly moving along....
 

904Bronco

Contributor
Bronco Guru
Joined
Sep 28, 2004
Messages
5,769
Loc.
San Martin, CA
Sears Muzzler... A blast from my past. I use to install those back in the early 80's.

I think they lost their ass with the lifetime warranty, not that it works now.

Nice work there Sir, just the little bits and pieces left.
 
OP
OP
chuckyb

chuckyb

Contributor
Sr. Member
Joined
Oct 25, 2016
Messages
941
Recent progress

The Bronco is back in the stable after a three week stay with the master body man. There were some paint touch ups and he put the roof windows back in, installed the bumpers, weatherstripping along with adding badges, reflectors and windshield latch for the hood.

I’ve since added the floor and roof insulation, replaced a lot of the worn out throttle linkage, finished off the wipers and started to prep for adding the roll cage and three point belts.

I ordered the new Dennis Carpenter Sport floor mats - rear is received and looks and fits great, along with providing that new car smell! Front mat is on back order along with TBP premium seats.

Next up is DMV inspection, hopefully this week. We are planning on removing the roof this weekend and putting the cage in place.
 

Attachments

  • 71BF9CE0-2131-4D18-813A-89031BD1EE9B.jpg
    71BF9CE0-2131-4D18-813A-89031BD1EE9B.jpg
    85.2 KB · Views: 77
  • F68782F2-E6DF-4254-9311-838B24442B85.jpg
    F68782F2-E6DF-4254-9311-838B24442B85.jpg
    57.5 KB · Views: 64
  • 6E193706-A782-4AF9-B57A-FB4281A21055.jpg
    6E193706-A782-4AF9-B57A-FB4281A21055.jpg
    120.1 KB · Views: 60
  • 42A24EB8-87E5-4461-8228-0043929EF3E5.jpg
    42A24EB8-87E5-4461-8228-0043929EF3E5.jpg
    95.7 KB · Views: 54
  • 992704B0-3881-4B35-B293-F61F4BFBF341.jpg
    992704B0-3881-4B35-B293-F61F4BFBF341.jpg
    101.3 KB · Views: 58
  • D7A56FBC-A61A-46BB-B16B-E02F2CE917A6.jpeg
    D7A56FBC-A61A-46BB-B16B-E02F2CE917A6.jpeg
    214.6 KB · Views: 54
  • 62935038-A786-4B48-B923-F37B1AB2AF50.jpeg
    62935038-A786-4B48-B923-F37B1AB2AF50.jpeg
    258 KB · Views: 58
  • 11B01110-7BE6-43D8-9EDE-0F52249405D3.jpg
    11B01110-7BE6-43D8-9EDE-0F52249405D3.jpg
    70.4 KB · Views: 57
OP
OP
chuckyb

chuckyb

Contributor
Sr. Member
Joined
Oct 25, 2016
Messages
941
Out and about

She’s got a license plate, new seat belts and a cage - some pictures from first 100 miles.
 

Attachments

  • DA62E647-593A-44B5-9695-F73E14CF5FC0.jpg
    DA62E647-593A-44B5-9695-F73E14CF5FC0.jpg
    149.3 KB · Views: 57
  • 7FDB0CF3-94DA-426B-A138-43FA00AD20F1.jpg
    7FDB0CF3-94DA-426B-A138-43FA00AD20F1.jpg
    193.9 KB · Views: 52
  • FEF59F90-3EC2-47CD-8F18-55A8326CFF8F.jpg
    FEF59F90-3EC2-47CD-8F18-55A8326CFF8F.jpg
    79.3 KB · Views: 58
  • 325CEE9B-D8B8-4CF7-B691-7786C6934900.jpg
    325CEE9B-D8B8-4CF7-B691-7786C6934900.jpg
    102.6 KB · Views: 56
  • C360CB82-D2F2-4C6B-904F-FE58C1C70A55.jpg
    C360CB82-D2F2-4C6B-904F-FE58C1C70A55.jpg
    116.3 KB · Views: 52
  • B33EAB11-2FA6-4EC5-9052-ACC06312BCF4.jpg
    B33EAB11-2FA6-4EC5-9052-ACC06312BCF4.jpg
    119.9 KB · Views: 53
OP
OP
chuckyb

chuckyb

Contributor
Sr. Member
Joined
Oct 25, 2016
Messages
941
Interior progress

No miles logged since November since the failure with the Rancho Overdrive, but I’m planning to get the new Rancho installed next week and then she will be back on the road. In the meantime, some progress on the interior. Dennis Carpenter sport floor mats and TBP Premium seats added. I also added a 66 style t-case shifter. Underneath I have swapped out two degree bushings for seven degree to help with handling.


I included a pic of the stable after receiving the new license plate. I found Galaxie dog dish hubcaps which I plan on installing - not my idea the credit goes to some other members here.
 

Attachments

  • 525A3E7E-07DD-432C-AD2B-F87EA8DEEBE5.jpg
    525A3E7E-07DD-432C-AD2B-F87EA8DEEBE5.jpg
    80.6 KB · Views: 76
  • 5B0F50FC-42FF-4AFA-BFBB-C84BB5193E0F.jpg
    5B0F50FC-42FF-4AFA-BFBB-C84BB5193E0F.jpg
    55.3 KB · Views: 77
  • 988B7C12-BA23-40DA-B6E3-501CDD0DFC84.jpg
    988B7C12-BA23-40DA-B6E3-501CDD0DFC84.jpg
    65.2 KB · Views: 73
  • 6789CCB4-9AFF-4438-8A81-AFE870D9F94F.jpg
    6789CCB4-9AFF-4438-8A81-AFE870D9F94F.jpg
    55.2 KB · Views: 75
  • 83A24C33-EAD0-4F90-9137-85A4F667AA77.jpg
    83A24C33-EAD0-4F90-9137-85A4F667AA77.jpg
    82.2 KB · Views: 81
  • 975D41A9-5DB0-416B-8A8C-061F897D2938.jpg
    975D41A9-5DB0-416B-8A8C-061F897D2938.jpg
    67 KB · Views: 76
  • FECFE4D1-7B99-487F-ADB8-A5F337B0560C.jpg
    FECFE4D1-7B99-487F-ADB8-A5F337B0560C.jpg
    82.2 KB · Views: 88
  • 5926FB9D-A7FE-4F2B-9777-2FC9D297CC05.jpg
    5926FB9D-A7FE-4F2B-9777-2FC9D297CC05.jpg
    155.3 KB · Views: 82
Top