• Just a reminder that you won't be able to start new posts or reply to existings posts in the Archive forum.

    This is where all the old posts go so they can still be used for reference and searched.
  • Welcome to ClassicBroncos! - You are currently viewing the forums as a GUEST. To take advantage of all the site features, please take a moment to register. It's fast, simple and absolutely free. So please join our community today!
    If you have problems registering or can't log into your account, please contact Admin.

74 Bronco Redoux....The home stretch!

casadejohnson

Bronco Alchemist
Joined
Jan 21, 2005
Messages
3,587
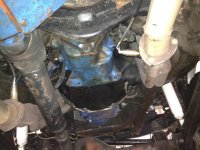
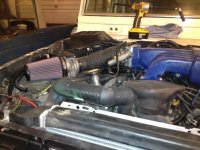
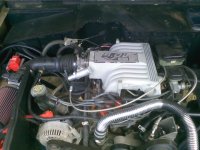
I'm looking for under the hood photos of engine bays with EFI. I'm pulling my engine in the 74 pretty quick for a makeover and converting to a C4 at the same time. Its currently a spaghetti of hoses and wires and I want to get it looking a little better. Also looking to repaint the engine bay while I'm at it. In my less than brilliant younger years, I painted it rattle can semi gloss black. Thinking of taking it back to white but I'm not sure I want to break out the spray gun to do a base clear on it. I did that on my 66 and it was more work than I expected so any ideas in that department would also be appreciated as well.

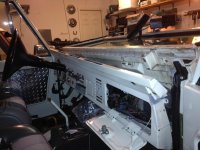
I didn't see that we already had an EFI engine bay upgrade thread so I'm changing this to my C4 upgrade thread. Viperwolf has assembled a Bronco C4 for me to replace my 3 speed and recently fried clutch. While its apart I'm planning to do the following upgrades.

Twin sticks
New dana 20 seals
Auto tilt column
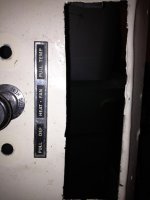
Dash - I'm moving the glove box over to clear future family cage
Repaint engine bay
fix engine leaks
 
Last edited:

Gas Pig

Contributor
Bronco Guru
Joined
Oct 19, 2005
Messages
2,690
efi engine bay pics

Hey here is my old 72 efi pics. Sorry the engine bay was a bit dirty :p when I shot the photos!
 

Attachments

  • DSCN0527.jpg
    DSCN0527.jpg
    103.8 KB · Views: 117
  • DSCN0526.jpg
    DSCN0526.jpg
    86.8 KB · Views: 114
  • DSCN0525.jpg
    DSCN0525.jpg
    101.4 KB · Views: 120
  • DSCN0524.jpg
    DSCN0524.jpg
    121.8 KB · Views: 124
  • DSCN0523.jpg
    DSCN0523.jpg
    116.8 KB · Views: 140
OP
OP
casadejohnson

casadejohnson

Bronco Alchemist
Joined
Jan 21, 2005
Messages
3,587
Here is what I'm starting with.

Started doing a few things this afternoon. I cleaned up the garage a bit to make room for parts. I pulled the drive shafts out and drained the transfer case fluids. I also started on getting the windshield unbolted so I can drop it down for the dash removal. I had my fingers crossed that I would only have to remove the bolts at the windshield frame to get it down but it looks like I'll have to unbolt the whole damn top. to get it down. That means I have to remove the rear interior panels to get it done. I'm barely getting started and its already starting to snowball on me. I hope to have it all out this weekend but we will see how it goes. I need to grab another harbor freight engine stand since my 170 from my 66 is now permanently attached to my old one.

And so it begins ......again.
 

Attachments

  • IMG_0155.jpg
    IMG_0155.jpg
    77.2 KB · Views: 87
  • IMG_0154.jpg
    IMG_0154.jpg
    70.5 KB · Views: 88
  • IMG_0153.jpg
    IMG_0153.jpg
    57.9 KB · Views: 90
  • IMG_0152.jpg
    IMG_0152.jpg
    99.7 KB · Views: 111
  • IMG_0150.jpg
    IMG_0150.jpg
    96.7 KB · Views: 113
  • IMG_0149.jpg
    IMG_0149.jpg
    99.3 KB · Views: 119
  • IMG_0148.jpg
    IMG_0148.jpg
    115.9 KB · Views: 103
  • IMG_0147.jpg
    IMG_0147.jpg
    106.9 KB · Views: 101
OP
OP
casadejohnson

casadejohnson

Bronco Alchemist
Joined
Jan 21, 2005
Messages
3,587
Well, the 153 bolts on the top are out and he windshield is folded down! Its been a few years since its been down so the hinge is a little stiff. The dash is unbolted but I still need to pull al of the dash knobs, swathes and cables to get it out. Hope to have it out tomorrow after work.
 

Attachments

  • IMG_0159.jpg
    IMG_0159.jpg
    110.7 KB · Views: 61
  • IMG_0158.jpg
    IMG_0158.jpg
    85.9 KB · Views: 54
  • IMG_0160.jpg
    IMG_0160.jpg
    97.3 KB · Views: 62
  • IMG_0161.jpg
    IMG_0161.jpg
    71.6 KB · Views: 52
OP
OP
casadejohnson

casadejohnson

Bronco Alchemist
Joined
Jan 21, 2005
Messages
3,587
The dash and steering column are out. I'm considering getting my dash mods done and fixing 38 years of wiring hack jobs ( Many of them mine ) before I pull the engine and transmission. We'll see:) The radio hole in the dash is getting welded shut in favor of a console mounted stereo. I'll also be moving the glove box over to clear the future roll cage. Also does anyone make the light bezels for the dash? My "Lights" / "Wipe Wash" bezel is all crappy looking and its going to look worse once the dash is painted. I looked at the vendor web sights and couldn't find them. The Bronco is painted White and Legend Lime and the interior is currently all white. I'm thinking of painting the dash Legend lime. Good idea or should I stick with white?
 

Attachments

  • IMG_0172.jpg
    IMG_0172.jpg
    62.8 KB · Views: 50
  • IMG_0171.jpg
    IMG_0171.jpg
    70 KB · Views: 58
  • IMG_0169.jpg
    IMG_0169.jpg
    49.2 KB · Views: 57
  • IMG_0167.jpg
    IMG_0167.jpg
    84.9 KB · Views: 60
  • IMG_0164.jpg
    IMG_0164.jpg
    136.1 KB · Views: 66
  • IMG_0163.jpg
    IMG_0163.jpg
    121 KB · Views: 63
  • IMG_4957.jpg
    IMG_4957.jpg
    79.6 KB · Views: 123

Viperwolf1

Contributor
electron whisperer
Joined
Aug 23, 2007
Messages
24,326
Damn Jeremy, you sure put a lot of work into a trans swap.

I don't think anyone makes the bezels. You might be able to remove them and straighten/polish them. Lime would look good on the dash.
 
OP
OP
casadejohnson

casadejohnson

Bronco Alchemist
Joined
Jan 21, 2005
Messages
3,587
Damn Jeremy, you sure put a lot of work into a trans swap.

I don't think anyone makes the bezels. You might be able to remove them and straighten/polish them. Lime would look good on the dash.

I know, I'm an idiot! I make everything about twice as hard as I should. I justified the dash mods because the column has to come out anyway. I forgot how much work a dash is to get out. You would think I would remember since I did the same damn thing to the 66 a few months ago!
 
OP
OP
casadejohnson

casadejohnson

Bronco Alchemist
Joined
Jan 21, 2005
Messages
3,587
Moving along slowly.

Yanked the front clip off with the help of my "assistant" he actually slows the progress down but that ok, I'm just glad he is interested. Hope to have the D20 and the 3 speed on the floor this evening. Maybe the engine as well if my ambition holds out.

Also have a little issue with the cowl, looks like it had some water in there. These are open on my 66 is that the way it should be? On this one they were closed up with seam sealer.

one more thing if you don't have a cordless impact, buy one! It cuts the work in half!
 

Attachments

  • IMG_0187.jpg
    IMG_0187.jpg
    76.1 KB · Views: 58
  • IMG_0183.jpg
    IMG_0183.jpg
    68.8 KB · Views: 60
  • IMG_0182.jpg
    IMG_0182.jpg
    81 KB · Views: 59
  • IMG_0180.jpg
    IMG_0180.jpg
    100.2 KB · Views: 62
  • IMG_0115.jpg
    IMG_0115.jpg
    71.7 KB · Views: 54
  • IMG_0185.jpg
    IMG_0185.jpg
    78.9 KB · Views: 57
  • IMG_0186.jpg
    IMG_0186.jpg
    112.6 KB · Views: 60
OP
OP
casadejohnson

casadejohnson

Bronco Alchemist
Joined
Jan 21, 2005
Messages
3,587
Transmission and transfer case are on the floor! Looks like I did a bit more than frag out a throw out bearing. The clips on the bearing are broken off and the tube on the input bearing retainer is broken completely off. It would be a major problem if I wasn't replacing it with a c4 anyway.;D I had a clutch and pressure plate come apart on me completely a few years back. I'm guessing that the tube was cracked at that time and just took some time to come apart completely.
 

Attachments

  • IMG_0188.jpg
    IMG_0188.jpg
    80.5 KB · Views: 18
  • IMG_0190.jpg
    IMG_0190.jpg
    72.2 KB · Views: 21
  • IMG_0192.jpg
    IMG_0192.jpg
    45.7 KB · Views: 20
OP
OP
casadejohnson

casadejohnson

Bronco Alchemist
Joined
Jan 21, 2005
Messages
3,587
Got a a good chunk of progress made in the last few days. I pulled the engine a few days ago and started cleaning up the engine bay to be painted. I also started in on the dash, I flip flopped the the speaker grill and the glove box so it can be opened once I get the cage in. I'm not even actually putting in a glove box just my fuse box, ECM and my fuel pump switch will be located in there. The dash still needs some body work but I'm happy with it so far. On Sat., I met with my friends from Colorado Classic Broncos and picked up my shiny new "Viper Built" C4 from Phil. It looks SO NICE that I now have to clean and paint all of the rest of my drivetrain so it doesn't look out of place next to the new Transmission!
 

Attachments

  • IMG_0166.jpg
    IMG_0166.jpg
    79.7 KB · Views: 25
  • IMG_0209.jpg
    IMG_0209.jpg
    120.7 KB · Views: 24
  • IMG_0214.jpg
    IMG_0214.jpg
    75.2 KB · Views: 26
  • IMG_0215.jpg
    IMG_0215.jpg
    86.3 KB · Views: 28
  • IMG_0219.jpg
    IMG_0219.jpg
    95.9 KB · Views: 29
  • IMG_0231.jpg
    IMG_0231.jpg
    96.4 KB · Views: 47
  • IMG_0228.jpg
    IMG_0228.jpg
    76.1 KB · Views: 31
  • IMG_0227.jpg
    IMG_0227.jpg
    90.8 KB · Views: 32
  • IMG_0223.jpg
    IMG_0223.jpg
    100.5 KB · Views: 29
OP
OP
casadejohnson

casadejohnson

Bronco Alchemist
Joined
Jan 21, 2005
Messages
3,587
Well after hours of sanding and chemical persuasion, I have cleaned up the engine bay pretty well. At least all of the oil and grease has been removed so new paint will stick! Now I just have to relocate my hydroboost and I'll be ready to start priming and painting. Progress is slower than I would like but its moving along.
 

Attachments

  • IMG_0245.jpg
    IMG_0245.jpg
    87.1 KB · Views: 59
  • IMG_0240.jpg
    IMG_0240.jpg
    97.4 KB · Views: 53
OP
OP
casadejohnson

casadejohnson

Bronco Alchemist
Joined
Jan 21, 2005
Messages
3,587
Almost forgot about this, When i originally built my dual return reservoir for my power steering and my hydroboost I had a leak at one of the fittings and it was rubbing slightly against the hood so I chopped it up and redesigned it a little today. This time I sloped the front corner down where the interference with the hood was. I also tapped for the fittings and soldered them in so I hope it does not leak this time. It would be nice if I had steal fittings that I could just weld in but this will have to do. A little paint and it came out pretty good.
 

Attachments

  • IMG_0247.jpg
    IMG_0247.jpg
    99.9 KB · Views: 35
  • IMG_0248.jpg
    IMG_0248.jpg
    70.6 KB · Views: 36
  • IMG_0246.jpg
    IMG_0246.jpg
    87.8 KB · Views: 43

JefeAZ

Bronco Guru
Joined
Aug 23, 2011
Messages
3,038
Loc.
Tucson
Any more pics of the exterior during the day? Dad likes your paint scheme a lot! Name of the green?
 
OP
OP
casadejohnson

casadejohnson

Bronco Alchemist
Joined
Jan 21, 2005
Messages
3,587
sure, here are a few from the day time. The green is Lime Gold AKA Legend lime It was a 67 Mustang color that they brought back in 2008 or so for the new mustangs. I used the paint code from the early mustangs but I think they are the same. I'm actually going to paint my intake that is now blue the same color. I'm also seriously considering painting the dash that color as well while its out.
 

Attachments

  • IMG_2810.jpg
    IMG_2810.jpg
    90.9 KB · Views: 54
  • 100_4041.jpg
    100_4041.jpg
    85.2 KB · Views: 57
  • 100_2597.jpg
    100_2597.jpg
    89.5 KB · Views: 63
  • IMG_5032.jpeg
    IMG_5032.jpeg
    25.9 KB · Views: 69
Top