


Community
Message Forum
Photo Gallery
Event Calendar
Book Reviews
Bronco Wallpaper
Bronco FAQ
Link Back to CB!
Photo Gallery
Event Calendar
Book Reviews
Bronco Wallpaper
Bronco FAQ
Link Back to CB!
Buy / Sell


Bronco Tech
3 Arm Wiper Setup
Fix Motor Mount
Roll Cage Braces
Throttle Body 65mm
Wheel Alignment
Heat Riser Replacement
Vent Window Repair
Center Console Mount
Straighten Bumper
Ford 6R80 6 spd
More Tech...
Fix Motor Mount
Roll Cage Braces
Throttle Body 65mm
Wheel Alignment
Heat Riser Replacement
Vent Window Repair
Center Console Mount
Straighten Bumper
Ford 6R80 6 spd
More Tech...

Install the app
-
Welcome to ClassicBroncos! - You are currently viewing the forums as a GUEST. To take advantage of all the site features, please take a moment to register. It's fast, simple and absolutely free. So please join our community today!If you have problems registering or can't log into your account, please contact Admin.
You are using an out of date browser. It may not display this or other websites correctly.
You should upgrade or use an alternative browser.
You should upgrade or use an alternative browser.
1969 4BD1T Diesel & NV4500 conversion on 33's
- Thread starter BradtheWelder
- Start date
big a
Full Member
What! You bought a window frame. You've built everything else from scratch.
HAHAHAHAHA, so true... You've disappointed us all Brad!

JK!!!!
-Andy
big a
Full Member
Oh, btw, I just clicked on your other thread about that frame. Man, that sux, but I was referring to the cowling when I was talking about a bow and not the actual frame, but glad you checked that frame as well. My cowling was bowed into the cab 1/4" and I had to cut out the windshield pad on the cowling and move them out a bit to get the bolt to line up on the driver's side. This won't show as the windshield hinge and hood will hide it from the outside and the dash will hide it from the inside. It still bother's me, so when I get back in there I'm gonna fix it. I'll either push it out and try to fix it that way, or I'll just cut it and weld it back up. Not sure yet though.
The hassle of returning it to get another wasn't worth it to me, so I just burned it in and figured I'd deal with it later. Now, had I need the actual frame, I'd have done the same as you and returned it!!!
-Andy
The hassle of returning it to get another wasn't worth it to me, so I just burned it in and figured I'd deal with it later. Now, had I need the actual frame, I'd have done the same as you and returned it!!!
-Andy
OP
OP
BradtheWelder
Full Member
What! You bought a window frame. You've built everything else from scratch.
HAHAHAHAHA, so true... You've disappointed us all Brad!
JK!!!!
-Andy
I got too much other things to work on to make one of those! HAHAHA
The vendor was understanding with my problem when I showed him the pictures. They even sent the new windshield frame when they seen the bent frame was picked up.
So I thought that was very cool of them. I did not have to pay for shipping it back either.big a
Full Member
Well, that's good! Oh, and I completely understand! have to draw the line somewhere or the project will never get finished!
-Andy
-Andy
OP
OP
BradtheWelder
Full Member
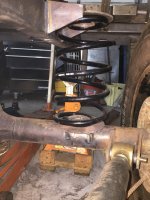
Got the rear coils mounted tonight but not fully welded in. I can do that later whenever I take the axle back out. They're welded enough to put weight on them. Simple design nothing fancy. They will be bolted in later also.
Attachments

Last edited:
OP
OP
BradtheWelder
Full Member
I have been working on the bronco but getting that windshield frame was driving me crazy due to some shifting while the firewall was cut out. I have off work tomorrow so hopefully I will get it right and start working on the firewall.
The windshield frame was making me mad so I wanted to work on something else. So I decided to work on motor mounts. The old ones I made were not pretty and I just wasn't happy with them. They were made from the ones that came on the engine when I removed them from the NPR. I decided to remake them and turned out much better. I might reinforce them a little more but you get the picture. It was very tight fit.
Here's a little fabrication trick I'll pass along, when need to make a bend in thicker metal. You cut through most of the way through then put the part in a vise and can either use a hammer or bend it by hand if cut it enough. Then once you get it where you want it you weld up the cuts you made.
Attachments


Last edited:
big a
Full Member
Oh man, those new engine mounts look awesome!!!!!!!!!!!!!!!!!!
OP
OP
BradtheWelder
Full Member
I almost didn't post a pic of the old engine mounts. I was a little embarrassed with the old ones but I feel like I redeemed myself with the new ones.
big a
Full Member
Lol!!!!!
OP
OP
BradtheWelder
Full Member
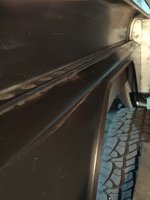
I had an exrtemely hard time with getting all the door gaps and hood gaps but I finally got it. Body lines are lined up very nicely and there is no rachet straps hold anything. Sweet success tonight. The hood is attached to the original two places from the stock cowl points with a new plate around them. It's not fully welded yet but that's the easy part. I'm not going to weld it until I get the firewall in so it will have enough reinforcement to minimize distortion. I'm starting to see the light and the end of the tunnel for the body work anyway. Then I can get on the easier stuff soon.
My after market turbo came in today
Gonna try to get 200 horse or more.
This weekend I will hopefully get the passenger striker panel on and get it to latch,maybe even get some of the firewall put together.
My after market turbo came in today
Gonna try to get 200 horse or more.
This weekend I will hopefully get the passenger striker panel on and get it to latch,maybe even get some of the firewall put together.
Attachments


Last edited:
OP
OP
BradtheWelder
Full Member

OP
OP
BradtheWelder
Full Member
Didn't get to work on the bronco as much as I wanted to this weekend. My brother needed help with his project. That's alright, he's me plenty of times. I did get the passenger striker panel welded in along with the inner rear fender. Pretty happy with it.
Attachments


Last edited:
big a
Full Member
Cool! I have to replace those striker panels on mine too. So, what sort of turbo is that?
-Andy
-Andy
OP
OP
BradtheWelder
Full Member
Cool! I have to replace those striker panels on mine too. So, what sort of turbo is that?
-Andy
It's the Holset hx30 super. Guys on 4btswaps.com with this turbo are reporting boost pressures at 35 psi at 2000 rpms. That should be a good amount of power for this little rig.
broncosbybart
Bronco Guru
- Joined
- Mar 13, 2002
- Messages
- 2,644
Should be a great turbo, based on what I've heard. Love the progress. Great work!
big a
Full Member
It's the Holset hx30 super. Guys on 4btswaps.com with this turbo are reporting boost pressures at 35 psi at 2000 rpms. That should be a good amount of power for this little rig.
Yeah, seems like a great turbo! I read about it just a bit ago over on this thread: http://forum.ih8mud.com/threads/target-carrier.796065/page-58
Very cool!!!!
-Andy
OP
OP
BradtheWelder
Full Member
Holy crap. You've replaced every piece of tin now. Great work.
Yeah never would of guessed in the beginning that it would of been this bad. I would of found a better Bronco if I had known. I should of called this thread the "2016 Bronco"
Similar threads
- Locked
City: Palm Springs
Price: $16500
- Replies
- 0
- Views
- 112
- Locked
City: Palm springs Ca 92262
Price: $13900
- Replies
- 6
- Views
- 432
City: Ogden, UT
Price: $5000
- Replies
- 2
- Views
- 634