• Welcome to ClassicBroncos! - You are currently viewing the forums as a GUEST. To take advantage of all the site features, please take a moment to register. It's fast, simple and absolutely free. So please join our community today!
    If you have problems registering or can't log into your account, please contact Admin.

Tom’s Steering Shaft Set Screw

OP
OP
N

NJBronk

Contributor
Full Member
Joined
Oct 11, 2022
Messages
216
The pic is misleading - must be a stock photo of a longer length. Mine are threaded all the way to the head.

Todd Z.
Awesome, thanks!

But ugh, I just noticed they're closed until April 29th... I really want to get her back on the road. Since I already have Grade 5 3/4" length drilled bolts I may try to find the longer one somewhere else for the DD shaft...
 
OP
OP
N

NJBronk

Contributor
Full Member
Joined
Oct 11, 2022
Messages
216
Are you people afraid of a tiny little drill?

Go get a 1/16 inch drill.
Put the bolt in a vise. Start drilling thru one flat. Go about 1/2 way.
Rotate the bolt 180 degrees, and start drilling thru the opposite flat. Go about 1/2 way.

If you are steady handed, the holes will align perfectly. If you are like me, the holes will be offset a bit, and will bite half of the drill bit, and break it off in the hole.

Do this about 5 times, and you will be an expert. A drill vise on a drill press will make you look like a hero. Grade 5 drills like butter.

(...I'd do it for you, but you won't learn anything by me doing the work. Besides, it's ONE hole!)
I mean sure, if you want to take the cheap and easy way out...
 

ba123

Contributor
Bronco Guru
Joined
Oct 29, 2022
Messages
1,753
Loc.
CA
Ben was the intended target of my wrath. He’s a good guy. PM would be welcome!

Ok, ok, I will redo it. I'll even drill my own holes. Will be nothing like the crap I had to deal with on drilling the Grade 9 3/4" bolts through the threads for pins! Head is easy peazy!

I had some conversations with @jamesroney about this and found some drilled Grade 8 bolts online that I purchased.

I'd recommend these:

https://drilledheadbolts.com/products/0-75-grade-8-drilled-head-bolt-5-16-18-x-3-4-10-pcs

I bought the 1" long versions and now I'm in the bolt-shortening business :). I changed out my first set screw last night and will gradually work through all of them. I'm planning to Loctite all the bolts in addition to using set screws and then safety wire them.

Todd Z.
Put EXTRA Loctite just for James. ;)
 

toddz69

Sponsor/Vendor
Bronco Guru
Joined
Nov 28, 2001
Messages
10,137
Ok, ok, I will redo it. I'll even drill my own holes. Will be nothing like the crap I had to deal with on drilling the Grade 9 3/4" bolts through the threads for pins! Head is easy peazy!


Put EXTRA Loctite just for James. ;)
Ha! I had a rather large bottle of the stuff here at the HQ - probably last as long as a large of Tabasco Sauce - I think I loaned it to my nephew and now it hasn't made it back yet. I found a small container in my fluids/adhesives coffee can a few nights ago and used that.

Got the safety wire kit from work so I can use that now too!

Todd Z.
 
OP
OP
N

NJBronk

Contributor
Full Member
Joined
Oct 11, 2022
Messages
216
So I’m struggling to get my column shifter working so haven’t put the steering shaft in yet, but I did start modifying the WH collapsible lower steering shaft and prep for the upper shaft and steering box connections.

First, I removed the existing set screws from the lower steering shaft u-joints, took it apart, and used a tap and air compressor to clean the old Loctite out. Then for the hollow DD I drilled a 1/4 hole in the flat (there was a divot drilled for the set screw, so easy to locate). I then put it back together with the other set screw holding it in place and ran a tap through the existing u-joint threads and tapped the DD shaft (did this assembled so the threads would line up between the two).

I then used the 3/4” drilled head bolt I had, along with some blue Loctite. I then replaced the other set screw with another 3/4” drilled head bolt with a grade 8 jam nut, again with blue Loctite. Then I safety wired the two together:

IMG_0979.jpeg

IMG_0980.jpeg

IMG_0981.jpeg

On the other end, it’s a solid rod, so on the flat I drilled just slightly deeper (maybe 1/8”) to give the bolt a bit more depth to bite into. I then used the same 3/4” bolts, jam nuts, and Loctite and then safety wired those together as well.

IMG_0983.jpeg

It’s not very pretty, but pretty sure that ain’t goin’ nowhere….

To prep for the upper shaft and steering box connections, which both have “valleys” in the splines, I ground/filed the bottom of two bolts to try to match the shape of the valley. These will get jam nuts, loctite, and safety wired to the shaft.

IMG_0975.jpeg

IMG_0977.jpeg

IMG_0978.jpeg
 

toddz69

Sponsor/Vendor
Bronco Guru
Joined
Nov 28, 2001
Messages
10,137
Looking good! Between a jam nut, loctite and safety wiring, I think you're in pretty good shape! Slowly working on mine as well.

Todd Z.
 
OP
OP
N

NJBronk

Contributor
Full Member
Joined
Oct 11, 2022
Messages
216
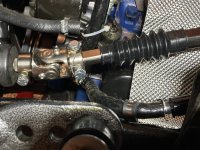
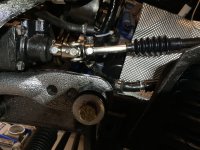
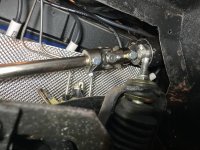
PSA: test-fit the lower shaft before securing everything with loctite and safety wire…. I finally got my rebuilt column in and there’s only about 1” of travel on the shaft, which won’t do much good in a collision….

I’ll have to cut both the inner and outer shafts. Cutting the bottom of the outer is no problem, but the inner shaft has a spring on the end that goes inside the outer shaft, so I’ll have to remove the u-joint (and all my work) to cut that end and re-do it…

IMG_1079.jpeg

The bolt holding the u-joint to the upper outer shaft is just grazing my hard brake line, so I’ll have to bend that away a bit.

IMG_1080.jpeg

Also of note, this part is much easier since I have the WH inner fender screens that I can remove…. Your mileage may vary with full inner fenders.

Hopefully Sunday I can finish this up…
 
OP
OP
N

NJBronk

Contributor
Full Member
Joined
Oct 11, 2022
Messages
216
I took 2” off both the inner and outer shafts, so now I have about 5” of the smaller shaft exposed and 6” extending inside the larger shaft. Bent the hard stainless brake line slightly to give 1/4”+ of clearance. Loctite, jam nuts, and safety tied everything. I think I can finally call this part done. Now just steering wheel back on, inner fender screen, and wheel/tire and I should be back on the road (until I decide to do my suspension)!

IMG_1081.jpeg

IMG_1082.jpeg

IMG_1083.jpeg

IMG_1084.jpeg
 
Top