• Welcome to ClassicBroncos! - You are currently viewing the forums as a GUEST. To take advantage of all the site features, please take a moment to register. It's fast, simple and absolutely free. So please join our community today!
    If you have problems registering or can't log into your account, please contact Admin.

Rear Drum brake rebuild, 1973 Ford Bronco truck

73azbronco

Contributor
Bronco Guru
Joined
Nov 11, 2007
Messages
7,839
Here is my rebuild DIY of a 1973 Ford Bronco rear drum brake.

I was unable to find any useful photos specific to the EB. Here is a link to a ranger rebuild that looks close, but not all the parts are the same:http://www.ranger-forums.com/f59/how-servicing-rear-drum-brakes-81906/

http://www.fordrangerforum.com/general-tech/1918-rear-drum-brake-photos-questions.html and

http://www.allfordmustangs.com/foru...2-drum-brake-springs-location-drum-brakes.jpg

http://image.mustangandfords.com/f/...mufp_16_z+brake_system+adjust_drum_brakes.jpg

These links are actually pretty good and I'll try to only mention bronco specific.

I also referenced a 1973 Ford truck shop manual.

Parts were bought from Wild Horses and included their parts kit, shoes, brake cylinders, parking brake cables. Yes, local stores have this stuff, but it was nice having it all together in one box.

The only part I had to run down was a washer for the parking brake lever (missing on mine) and I had to reuse the parking brake link or spreader bar spring, no big deal.

I needed to buy two drum brake spring tools and a brake grease packet, all for $14 at Checker.

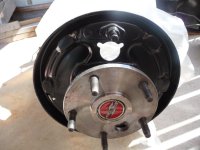
Here was my basic problem, usually when you do brakes you do one side at a time so you can compare what your doing with what your replacing. Well, when I got my rearend back from being totally rebuilt with ARB, 4.11 and Superior 31 spline axles, powdercoated, this is what it looked like:

I know others have made the same mistake, so here we go.
 

Attachments

  • P1000512.jpg
    P1000512.jpg
    74.2 KB · Views: 282
Last edited:
OP
OP
73azbronco

73azbronco

Contributor
Bronco Guru
Joined
Nov 11, 2007
Messages
7,839
First photo is the backing plate after economical use of brake grease on the backing plate tabs (six raised/flat spots on backing plate) where the side of the brake shoe ride and installation of new brake cylinder, one brake shoe pin is installed from the rear of the backing plate. If I had thought about it, I would have bought new backing plates before the rebuild and powdercoating as there is a noticeable groove from the brake shoe at the bottom part of the backing plate, hope this doesn't mess up the brakes to much.

Second picture is rear of backing plate showing Wild Horses parking brake cable entering wheel plate, this is the big cable outside the wheel going to the "Y" under the vehicle where the parking brake cable from the parking brake pedal meet. Be sure to install circlip on the grove closest to cable, the farthest grove allows to much slop in cable to backing plate.

Third photo shows brake shoes, springs and parking brake link bar and spring (rusty bar thing below brake cylinder).

I used the red tool in last photo to install the shoe spring caps.

Installation order "front" or "primary" brake shoe first by installing brake spring holdown pin through back of brake plate, then brake shoe, then one spring perch, then spring, then last spring perch using tool to push perch onto pin and lock it in place (two perches per spring, brake shoe "rides" on backing plate and top groove lines everything up). Yes, three hands would be useful.

Parking brake arm from old rear shoe must be removed and installed on new rear shoe, see link in first post to Ford ranger site.

Parking brake cable was simply slid over parking brake arm and then extra cable was pulled slack then rear shoe installed like front.

Last photo shows remaining hardware: anchor pin plate (rusty wing looking washer at top) then the parking brake cable, cable guide in place on rear shoe by pressing into hole closest to parking brake lever clip. You can see the new parking brake lever washer and locking circlip just to the right of the right brake cylinder piston rod, you will need to take the parking brake lever off your old shoes and put it on the new one. This pic does not show the cable correctly routed over the cable guide.
 

Attachments

  • P1000519.jpg
    P1000519.jpg
    68.8 KB · Views: 334
  • P1000522.jpg
    P1000522.jpg
    50.3 KB · Views: 308
  • P1000520.jpg
    P1000520.jpg
    93.1 KB · Views: 379
  • P1000518.jpg
    P1000518.jpg
    92.2 KB · Views: 306
  • P1000527.jpg
    P1000527.jpg
    74.5 KB · Views: 380
Last edited:
OP
OP
73azbronco

73azbronco

Contributor
Bronco Guru
Joined
Nov 11, 2007
Messages
7,839
Here is a shot of parking brake cable routing at bottom of brake plate.

Next step is to place the anchor pin plate over the anchor pin, the big rusty wing looking washer over the big pin at the top. Then silver parking brake cable, then forward or "primary" brake shoe spring, in my kit these are red.

Use spring tool carefully as you place the groove over the pin and pry the spring into place. This will "seat" the front brake shoe into it's proper position. While placing this spring into place, carefully ensure the brake cylinder piston pins align and the grooves attach properly to the shoe, they just slide onto the shoe grooves. I also replaced my piston "arms" as they were quite messed up. If you are doing this job with brake fluid in the cylinders, you may or will need to use a brake cylinder tool which compresses the cylinder and holds it together while being worked on.

Next spring is rear or "secondary brake shoe" spring, mine were brown (yes, this photo erroneously shows the forward spring missing, that should already be there, sorry). Realize you'll need to align the piston arms, the parking brake link and springs.

Last photo shows parking brake cable, guide, rear spring (brown) in proper position. Cable moves easily in guide groove.
 

Attachments

  • P1000536.jpg
    P1000536.jpg
    81.3 KB · Views: 312
  • P1000525.jpg
    P1000525.jpg
    65.9 KB · Views: 310
  • P1000531.jpg
    P1000531.jpg
    66.1 KB · Views: 296
  • P1000533.jpg
    P1000533.jpg
    86.7 KB · Views: 290
Last edited:
OP
OP
73azbronco

73azbronco

Contributor
Bronco Guru
Joined
Nov 11, 2007
Messages
7,839
Now I install the parking adjusting screw by greasing the threads (lightly), closing it and installing the parking brake adjuster (seen installed in 4th photo with left grove out of position, my bad). You will need to place the small cap on the end of the adjuster which completes the adjuster, the cap (with groove) is in the upper right part of the first photo.

Second photo shows you need to ensure you put the left adjuster on the left brake, and right adjuster on right brake.

Third photo shows the special tool being used to grasp and pull the parking brake adjuster spring (blue) onto the parking brake adjusting lever. Once installed, check the adjusting cable by wiggling it at the top by the anchor plate, the bottom part of the cable should move easily over the cable guide and wiggle the cable adjuster. Next, ensure the cable adjuster sits on the "star" parking adjuster and "ratchets" when you turn the parking adjuster. You should only be able to turn this one way, this ensures it will freely adjust as you apply brakes when you stop while going in reverse.

Fourth photo shows parking brake adjuster (left side NOT installed correctly, just turn it and pop it in place on brake shoe), spring, adjuster pivot hook and cable installed.

Fifth photo is the installed drum on axle and note it is snug, which is good. With the wheel on, you will want to adjust the parking brake by going through the access hole on the back/inside of the brake backing plate. Using two screw drivers (one to push the adjuster off the ratchet/star) you can slowly ratchet the adjuster until the brakes just start to drag, then back it off a few notches until no more dragging. This is best done wheel on still jacked up, but you can see how to do it with the wheel drum off.

Bleed the brakes per other writeups, adjust parking brake linkage under truck, Go 4x4. Last photo, 4x4porn: ARB 4.11 31 spline ready to roll.
 

Attachments

  • P1000528.jpg
    P1000528.jpg
    94.1 KB · Views: 201
  • P1000529.jpg
    P1000529.jpg
    56.9 KB · Views: 199
  • P1000539.jpg
    P1000539.jpg
    68.2 KB · Views: 261
  • P1000541.jpg
    P1000541.jpg
    79.1 KB · Views: 283
  • P1000546.jpg
    P1000546.jpg
    99 KB · Views: 202
  • P1000547.jpg
    P1000547.jpg
    57.3 KB · Views: 229
Last edited:

brocken

Full Member
Joined
Oct 11, 2009
Messages
281
Loc.
Seattle
Just had to say thanks for posting this!
I was getting pissed trying to put my first drum back together last night... couldn't get that cable guide clip to stay...
Ate dinner and found your post... duh! I don't know why I didn't realize that spring held the clip in.

Plus, I was trying to connect the bottom before putting the springs on top.
I have the Bronco manual but some of the directions suck. I like pictures. :D
 

sriha

Sr. Member
Joined
Jul 28, 2010
Messages
683
This was very helpful but when you say you had to reuse the parking brake link spring, were you referring to the blue spring? I ordered a spring kit from Bronco Graveyard and the blue spring just doesn't fit anywhere. Raybestos kit H7144. I even double checked my order to make sure that I got the right parts. I have a 66-75 big drum (11" drum, 1-3/4" pad) I reused my old spring but for some reason my shoes aren't lining up. Maybe someone can spot my error? I don't think I switched the pads around while they were off. The second picture is the spring from the kit. The first and third pictures are of the drivers side, and the rest are from the passenger side. I did notice that the springs pointed up on one side and down on the other. Is that right?
 

Attachments

  • CIMG4994.jpg
    CIMG4994.jpg
    131.1 KB · Views: 153
  • CIMG4991.jpg
    CIMG4991.jpg
    84.3 KB · Views: 157
  • CIMG4990.jpg
    CIMG4990.jpg
    108.7 KB · Views: 166
  • CIMG4988.jpg
    CIMG4988.jpg
    99.1 KB · Views: 187
  • CIMG4987.jpg
    CIMG4987.jpg
    56.7 KB · Views: 151
  • CIMG4985.jpg
    CIMG4985.jpg
    100.1 KB · Views: 219
  • CIMG4996.jpg
    CIMG4996.jpg
    98.2 KB · Views: 170

Explorer

Bronco Guru
Joined
Mar 2, 2008
Messages
4,390
Loc.
Raphine, Virginia
This was very helpful but when you say you had to reuse the parking brake link spring, were you referring to the blue spring? I ordered a spring kit from Bronco Graveyard and the blue spring just doesn't fit anywhere. Raybestos kit H7144. I even double checked my order to make sure that I got the right parts. I have a 66-75 big drum (11" drum, 1-3/4" pad) I reused my old spring but for some reason my shoes aren't lining up. Maybe someone can spot my error? I don't think I switched the pads around while they were off. The second picture is the spring from the kit. The first and third pictures are of the drivers side, and the rest are from the passenger side. I did notice that the springs pointed up on one side and down on the other. Is that right?

For one thing, neither you or AZ have the adjuster seated on the shoes properly. You possibly have the shoes too far back and hanging up on the lip of the backing plate.
 
OP
OP
73azbronco

73azbronco

Contributor
Bronco Guru
Joined
Nov 11, 2007
Messages
7,839
Explorer, in my photo I mention it's not set right, it just ended that way after installing all the parts and easily snapped into place, but i do know what you mean.

As for sriha's photo, I don't know why you would replace the parts and not replace the brake pads? The blue spring is the park brake spirng, I know it doesn't look right, but the spring end which exits the spring at a 90 degree angle goes to the shoe, the part that exits the spring straight out then bends goes to the adjuster.

I reused the parking brake or spreader bar spring, the one rusty bar thing on top with a relatively big spongy spring about 3/4 inch dia. in the 3rd photo post #2.
 
OP
OP
73azbronco

73azbronco

Contributor
Bronco Guru
Joined
Nov 11, 2007
Messages
7,839
Edit today.

I'm doing a brake job on a stock 66, just realized rear brakes have no self adjuster, but by looking at some spare parts I have, you can make brakes self adjuster style by buying that kit from NAPA for a later model, say 69 or 73. I'll repost if untrue.

untue, sorry, the parking brake adjuster cable is to long on a 11 inch 69 brake, need to research more and try to find the right cable
 
Last edited:
Top