Community
Message Forum
Photo Gallery
Event Calendar
Book Reviews
Bronco Wallpaper
Bronco FAQ
Link Back to CB!
Photo Gallery
Event Calendar
Book Reviews
Bronco Wallpaper
Bronco FAQ
Link Back to CB!
Buy / Sell


Bronco Tech
3 Arm Wiper Setup
Fix Motor Mount
Roll Cage Braces
Throttle Body 65mm
Wheel Alignment
Heat Riser Replacement
Vent Window Repair
Center Console Mount
Straighten Bumper
Ford 6R80 6 spd
More Tech...
Fix Motor Mount
Roll Cage Braces
Throttle Body 65mm
Wheel Alignment
Heat Riser Replacement
Vent Window Repair
Center Console Mount
Straighten Bumper
Ford 6R80 6 spd
More Tech...

Install the app
-
Welcome to ClassicBroncos! - You are currently viewing the forums as a GUEST. To take advantage of all the site features, please take a moment to register. It's fast, simple and absolutely free. So please join our community today!If you have problems registering or can't log into your account, please contact Admin.
You are using an out of date browser. It may not display this or other websites correctly.
You should upgrade or use an alternative browser.
You should upgrade or use an alternative browser.
Gorilla War Flare Install - final check before cutting
- Thread starter Yooper74
- Start date
NateMob
Full Member
- Joined
- Jul 24, 2011
- Messages
- 248
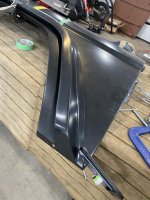
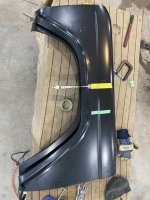
Thought I'd throw this out there for a for a quick sanity check before I cut up my fenders.
How's this mounting position look? The front side doesn't go all the way to the bottom of the fender where it curls around. Is this normal?
That is way to far rearward. Lots of photos of them mounted and non of them come close to that fender/rocker panel line.
Right on wild horses website there are two pictures that show them two different ways. Black rig goes all the way back to the rocker. Tan rig about half way between but looks like it wraps on the grill almost in the front
https://www.wildhorses4x4.com/product/WH_Gorilla_Warflares_Front/Bronco_Fender_Flares
https://www.wildhorses4x4.com/product/WH_Gorilla_Warflares_Front/Bronco_Fender_Flares
NM_outdoors
Jr. Member
- Joined
- Nov 27, 2012
- Messages
- 122
I went through this decision recently. I centered the midpoint of the straight section over the axles and then adjusted the open ends to lay relaxed on the fender. Ended up mounting to almost the body lines like shown on the black rig posted above. They're flexible enough to reduce the overall opening (front and rear) but I chose a wider cut to have the most relaxed fit.... the rear part of the rear flare doesn't really have much allowance (thankfully) but the front of the rear flares can be adjusted quite a bit. Again, I went with the most relaxed fit there too, which was a larger than expected opening. Main thing is to get them centered over the axles while maintains the same distance to the body line (2") and PARALELL to that line. I know its unnerving to cut new sheetmetal! I mounted the sheet metal before cutting.
Sent from my SM-A716U1 using Tapatalk
Sent from my SM-A716U1 using Tapatalk
NM_outdoors
Jr. Member
- Joined
- Nov 27, 2012
- Messages
- 122
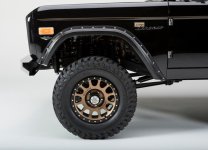
Not the best side shot but all I have at the moment....

Sent from my SM-A716U1 using Tapatalk

Sent from my SM-A716U1 using Tapatalk
- Joined
- Mar 28, 2012
- Messages
- 3,542
Mine is a little closer to the body line which brings the ends in slightly, but it's pretty close to what you have. Like NM, I centered the opening over the axle. If you're going to use the welting, make sure you account for that 1/4". I measured without it and the welting now overlaps the turn signal and gas caps. I'll probably remove the welting because the overlap drives me insane. Now how do people post those large pictures like NM instead of attached thumbnails?
Attachments
Last edited:
NateMob
Full Member
- Joined
- Jul 24, 2011
- Messages
- 248
Right on wild horses website there are two pictures that show them two different ways. Black rig goes all the way back to the rocker. Tan rig about half way between but looks like it wraps on the grill almost in the front
https://www.wildhorses4x4.com/product/WH_Gorilla_Warflares_Front/Bronco_Fender_Flares
wow, you right. ;D I've never seen them like that personally, i can't say it looks very centered with the rear stretching to that body line though. There is a good YouTube video where a guy mounts a set and goes over the location in detail if you want another idea of where to put them and how they will look.
1buckeyefan1
Sr. Member
- Joined
- Sep 21, 2017
- Messages
- 632
Mine is a little closer to the body line which brings the ends in slightly, but it's pretty close to what you have. Like NM, I centered the opening over the axle. If you're going to use the welting, make sure you account for that 1/4". I measured without it and the welting now overlaps the turn signal and gas caps. I'll probably remove the welting because the overlap drives me insane. Now how do people post those large pictures like NM instead of attached thumbnails?
So the welting doesn't really serve any purpose? I'm probably a few mos away from mounting mine, so bookmarking this thread. I'm most uneasy about making the hole spacing/centering look 'perfect' as well.
btw - pretty sure the large images are a byproduct of the Tapatalk app. Last night when i posted somethings, it asked me if I wanted large, medium or small images. I picked large on a whim and they were almost full-page size.
- Joined
- Mar 28, 2012
- Messages
- 3,542
So the welting doesn't really serve any purpose? I'm probably a few mos away from mounting mine, so bookmarking this thread. I'm most uneasy about making the hole spacing/centering look 'perfect' as well.
My understanding is welting is optional. I'm not even sure what purpose it serves except maybe as a "gasket" to fill in any spaces the flares don't conform to, but when I test fit them without the welting before the final install, I didn't find any open space.
When I did mine, I took a pencil on a jig set to halfway across the flat part of the flare, which I measured as 1" wide. So the edge of the jig followed the top edge of the flare and the pencil drew a line 1/2" down all the way around. I started with the Driver's rear because I had to account for the gas caps. Then I did a best guess for the "center" of the flat top section and lined that up exactly over the axle and marked it on the line that's 1/2" down. I then ran a string along the 1/2" pencil line so I could get the total distance, a little math, and it turned out a screw every 3" in both directions made a nice, even distribution with a screw ending up at the bottom of the front and back for a total of 23 screws. There's a 24th screw on the rear wrap around facing the ground. This method also put a screw just above the rear lower body line so it holds it tight around that edge.
The fronts were done basically the same - scribe a pencil line 1/2" all the way around. But the fronts are shorter so I played a little with a starting point, basically the wrap around towards the front facing down, then measured every 3" all the way around. It worked out very good, ending at the bottom of the rear, with a total of 22 screws, although the top screw isn't exactly over the axle. If I put it there, the ends wouldn't line up right. But I did mark the "center" of the flat part of the front flare and lined that up with the axle when I was ready to drill. I wanted it to "look" right, like it belonged there. I've seen sloppy work where it's shifted front or back and it just looks bad compared to the tire.
I drilled pilot holes in the flares at the marks while they were off, then held them on using "C" clamp vice grips. I adjusted and adjusted until it looked good, then drilled through the pilot holes into the metal. Make SURE the top of the flare is parallel to the body line. It makes all the difference.
Once I had all the holes drilled, I pulled the flares off and used 1" blue painter's tape, taping along just below the holes all the way around. The bottom of the tape was now my cut line for the fender, 1" below the holes, but you can actually cut it lower - 1.5". My Bronco wasn't painted at the time I did this, but I still ran blue tape along the upper part of the path to prevent my jig saw base from scratching the metal. I used a new, metal cutting blade and went slow.
Last edited:
1buckeyefan1
Sr. Member
- Joined
- Sep 21, 2017
- Messages
- 632
My understanding is welting is optional. I'm not even sure what purpose it serves except maybe as a "gasket" to fill in any spaces the flares don't conform to, but when I test fit them without the welting before the final install, I didn't find any open space.
When I did mine, I took a pencil on a jig set to halfway across the flat part of the flare, which I measured as 1" wide. So the edge of the jig followed the top edge of the flare and the pencil drew a line 1/2" down all the way around. I started with the Driver's rear because I had to account for the gas caps. Then I did a best guess for the "center" of the flat top section and lined that up exactly over the axle and marked it on the line that's 1/2" down. I then ran a string along the 1/2" pencil line so I could get the total distance, a little math, and it turned out a screw every 3" in both directions made a nice, even distribution with a screw ending up at the bottom of the front and back for a total of 23 screws. There's a 24th screw on the rear wrap around facing the ground. This method also put a screw just above the rear lower body line so it holds it tight around that edge.
The fronts were done basically the same - scribe a pencil line 1/2" all the way around. But the fronts are shorter so I played a little with a starting point, basically the wrap around towards the front facing down, then measured every 3" all the way around. It worked out very good, ending at the bottom of the rear, with a total of 22 screws, although the top screw isn't exactly over the axle. If I put it there, the ends wouldn't line up right. But I did mark the "center" of the flat part of the front flare and lined that up with the axle when I was ready to drill. I wanted it to "look" right, like it belonged there. I've seen sloppy work where it's shifted front or back and it just looks bad compared to the tire.
I drilled pilot holes in the flares at the marks while they were off, then held them on using "C" clamp vice grips. I adjusted and adjusted until it looked good, then drilled through the pilot holes into the metal. Make SURE the top of the flare is parallel to the body line. It makes all the difference.
Once I had all the holes drilled, I pulled the flares off and used 1" blue painter's tape, taping along just below the holes all the way around. The bottom of the tape was now my cut line for the fender, 1" below the holes, but you can actually cut it lower - 1.5". My Bronco wasn't painted at the time I did this, but I still ran blue tape along the upper part of the path to prevent my jig saw base from scratching the metal. I used a new, metal cutting blade and went slow.
Excellent detail, I will use this for sure! This is almost as good as having a buddy that's sitting next to you with a beer in hand, having done it before, correcting you along the way
1buckeyefan1
Sr. Member
- Joined
- Sep 21, 2017
- Messages
- 632
Little off topic but has anyone found a torx head bolt/nut combo to use instead of the self tappers?
Seems to me it'd provide a nicer look and more robust attachment. The self tappers seem like a cheesy approach to me.
I'll have to dig through my notes.. but there have been a couple threads on stainless bolts and sources that people have used on the flares. I'm hoping to find a nice black stainless or black oxide-look myself.
- Joined
- Jul 1, 2011
- Messages
- 1,840
Now how do people post those large pictures like NM instead of attached thumbnails?
Click Quote on his post and you'll see how he did it...
- Joined
- Mar 28, 2012
- Messages
- 3,542
Little off topic but has anyone found a torx head bolt/nut combo to use instead of the self tappers?
Seems to me it'd provide a nicer look and more robust attachment. The self tappers seem like a cheesy approach to me.
Lots of people. I got a bag of 100 from here:
https://www.boltdepot.com/Product-Details.aspx?product=7635
https://www.boltdepot.com/Product-Details.aspx?product=15795
- Joined
- Mar 28, 2012
- Messages
- 3,542
I'll have to dig through my notes.. but there have been a couple threads on stainless bolts and sources that people have used on the flares. I'm hoping to find a nice black stainless or black oxide-look myself.
They're only 1/2" but they should work. I used 5/8 and there was at least 1/8" thread sticking out the back.
https://www.boltdepot.com/Socket_button_head_Stainless_steel_18-8_black_oxide_finish.aspx
https://www.boltdepot.com/Socket_button_head_Alloy_steel_black_oxide_finish.aspx
Attachments
Similar threads
- Locked
- Replies
- 5
- Views
- 946
- Replies
- 0
- Views
- 345
- Locked
- Replies
- 5
- Views
- 1K


