• Welcome to ClassicBroncos! - You are currently viewing the forums as a GUEST. To take advantage of all the site features, please take a moment to register. It's fast, simple and absolutely free. So please join our community today!
    If you have problems registering or can't log into your account, please contact Admin.

Fireball's '76 build thread - "Piece by Piece" - PAINTED, ASSEMBLED & ON THE ROAD!

OP
OP
Fireball05

Fireball05

Bronco Guru
Joined
Oct 7, 2012
Messages
1,822
Those were aftermarket emblems that a PO had added. I believe they are Ford items, but not original to the Bronco. They're pretty cool looking, but I'm going for a stock look, so quickly removed them.

Here are the actual one used on the Broncos from the factory. Someone more knowledgeable than me will have to tell you which years got them. I'm pretty sure the 76s didn't come with any.

http://www.tomsbroncoparts.com/product/fender-script-engine-302-66-77-early-ford-bronco-new-each
 
OP
OP
Fireball05

Fireball05

Bronco Guru
Joined
Oct 7, 2012
Messages
1,822
Also, can someone please help me out with the reverse wiring question I posted above?


"Need some quick help: anyone have a photo of the reverse sensor wiring, or know what color wires need to be plugged into the plug on the shift column? There are two male spades on the steering column, can't seem to find anything to plug them into. "
 
OP
OP
Fireball05

Fireball05

Bronco Guru
Joined
Oct 7, 2012
Messages
1,822
Just a few more quick updates, things are moving along!

Got the seat belt bungs in for the roll bar, ordered from Bluetorch Fabworks http://www.bluetorchfab.com/Product/1316/BTF-Seatbelt-Bung.aspx and got them installed and the bar is ready to be sent to the powder coater tomorrow. Just so happened to have a milling machine sitting in the corner of the garage, so made easy work of the 3/4" diameter holes that need to be drilled in the bar:


We also cut off the remains of the e-brake cable bracket, cleaned it up a bit, drilled some holes and bolted it back to the underside of the body. Still need to weld it up, but I don't think it'll move! FWIW, pretty sure that the e-brake cables were at one time the limiting factor to rear suspension travel, and that is how the bracket got torn off the body!


Lastly, I removed the dash pad today, and found this awesome sticker hidden under there:


Safety first, folks!
 
OP
OP
Fireball05

Fireball05

Bronco Guru
Joined
Oct 7, 2012
Messages
1,822
Since this has basically turned into my build thread, I thought I'd post a few more photos and updates. I've fallen victim to the slippery slope, and am really tearing into things now!

Took down the rear driveshaft to replace the rear pinion seal, and found a bad u-joint. Removed both drive shafts and had all 6 u-joints replaced.

Got the rollbar sorted out, seatbelt bungs installed, and had it powdercoated.


Cut out a small bit of rust in the driver side footwell and got the patch welded back in. Still have a few more small holes to fill on the passenger side, and will then have zero extraneous holes on the interior!


Also installed the BC Broncos fuel line kit. This was much harder than anticipated, and required a lot of new bending around my proportioning valve. The site was a huge help with photos from other guys who did this, but noone else had the large valve that my '76 came with. Nonetheless, it's all in and complete.


Had a bit of a fiasco trying to powdercoat the wheels. PC did not match well at all, so I had them painted. The bad news is I spent way too much money fixing up a set of old steel wheels, the good news is that they look awesome!


Also since I had two quarts of Wimbledon white, and a slot at the paint booth, I removed the dash and had that painted as well. Also sent my gauge cluster off to Kevin to have him work his magic.


And, since the dash was out, it looked like a good time to remove the steering column and rebuild that. Call me crazy, but I really love the old 3 on the tree! Not to mention the $2.5k entry fee for a nv3550 puts that swap a few years out.


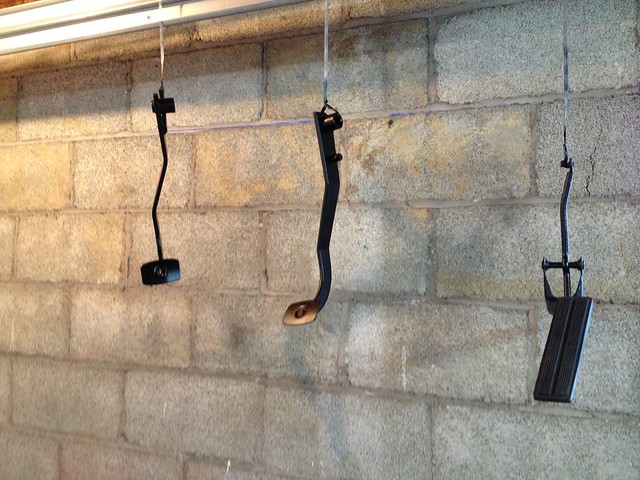
And lastly, with the steering column removed, it was a good time to remove the pedal assembly, clean, seam seal, paint and insulate the drivers side footwell, and paint the pedal asssembly.


Also got the "Alice" mod completed. Huge improvement, love the looks! FYI, the wires need to be swapped on my '76. I didn't read about this on other threads posted here, but when I first tested, the bulb was super bright when parking lights on, and dimmer when flashing as a turn signal. Swapped the wires and it's back to normal.


IMG_0790

That's about it! Will be rebuilding the column and reassembling that and the dash this week and next weekend. Hope to have the interior back together and have it back on the ground and driving again in a week or two.

Thanks for following along!
 

bigpitbull

BRONCO ADDICT
Joined
Nov 1, 2011
Messages
2,535
Loc.
Saltillo, MS
Dude.. you are kickin ass and breakin glass!!! keep up the progress!!!!
What process did you use to restore those wheels?
 

Blue Bastard

Bronco Guru
Joined
May 14, 2012
Messages
2,161
Ya buddy! Get er done!

Sincerely, your boy,

Blue

P.s hope to see you at broncorama in Michigan, or super celebration.

Oh ya, happy new year.
 
OP
OP
Fireball05

Fireball05

Bronco Guru
Joined
Oct 7, 2012
Messages
1,822
Thanks guys, appreciate it! Having lots of fun, spending way more money than I thought I would :)

The wheels were in pretty rough shape. They were sand blasted back to bare metal, then 2 coats of powder coat. The powder wasn't the right color, so they were then scuffed, sprayed with sealer and now 2 coats of wimbledon white single stage PPG paint. They came out looking great! Too bad the PC wasn't a match though.
 

Tedster100

Chairman of the Bored
Joined
Aug 25, 2010
Messages
1,762
Wow, stopped back to see the progress and you've done a lot! Looking good! I've found that sitting down and making a list of all the parts, gaskets, bolts, paint, etc.. you think you will need and then looking them up to get current pricing gives you a good idea of what you will need to spend...after you multiply that number by 3! Hey, at least you're spending it on something good that you will have for a long time.
 

xcntrk

Bronco Guru
Joined
Jan 12, 2012
Messages
2,473
Loc.
NOVA
That's some good customer service there! When I ordered my NV3550 from WH (at almost 2k) I wrote in the order notes "how about a T-shirt for this loyal customer". Sure enough 5min after submission I got a phone call asking my size :)
 
OP
OP
Fireball05

Fireball05

Bronco Guru
Joined
Oct 7, 2012
Messages
1,822
Just wanted to keep updated on the progress. Lots of not very exciting things going on, but hey, I'm having fun fixing this thing up "PIECE BY PIECE."

Was able to rebuild the steering column and wrote up a few bits of advice and some photos here: http://classicbroncos.com/forums/showthread.php?t=217965

Also finished up the firewall sound deadening and insulation. I'm pretty happy with the way it turned out, looks good and will hopefully help keep the heat out and keep things quiet.


Inspired by some pretty pictures on Jsmall's build blog, I cleaned up all the dash wiring and have that all ready to go back in. I got a NOS courtesy light from Delconick, and will be installing a secondary 12v power source that will be hidden up under the dash to power my Garmin nav unit.


I've got the front half of the cabin prepped and ready for raptor liner install:


Removed the OEM rear tank and ready for the BCB 23 gallon tank install. Also drilled all the mounting holes for the rear seat and seat belts:


Looks pretty clean up there:


Got all the old chrome dash pieces shined up, and started reassembling the dash:


Part of the reason it takes me a long time to get anything meaningful done is that I'm easily distracted by cleaning parts and hanging out at the wire wheel. Others have great talents in the shop, mine is with rattle can satin black and the course thread wire wheel!


That's the latest and greatest! Hoping to get the interior back together, dash and column installed and back on the ground by the end of the week.
 

BluebroncoNC

Bronco Guru
Joined
Jul 30, 2007
Messages
1,717
Loc.
Asheville, NC
Nice work, keep it going... So right on getting rolling only to be stopped by a part that needs a bit of cleaning... 2 hours later...
 
OP
OP
Fireball05

Fireball05

Bronco Guru
Joined
Oct 7, 2012
Messages
1,822
Another installment of "relatively slow and relatively unexciting progress" And a few questions if anyone can help out:

Got the inside of the rear quarter panel seams finished. Wire brushed, cleaned, sprayed rust convertor, applied seam sealer and sprayed with rubberized undercoating. Not exciting, and hard work, but will hopefully prevent any future problems!

Disassembled the wiper setup a few weeks ago, painted the inside of the windshield frame and spent a good bit of time cleaning up the wiper setup and painting the mounting bracket. Looks good!


The original wipers weren't parallel to the windshield frame, I tried to bend and adjust them but couldn't get them perfect. Ordered a new set from Wild Horses, and got them installed as well. They look great and satisfy my OCD need.


QUESTION: what is the male spade connector on the wiper motor for? You can barely see it in the above photo, it faces the front of the car.

Also, I'm now ready to mount the wiper cover brackets and install the cover, but I don't seem to have the right mounting holes in the windshield frame. Can anyone help with this? I also posted the same question, so please post on this link, which might be helpful for someone doing a future search.

Lastly, I got the dash installed and most of the wiring hooked up. Got my gauge cluster back from Kevin earlier this week, and also wired a second 12V power source for my Garmin nav. The cord will tuck up under the dash out of sight, and will have a 6" pigtail that comes b/w the windshield frame and the dash pad.


Hoping to get the steering column back in tomorrow, finish up the wiring, hook the battery back up and test everything out!
 
Top