• Welcome to ClassicBroncos! - You are currently viewing the forums as a GUEST. To take advantage of all the site features, please take a moment to register. It's fast, simple and absolutely free. So please join our community today!
    If you have problems registering or can't log into your account, please contact Admin.

1977 Bronco: Victoria Project- UPDATED FINALLY

OP
OP
u10072

u10072

Bronco Guru
Joined
May 18, 2007
Messages
2,249
Finally got the door gaps all lined out. I think they really turned out nice. The doors are really nice-- but I may never want another set due to the huge PITA to get the gaps right. Maybe the doors might be something I just completely learn to love :)
 

Attachments

  • photo 4(1).JPG
    photo 4(1).JPG
    100.5 KB · Views: 160
  • photo(2).JPG
    photo(2).JPG
    112.8 KB · Views: 148

reynard101

Bronco Guru
Joined
Aug 19, 2006
Messages
1,098
Looks good.

How much of a pain is it to align the doors? I've reskinned some doors and a lot of panel replacement. Dreading shimming the body mounts and aligning everything and tweaking and tweaking.
 
OP
OP
u10072

u10072

Bronco Guru
Joined
May 18, 2007
Messages
2,249
Well its a total pain. You have to have a baseline, so you have to mount the body back down and just go from there. HUGE TIP-- get some really good quality duct tape-- I used the black Gorilla tape-- and put it over the hole in the frame just below the mounts right behind the seats. I put the WH 1" bodylift/body mount kit on mine and lost the spacers into the bowels of the frame never to be fished out again.. LOL!! All kidding aside, a hole saw and some welding the hole in the side of the frame up again the spacer was retrieved. HUGE PITA. I replaced the floors in mine and part of the door hinge panel, so some shimming was needed. Mainly for me in the rear most part of the bed. I just worked one side then the next and a buddy really helps a lot. Another tip-- you can change the size of the holes on the actual door hinge and where the hinge bolts to the body-- but dont change the holes in the door as it causes the hinge to physically hit the door instantly chipping paint. Going to the metal yard and having them shear some various thicknesses of aluminum-- from pretty thin to about 1/8"- to the height of the hinge makes it very easy to make shims that go behind the hinge against the hinge pillar. Most important tip is just be slow and methodical with no time frame. If you get it bam on the first shot- buy a lotto ticket :) -- if not keep a level head and when you get pissed off-- go inside, watch 30 minutes of TV and relax. I guess one more thing- if you haven't painted the parts first that would make things much easier but if you have, then spend the $7 a roll on the wide 3M yellow tape-- as it will save your butt on the chips-- and dont remove it until you are completely done. Ive got some chip touchup due to not following this rule.
 

Ohio Bronco 21

Bronco Guru
Joined
Dec 5, 2006
Messages
4,194
Loc.
Cleveland
Well its a total pain. You have to have a baseline, so you have to mount the body back down and just go from there. HUGE TIP-- get some really good quality duct tape-- I used the black Gorilla tape-- and put it over the hole in the frame just below the mounts right behind the seats. I put the WH 1" bodylift/body mount kit on mine and lost the spacers into the bowels of the frame never to be fished out again.. LOL!! All kidding aside, a hole saw and some welding the hole in the side of the frame up again the spacer was retrieved. HUGE PITA. I replaced the floors in mine and part of the door hinge panel, so some shimming was needed. Mainly for me in the rear most part of the bed. I just worked one side then the next and a buddy really helps a lot. Another tip-- you can change the size of the holes on the actual door hinge and where the hinge bolts to the body-- but dont change the holes in the door as it causes the hinge to physically hit the door instantly chipping paint. Going to the metal yard and having them shear some various thicknesses of aluminum-- from pretty thin to about 1/8"- to the height of the hinge makes it very easy to make shims that go behind the hinge against the hinge pillar. Most important tip is just be slow and methodical with no time frame. If you get it bam on the first shot- buy a lotto ticket :) -- if not keep a level head and when you get pissed off-- go inside, watch 30 minutes of TV and relax. I guess one more thing- if you haven't painted the parts first that would make things much easier but if you have, then spend the $7 a roll on the wide 3M yellow tape-- as it will save your butt on the chips-- and dont remove it until you are completely done. Ive got some chip touchup due to not following this rule.
Yes yes yes, I went through exactly the same thing on my first Bronco, first project. I thought I was going to loose it.
 

Hockeydad4-22

Jr. Member
Joined
Oct 11, 2010
Messages
79
Great idea on the shims except have them sheared from steel rather than aluminum. The dissimilar metals will corrode much more quickly. Otherwise you must isolate between the aluminum and steel with a minimum of 2 heavy layers of primer and paint.
 
OP
OP
u10072

u10072

Bronco Guru
Joined
May 18, 2007
Messages
2,249
O Hockeydad-- thats because you live where there is actually rain and snow :) You are right the dissimilar metals is for sure an issue. Best thing is stainless but thats tough to come by sometimes. I have lots of aluminum, ease of working with and I didn't have to paint was the real reason for me using it for mine though.
 
OP
OP
u10072

u10072

Bronco Guru
Joined
May 18, 2007
Messages
2,249
Well after about 2 years my rear bumper is finally installed-- its been done for easily a year+ but at least its on the bronco!
 

Attachments

  • RearBumpIns7.JPG
    RearBumpIns7.JPG
    128.4 KB · Views: 89
  • RearBumpIns6.JPG
    RearBumpIns6.JPG
    93.5 KB · Views: 80
  • RearBumpIns5.JPG
    RearBumpIns5.JPG
    123.9 KB · Views: 79
  • RearBumpIns4.JPG
    RearBumpIns4.JPG
    92.2 KB · Views: 77
  • RearBumpIns3.JPG
    RearBumpIns3.JPG
    102.2 KB · Views: 75
  • RearBumpIns2.JPG
    RearBumpIns2.JPG
    104.4 KB · Views: 86
  • RearBumpIns1.JPG
    RearBumpIns1.JPG
    144 KB · Views: 104
OP
OP
u10072

u10072

Bronco Guru
Joined
May 18, 2007
Messages
2,249
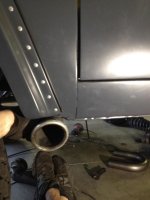
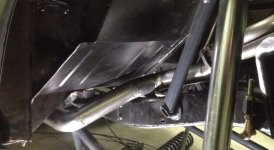
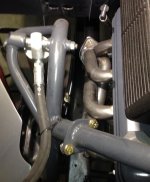
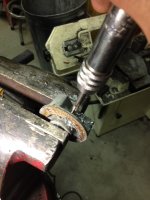
Pic of my exhaust. The headers are the Ford Motorsport M-9430-P50 that work perfect with the "P" heads. If you like you can get ceramic coated ones-- they are 409 stainless so they will surface rust but this is the material OEM's are using for most factory exhaust systems today. The transitions at the frame are sorta tight so thats why I use exhaust donuts on my systems that I build - done properly a J-bend would as well. The headers while a great product for $240 (about $340 for the ceramic coated ones) do require you to buy O2 bungs and the complimentary flanges to go with it. Not being able to find the flanges that I liked well enough, these were I made out of 3/8" material and they turned out really nicely. Those cool little blue exhaust isolators are called "poppers" and are really handy and being silicon are quite durable. For me I just can't justify some of the header costs out there when the fitment are just ok at best. These headers clear the plugs perfectly with the "P" heads just as advertised which is really nice and are a Ford product-- which means the quality is quite nice. The motor mounts are the "extreme" models that everyone sells today so they add just a tad of frame clearance.
 

Attachments

  • ExFl2.jpg
    ExFl2.jpg
    72.6 KB · Views: 78
  • ExHanger2.jpg
    ExHanger2.jpg
    66.4 KB · Views: 82
  • ExPS1.jpg
    ExPS1.jpg
    70.7 KB · Views: 87
  • ExP3.jpg
    ExP3.jpg
    81 KB · Views: 91
  • ExP2.jpg
    ExP2.jpg
    70 KB · Views: 89
  • ExP1.jpg
    ExP1.jpg
    85.6 KB · Views: 93
  • photo 2 (4).JPG
    photo 2 (4).JPG
    111 KB · Views: 91
  • photo 1 (8).JPG
    photo 1 (8).JPG
    106.1 KB · Views: 99
Last edited:
OP
OP
u10072

u10072

Bronco Guru
Joined
May 18, 2007
Messages
2,249
fkngiant-- thanks I appreciate it-- those were a total PITA to make :) Here are the exhaust pics you were asking about....
 
OP
OP
u10072

u10072

Bronco Guru
Joined
May 18, 2007
Messages
2,249
Just a quick inner fender note-- the pics are from another build of mine but the effect is still the same. Removing the material in the pics just does wonders for being about to mount shocks, and just general access to the engine, that I would pretty much never not have this almost free mod on any EB I own. By leaving the pinch weld intact you dont sacrifice any strength either.
 

Attachments

  • DSC00522.JPG
    DSC00522.JPG
    58.6 KB · Views: 111
  • DSC00504.JPG
    DSC00504.JPG
    155.4 KB · Views: 102
OP
OP
u10072

u10072

Bronco Guru
Joined
May 18, 2007
Messages
2,249
Installing a removable steering wheel on a stock column. So I had on hand a nice Mark Williams steering coupler and Sparco steering wheel from another build. On this one there wont be a horn button in the center of the wheel -- the horn will be in the center column (personally I cant remember when I used the horn last anyway). The modified adapter is really just there to hold the tension on the column via the spring and hold the cover in place which is why the little copper disc for the horn is removed. The splined adapter is going to be welded in place. It turned out pretty darn clean which was the goal. The firewall end will get a DD end milled in to connect the column via a WH collapsible lower steering shaft and then mate up to a 4x4x2 steering box.
 

Attachments

  • column1.JPG
    column1.JPG
    113.5 KB · Views: 49
  • column2.JPG
    column2.JPG
    114.4 KB · Views: 43
  • column4.JPG
    column4.JPG
    117 KB · Views: 44
  • column7.JPG
    column7.JPG
    84.2 KB · Views: 47
  • column5.JPG
    column5.JPG
    91.1 KB · Views: 46
  • column8.JPG
    column8.JPG
    150.7 KB · Views: 47
  • column9.JPG
    column9.JPG
    127.1 KB · Views: 50
  • column10.JPG
    column10.JPG
    120.5 KB · Views: 48
OP
OP
u10072

u10072

Bronco Guru
Joined
May 18, 2007
Messages
2,249
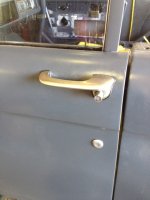
Got my doors all put back together. The factory door handles were done in brushed nickel, key locks replaced, the guts completely refurbished, new tinted glass in the windows and vents, all stainless button head fasteners and last was the vent windows have the locking mechs installed as well. Will have to post up the door panels next.....
 

Attachments

  • Door3.JPG
    Door3.JPG
    121.3 KB · Views: 94
  • Door2.JPG
    Door2.JPG
    115.8 KB · Views: 90
  • Door1.JPG
    Door1.JPG
    120.1 KB · Views: 84
OP
OP
u10072

u10072

Bronco Guru
Joined
May 18, 2007
Messages
2,249
In case anyone wondered about towing and using a Go fast FSB. So this week I towed a bunch with my 96. She's got a good flexy suspension and a 4.56 gear and stock everything engine. With a steel trailer, no trailer brakes, no sway bars, and really improperly loaded with a fully put together 77 bronco. It honestly pulled pretty nicely. Change to a shorter aluminum trailer, properly loaded, with brakes and I think pulling with it would be a breeze and pretty darn pucker-free. More engine power would have been nice but I could still pull a decent hill at speed. Don't be afraid to pull with a bronco like I was!
 

Attachments

  • image.jpg
    image.jpg
    61.3 KB · Views: 107
OP
OP
u10072

u10072

Bronco Guru
Joined
May 18, 2007
Messages
2,249
Finished up my steering column. It's the stock column but I wanted to keep the stock turn signals and have a removable wheel. I used a Mark Williams hub (which is kinda too tight) and a Sparco wheel. Mix a little theft deterrence, a much better feel and adds to the race inspired look.
 

Attachments

  • image.jpg
    image.jpg
    104.3 KB · Views: 49
OP
OP
u10072

u10072

Bronco Guru
Joined
May 18, 2007
Messages
2,249
Moved Victoria around some a few months back after a couple years and it’s kind of exciting thinking of getting the project moving forward again!
 

Attachments

  • 424759C0-81E0-45E3-BBE0-6D0CE983531E.jpg
    424759C0-81E0-45E3-BBE0-6D0CE983531E.jpg
    100.8 KB · Views: 72
  • 902A3DF4-BB83-4C50-9947-C0762F38F64C.jpg
    902A3DF4-BB83-4C50-9947-C0762F38F64C.jpg
    131 KB · Views: 63
  • 8493E51A-746B-4DBA-B529-F885A12069C1.jpg
    8493E51A-746B-4DBA-B529-F885A12069C1.jpg
    103.1 KB · Views: 60
  • 9F2EEF53-7DAA-49EC-A240-303D826F7FBE.jpg
    9F2EEF53-7DAA-49EC-A240-303D826F7FBE.jpg
    93.2 KB · Views: 56
OP
OP
u10072

u10072

Bronco Guru
Joined
May 18, 2007
Messages
2,249
Haven’t seen my old girl in awhile so I’ll look at her online and try to remember what I’ve forgotten! Going to look at some property in the morning to help get the broncos and VIF back up and rolling again!!
 
Top