• Welcome to ClassicBroncos! - You are currently viewing the forums as a GUEST. To take advantage of all the site features, please take a moment to register. It's fast, simple and absolutely free. So please join our community today!
    If you have problems registering or can't log into your account, please contact Admin.

1971 Stroppe Bronco rebuild

OP
OP
C_Man69EB

C_Man69EB

Full Member
Joined
Oct 28, 2009
Messages
307
Nevermind Mike and others, the quick search revealed that parchment 22780 in satin or semi-gloss is appropriate.

I can't believe I did that. I just had the DASH painted Wimbledon white like everything else. Ugh. I think that's a common misconception. I think 90% of the people think that the dashes were painted the same color as the top.
 
Last edited:

mjschneidy

Full Member
Joined
Nov 21, 2016
Messages
224
Hey Mike, I was just reading through your build thread and I stumbled across something that's a good reminder for me. You had noted the paint code for the parchment Color dash. Can you share that info on my thread here? I just realized I had my Dash painted along with the other Wimbledon white components of the truck. I fell into the classic false presumption that the dash was Wimbledon white instead of parchment. I really wanted to be correct. I think I'm going to have to get it repainted.

Absolutely, here you go. I meant to post this as a tech sticky but haven’t taken the 10 seconds to figure out how.

The problem you’ll run into is they will tell you 22780 is discontinued or at best a lacquer only formula and many places no longer mix lacquer. I was able to get the formula converted to single stage urethane.
 

Attachments

  • image.jpg
    image.jpg
    74.2 KB · Views: 50
Last edited:
OP
OP
C_Man69EB

C_Man69EB

Full Member
Joined
Oct 28, 2009
Messages
307
Dear Forum, I am ASHAMED to admit, the last post on my own build thread was in December of 2019. Life happens, I took a break, and dabbled on the truck off an on for a few years. This post is catch up everyone with progress.

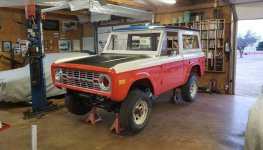
This is where I was in January of 2020.
1677814534936.png

February of 2020:

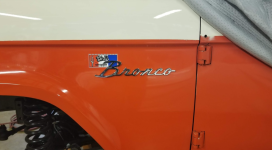
One of the first things I did was get my Stroppe Decals and emblems installed. I studied at least 2 dozen examples of premium restorations and original trucks to make sure I got the Bronco emblem in the right place over the decal.
1677814672011.png

things that could be bolted on quickly and make alot of visual difference seem to be first on the list. Plus it opens up space in the shop. LOL

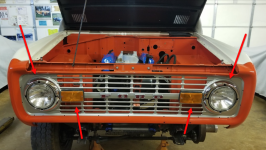
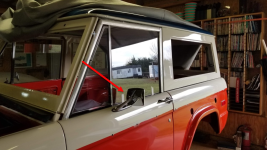
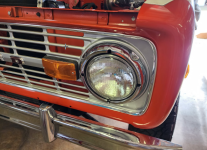
Headlight rings, signal lights, door mirrors went on.
1677814765248.png
1677814779713.png

Fresh Air Vent, and lesson learned, dont put the fender on before hand. Doh.
1677814802029.png

While L22491 did not orignally have power brakes or power steering, they are added for driver comfort. booster, master cylinder, mounting bracket and pedal assembly under dash were installed, and also washer fluid resevoir:

1677815213632.png

Radiator hi-temp painted and prepped
1677815255555.png

yes, I am a real person
1677815273637.png

Even though the chassis had been restored, I had not actually rebuilt the front brakes yet, so that got started.
As a reminder, L22491 was a drum brake truck and while I would probably put disks on it for drivability, I was really hung up on running the factory steel 15" Stroppe Wheels that I have, and they dont clear discs. I know there is a repop wheel that has been available in the past that does, but for now, "this is the way" says the Mandolorian.

1677815526541.png


10 photos max per post.... more to come!
 

Attachments

  • 1677814901278.png
    1677814901278.png
    575 KB · Views: 21
OP
OP
C_Man69EB

C_Man69EB

Full Member
Joined
Oct 28, 2009
Messages
307
Still in Spring of 2020.

Undercarriage shots are nice sometims, they have a lot of detail. I did paint and install the front and rear driveshafts around this time. My header flange hits the driveshaft. UGH. I will grind on it or something.

Speedo Cable and clips installed. You can see during the chassis resto, I did upgrade my fuel lines to stainless. I am not a fan of the factory black vinyl stuff.


1677816038982.png

Side Trim was a big step, that is installed. Took some effort to get the trim to lay down against the fender on the very front, with keeping the clips as far forward as they would go to pull down on the fender curve, but I got it.

1677816126437.png

1677816193257.png

So actually, I got real quiet on the truck from about spring of 2020 till Fall of 2022, I messed with it a few times but really it just sat.

In 2022 I got the grill trim installed, bumpers and bumper overriders. Here you can also see the radiator is in. I opted for the thicker radiator so I had to run the aftermarket wider brackets. Fan shroud installed. Also the FORD grill letters are installed.
1677816339203.png

1677816450518.png


I decided it was time to buy tires. I came across a good deal on the BFG's that I have been planning on the whole time, so I pulled the trigger. 33x10.50-15s. I am very happy with the stance.
1677816925019.png

More updates tomorrow!
 

DirtDonk

Contributor
Bronco Guru
Joined
Nov 3, 2003
Messages
47,709
I guess I never really paid too much attention to the wheel fitment issue with disc brakes.
Are the Baja wheels problematic with both Chevy and Ford brake setups?

And is it a different backspace/offset that causes the problem, or more of an issue with the thickness of the casting?
 

BajaBronco

Contributor
Bronco Guru
Joined
Apr 30, 2003
Messages
3,933
Yes, hard to pay attention to something that there is very little of. Haha.

Potentially. YES, YES and YES. I've had issues with rim thickness of the mag, and reverse vs standard placement of the rim as well on the steel as well as offset on both the alum and steel.
 

Bajabrewer

Contributor
Bronco Guru
Joined
Jan 28, 2012
Messages
1,457
Congrats on making progress on your build! I too have had life get in the way a few times & once I start making progress again it always feels SO GOOD!
Thanks for the pic with the new 33X10.50 BFGs they look great & are what I'll be getting in a couple weeks.
 

sprdv1

Contributor
REBEL
Joined
Mar 8, 2007
Messages
81,779
Congrats on making progress on your build! I too have had life get in the way a few times & once I start making progress again it always feels SO GOOD!
Thanks for the pic with the new 33X10.50 BFGs they look great & are what I'll be getting in a couple weeks.

That's for damn sure..

Looks great w/those bfgs @C_Man69EB sweet ride
 
OP
OP
C_Man69EB

C_Man69EB

Full Member
Joined
Oct 28, 2009
Messages
307
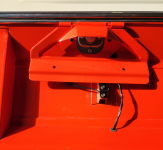
thank you all... I'm really trying to breeze through the overdue updates from the past year, to get to current stuff. When I got started in fall of 22, just a few months ago, I made the spare tire carrier and license plate bracket my mini-project.

I made the mistake of having the plate bracket painted with the spring attached, but it came off and got contrasting color, this was done in black. The flexible coating was still intact.

1678128903289.png

new tag light, clean and cleared screws.
1678129108145.png
1678129126433.jpeg

I opted for the stainless version of the spare wheel bolt, washer and giant wingnut. I know its not OE, but I thought it was a suitable upgrade.
1678129209333.jpeg

BTW I mentioned above the tires on the ground are 33x10.50's...but the spare is a 31x10.50. I didnt want the spare to put alot of weight on the carrier, and also didnt want it to look massive on the back, so its smaller. if I need it to get home it will work, keep the hubs unlocked if possible etc.

I do have a repop Stroppe cover for the spare, like the one on ebay right now, will install for shows and stuff.
1678129240004.png

spare tire latch was finished in grey and I dipped the handle in black flex-seal rubberized coating. I also put a small sheet of neoprene body seal material under the grey plate, so i doesnt tear up the paint on install or any movement it could have.

btw I had my tailgate fully assembled and failed to note the backing plate for this guy goes inside and behind...so the latch came back out for this little excercise.
1678129649849.jpeg

The stainless steel strike protector thing, that was interesting, but I polished the original, wrapped it on there and cinched it down with zip ties so it was tight against the carrier, then secured the screws to hold the overlapping layers together, then cut the ties off. seemed to work good.
1678129665045.jpeg

Function on this works great.
 
OP
OP
C_Man69EB

C_Man69EB

Full Member
Joined
Oct 28, 2009
Messages
307
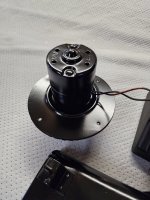
Next on my projects was the heater. I bought the standard heater reseal kit from the vendors, and a new heater core. The original had no signs of leaking but seemed like best practice. the blower motor bench tested fine so I decided to run it as is.

Here are some progress pics of the heater journey.

1679062464188.png


stripped
1679062681395.png

1679062733854.png

original heater core vs aftermarket replacement.
1679062827139.png

parts blasted, prepped and painted
1679064474050.png

20230115_171751.jpg


Then resassembled. This included the new baffles/control flaps . I failed to photo it but I found you have to drill out the rivets to get the back clamshell off, then re-wrap the baffle doors with the foam seals provided in the reseal kit. But it does seem to work great now, by hand.

More to come!

1679062583920.png

1679062599303.png

1679062609203.png
 

markatherton

Sponsor/Vendor
Bronco Guru
Joined
Aug 11, 2004
Messages
1,886
Your work is fantastic. Hard to believe you have not done one before. It is always best to use a copper heater core with a copper radiator. Aluminum with aluminum. Dis similar metals can create electrloysis.
 
OP
OP
C_Man69EB

C_Man69EB

Full Member
Joined
Oct 28, 2009
Messages
307
Your work is fantastic. Hard to believe you have not done one before. It is always best to use a copper heater core with a copper radiator. Aluminum with aluminum. Dis similar metals can create electrloysis.
Thank you Mark!

Your work is fantastic too, you are one of the leaders in this industry, and love seeing everything you do.

Good comment on the metals...UGH... I .... didn't think about that. The heater is not actually installed yet... so I'm gonna check my radiator and may just change the heater core to a copper model. I assume my radiator is copper....or brass? Its painted black but it IS a deeper core aftermarket...not original factory. I had to get the deeper brackets for it too.

previous photos for context...

20200404_172631.jpg 20200501_220112.jpg
 
OP
OP
C_Man69EB

C_Man69EB

Full Member
Joined
Oct 28, 2009
Messages
307
Your work is fantastic. Hard to believe you have not done one before. It is always best to use a copper heater core with a copper radiator. Aluminum with aluminum. Dis similar metals can create electrloysis.
ok, a quick google search notes that there are some aftermarket coolants that have "inhibitors" to address the dissimilar metal issue, AND/OR I can get a radiator cap with a sacrificial anode too. But the comments are very well taken, and science I overlooked. I will have an aluminum intake, so that makes my radiator the odd-man out. I will keep investigating.
 

ngsd

Contributor
Bronco Guru
Joined
Mar 2, 2019
Messages
2,543
I love following this one. Great job. One day I will tackle my 72 restoration but I think I will save that for my retirement project.
 
Top