• Welcome to ClassicBroncos! - You are currently viewing the forums as a GUEST. To take advantage of all the site features, please take a moment to register. It's fast, simple and absolutely free. So please join our community today!
    If you have problems registering or can't log into your account, please contact Admin.

EFI engine swap project....97 explorer into a 77 bronco

roloniko

New Member
Joined
Oct 17, 2013
Messages
38
Loc.
Ft. Collins/Loveland
Here we go with this wonderful project. We had to modify a few things so far but nothing too major yet. Its been fun since this is a first for me to do something as big as this. My friend is doing most of the work but I'm helping out as much as I can with it. I will say this, when we started this project and tearing apart things we found so many things wrong with it as far with the mods they did previously. It was put together/modified badly. Some of the things were very interesting on how they actually came up with the stuff they modified. We just had to laugh about it.

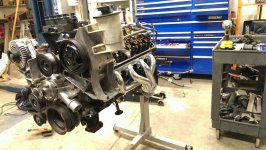
The engine out of the explorer was actually in great shape!! It did have 177k on it. We weren't as lucky with the (4r70w) transmission. I had it rebuilt and was told it was a very good thing you brought it in. We were also lucky he was a distributor for Advance Adapters and modify some of the parts for us.

On the engine we replaced the Cam shaft, timing chain, (Sanderson) headers, a better oil pickup tube, oil pan and water pump. We did a lot of cleaning and scraping to get all the debris off the engine. It is clean!! Looks like new. lol We painted it black as you can see on the photos. We didn't think we needed anything else at this time because everything else looked great. We thought about roller rockers but thought we didn't need to at this time.

The wire harness was done by EFI Guy. I was also lucky there as well. I had it back in 2 weeks and he only lives 36 miles away from me. The wire harness looked great and had everything labeled. Plus he was very helpful with information and suggestions about my project with the Bronco.

Plus Mike and I did hours upon hours of reading on this site. Whew!!! At times I found myself going crazy and wanted to punch a hole in the wall. lol I eventually found the info I needed.

We did decide to get the valve covers and upper intake manifold powder coated the same color as the bronco.


More to come............
 

Attachments

  • IMAG0081.jpg
    IMAG0081.jpg
    106.4 KB · Views: 271
  • IMG959657.jpg
    IMG959657.jpg
    112.7 KB · Views: 273
  • IMG_1101.jpg
    IMG_1101.jpg
    105 KB · Views: 261
  • IMG954366.jpg
    IMG954366.jpg
    109.6 KB · Views: 283
  • IMAG0149.jpg
    IMAG0149.jpg
    117.4 KB · Views: 275
  • IMAG0147.jpg
    IMAG0147.jpg
    111.3 KB · Views: 281
  • IMAG0137.jpg
    IMAG0137.jpg
    92.5 KB · Views: 243
  • IMAG0092.jpg
    IMAG0092.jpg
    75.7 KB · Views: 251

Gpops

Jr. Member
Joined
May 17, 2013
Messages
65
Looking good, nice to see more people doing this swap and sharing their experiences. The more information out there the easier it'll be when I do my own swap next fall.
 

TAC

Jr. Member
Joined
May 20, 2011
Messages
118
Loc.
Pocatello, ID
Cool, looking good. Making a comment so I can find this in the future and watch how it goes. I hope the same project is in my future in the next year or two. I also wish I had a friend like that.
 
OP
OP
roloniko

roloniko

New Member
Joined
Oct 17, 2013
Messages
38
Loc.
Ft. Collins/Loveland
Ok here we are with the next process with working out the kinks with project.....

Right when we thought all was good we ran into multiple snags!!! The biggest was the shifter to the transmission and the clearance for the transfer case. I don't remember reading people having problems with the transfer case. I did read people had problems with one of the pulleys. Which you had to bend part of the cross member in a certain area. We didn't have this problem!! We had problems on the other end!!

With that said when we looked at the engine, specifically the cables and the exhaust manifold, we saw we would have a possible problem with clearance when closing the hood. The solution to this was putting a body lift in it. We could of did either a 2" or 3" and that would of cleared it just fine. We decided to go with a 3" body lift. I'll show pictures of a mock up.

The biggest problem we had was the shifter and transfer case shift rods. Mike spend hours upon hours with modifying the shifter and transfer case shift rods (I think thats what they are called) making then longer so it would work. The Adv adapter spacer added length (obviously) so you had to do something to allow the shifter to work. He had to bend, take apart and weld the shifter. It was a big PIA!! But it does work finally!! There is probably a solution out there but we didn't ask.
I think he added a little over a inch and a half to the rods and extend the pin down by 3/8 of an inch to allow it to actually shift the rods. Brackets were made and moved back 2" to accommodate the adv adapter part, and the new tranny mounts were modified as well.

The CPU unit was placed right in the middle. I read to place it on the passenger side but it actually work best for us to place the CPU unit in the middle. We used the bracket from the explorer anchor it on the outside and a special bracket was made to fit the inside. If you place it right in the area we used, there were no issues with running into things on the other side.

A new throttle cable was placed. We did use the shifter cable from the explorer
to control the transmission. He made a bracket so we could use it with the existing steering wheel column shift shifter.

Here are some pics.......
 

Attachments

  • IMAG0192.jpg
    IMAG0192.jpg
    74.1 KB · Views: 169
  • IMG950776.jpg
    IMG950776.jpg
    96.8 KB · Views: 181
  • IMG_5454.jpg
    IMG_5454.jpg
    60.2 KB · Views: 182
  • IMG951816.jpg
    IMG951816.jpg
    68 KB · Views: 179
  • IMG956293.jpg
    IMG956293.jpg
    63.5 KB · Views: 172
  • IMG_3686.jpg
    IMG_3686.jpg
    80.9 KB · Views: 182
  • IMAG0017.jpg
    IMAG0017.jpg
    111.3 KB · Views: 191
  • IMAG0009.jpg
    IMAG0009.jpg
    76.1 KB · Views: 175
  • IMAG0202.jpg
    IMAG0202.jpg
    61.8 KB · Views: 147
  • IMAG0213.jpg
    IMAG0213.jpg
    100.9 KB · Views: 190
  • IMAG0214.jpg
    IMAG0214.jpg
    94.8 KB · Views: 162
  • IMAG0212.jpg
    IMAG0212.jpg
    65.6 KB · Views: 168
OP
OP
roloniko

roloniko

New Member
Joined
Oct 17, 2013
Messages
38
Loc.
Ft. Collins/Loveland
Her we go....Just about done with the project. After a few little hick ups we are finally to the end. We did notice when we tried cranking it there was an issue. We finally realized the shifter was reversed. So he had to modify the bracket again so the shifter would work correctly. See pic...

Everything else came together just fine. We put in a new radiator and bracket to secure it. We welded a piece for the top and the bottom. See pic...

I was told to use different types of gadgets for the fuel filter but we ended up using the original fuel filter bracket from the explorer to hold up the new one we put in. See pic...

The fuels line were a little modified. See pic...

We put in the Sherman gas tank from Wildhorses4x4.. went in easy!! See pic.

The only other thing we had to find were the hoses... With the help of people from auto zone who allowed to go back and check out their inventory of hoses we finally found 2 that would work. We took them back and made a total of 4 cuts and they fit perfect!! See pic... We used E72088 Dayco and C70445 Dayco Radiator hoses. I forgot which one was which but I'm sure you can figure it out.

The only things left are the drive shafts and the exhaust with a few hopefully minor electrical things to finish up.
 

Attachments

  • IMAG0230.jpg
    IMAG0230.jpg
    98.5 KB · Views: 151
  • IMAG0227.jpg
    IMAG0227.jpg
    105.1 KB · Views: 154
  • IMAG0225.jpg
    IMAG0225.jpg
    81.9 KB · Views: 158
  • IMAG0224.jpg
    IMAG0224.jpg
    102.7 KB · Views: 153
  • IMAG0223.jpg
    IMAG0223.jpg
    67.5 KB · Views: 154
  • IMAG0220.jpg
    IMAG0220.jpg
    95.2 KB · Views: 157
  • IMG954557.jpg
    IMG954557.jpg
    137.3 KB · Views: 167
  • IMG_0294.jpg
    IMG_0294.jpg
    103.8 KB · Views: 167
  • IMAG0232.jpg
    IMAG0232.jpg
    86.6 KB · Views: 161
  • IMAG0235.jpg
    IMAG0235.jpg
    79 KB · Views: 154
  • IMG950535.jpg
    IMG950535.jpg
    115.6 KB · Views: 164
  • IMG953937.jpg
    IMG953937.jpg
    81.7 KB · Views: 152

bronco 69

Full Member
Joined
Dec 9, 2013
Messages
157
Loc.
Union
Looks good!!! Theres not to many all explorer swap threads on here so its cool to see yours. I just bought a 96 explorer last weekend and getting ready to do the swap, I will be putting mine in front of my np435 so wont be as involved as yours. I assume you had efi guy do the harness? Any tips? Thanks in advance.
 

bbronko

Jr. Member
Joined
Jan 29, 2005
Messages
55
Nice job. Hope you keep up on the pics for everyone trying to do this swap.
 

rusty2078

Jr. Member
Joined
Jan 4, 2011
Messages
51
Loc.
Sherwood Park, AB
Backing up a bit...were you able to keep the stock engine mounts and placement with the 5.0? Pulled mine (out of a '97 donor) a couple of days ago and getting set to start working on the frame.

Thanks!
 

Teal68

Contributor
Bronco Guru
Joined
Mar 28, 2013
Messages
2,567
Loc.
Inlet Beach
Backing up a bit...were you able to keep the stock engine mounts and placement with the 5.0? Pulled mine (out of a '97 donor) a couple of days ago and getting set to start working on the frame.

Thanks!

Yes, the mounts and position are the same.

What heads are the 97 you got? If GT40P's, easily identified by four vertical bars on the front, you may wan to check on how you will deal with headers or exhaust manifolds. There's a lot of good info on here.
 

akirshbom

Full Member
Joined
Feb 12, 2006
Messages
240
Great build...
Just fired mine up yesterday. Many thanks to Gary EFI Guy on the harness and PCM work as well as advice and help along the way!
 

Teal68

Contributor
Bronco Guru
Joined
Mar 28, 2013
Messages
2,567
Loc.
Inlet Beach
I meant to same the same in my post above. Great build indeed! Love the detailed pics and descriptions.
 
Top