


Community
Message Forum
Photo Gallery
Event Calendar
Book Reviews
Bronco Wallpaper
Bronco FAQ
Link Back to CB!
Photo Gallery
Event Calendar
Book Reviews
Bronco Wallpaper
Bronco FAQ
Link Back to CB!
Buy / Sell


Bronco Tech
3 Arm Wiper Setup
Fix Motor Mount
Roll Cage Braces
Throttle Body 65mm
Wheel Alignment
Heat Riser Replacement
Vent Window Repair
Center Console Mount
Straighten Bumper
Ford 6R80 6 spd
More Tech...
Fix Motor Mount
Roll Cage Braces
Throttle Body 65mm
Wheel Alignment
Heat Riser Replacement
Vent Window Repair
Center Console Mount
Straighten Bumper
Ford 6R80 6 spd
More Tech...

Install the app
-
Welcome to ClassicBroncos! - You are currently viewing the forums as a GUEST. To take advantage of all the site features, please take a moment to register. It's fast, simple and absolutely free. So please join our community today!If you have problems registering or can't log into your account, please contact Admin.
You are using an out of date browser. It may not display this or other websites correctly.
You should upgrade or use an alternative browser.
You should upgrade or use an alternative browser.
Red Label 68 4.6 Terminator Powered Bronco
- Thread starter houseofdiesel
- Start date
OP
OP
houseofdiesel
Full Member
- Joined
- Dec 26, 2008
- Messages
- 253
Were did you get that pit man arm?
Making it. Flattened OE arm and tacked it to a piece a 1" flat steel. Cut out splines with a 2 1/4" hole saw. Marked hole for drag link, outlined it allowing for some more meat, separated them, and cut the hole for spline piece out of the new flat stock. Notched the blind splines with a pipe saw to allow 180 degrees of adjustment. Cut the two angles on the cold saw and notched the corners off to have less grinding to round the them off. Ground angles in the new piece to stack welds, slid in the splined piece, and tacked it.
Bulletproof Steering told me it was my only option. No body makes a custom flat for us Ford guys. There are a couple that come close but I needed to run a 1 ton Chevy BJ drag link from Ballistic Fab so my hand were tied. But for drops, 180 splined, and other options Bulletproof Steering has a lot of knowledge and options. Just not flat this is the only way.
OP
OP
houseofdiesel
Full Member
- Joined
- Dec 26, 2008
- Messages
- 253
Update 1/24/10
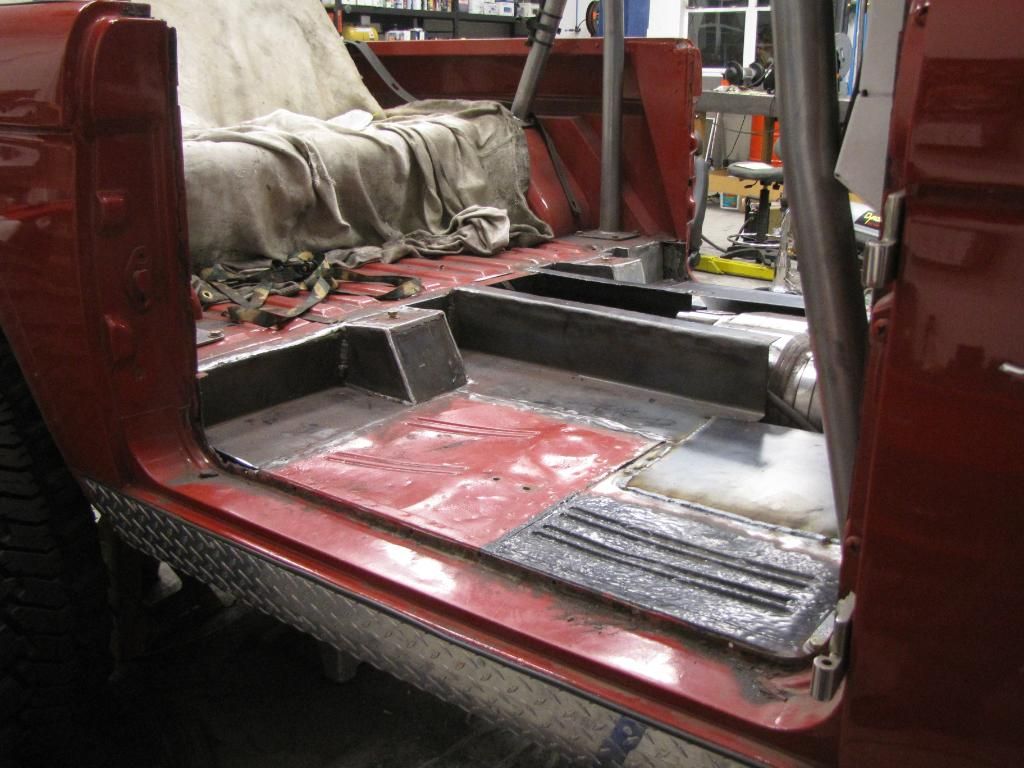
Cut and ran gussets for the driver side yesterday with my son and made the bracket to mount the transmission to the cross member/skid plate. Tried to let the boy piece it together himself while I watched some football, but neither really worked out. But still got the driver side done anyways. The passenger side is going to need to be trimmed up on the back side a little to allow room to pull the starter if I ever need to without pulling the motor. Grabbed a piece of 16 gauge and layed out the driver side floor pan for tonight.
Cut and ran gussets for the driver side yesterday with my son and made the bracket to mount the transmission to the cross member/skid plate. Tried to let the boy piece it together himself while I watched some football, but neither really worked out. But still got the driver side done anyways. The passenger side is going to need to be trimmed up on the back side a little to allow room to pull the starter if I ever need to without pulling the motor. Grabbed a piece of 16 gauge and layed out the driver side floor pan for tonight.
OP
OP
houseofdiesel
Full Member
- Joined
- Dec 26, 2008
- Messages
- 253
Update 2/1/10
Well to be honest the floor and firewall are kicking my but. I'm good at laying out the angles and all but welding it in and making the seams match isn't my strong suit. I've ran excess laps, folds, and 90's where ever possible to add strength though. Clearances all look good and the shifters, linkages, seats, and center console are all going to fit back in. The toughest part was getting the seats to mount lower. They were mounted before at the level of the rear deck. The passenger seat was easy to drop, but on the driver side I ran into problems with the huge Stak transfer case. I didn't want to have it sticking way below the frame so I had to bring it up into the cab, in turn taking up room for the driver seat. In all I was able to get the seats about two inches lower which is way better than before cause my head was at roll cage hight with the seat fully compressed down. A 12" section over the transfer case linkage and Trans to T case area will be removable to make linkage adjustment and transfer case removal easy. The motor ended up sitting a couple inches farther forward so a lot of what I cut out of the fire wall can be put back, but it's okay that I cut it out cause now I can lay it out to leave plenty of room for the fuel lines, wiring, and ECM. And add an access panel for fuse block and ECM mounting. After I get everything welded in, I'll pull the body off, ground down the welds, and Line X the tub, firewall, and under side.
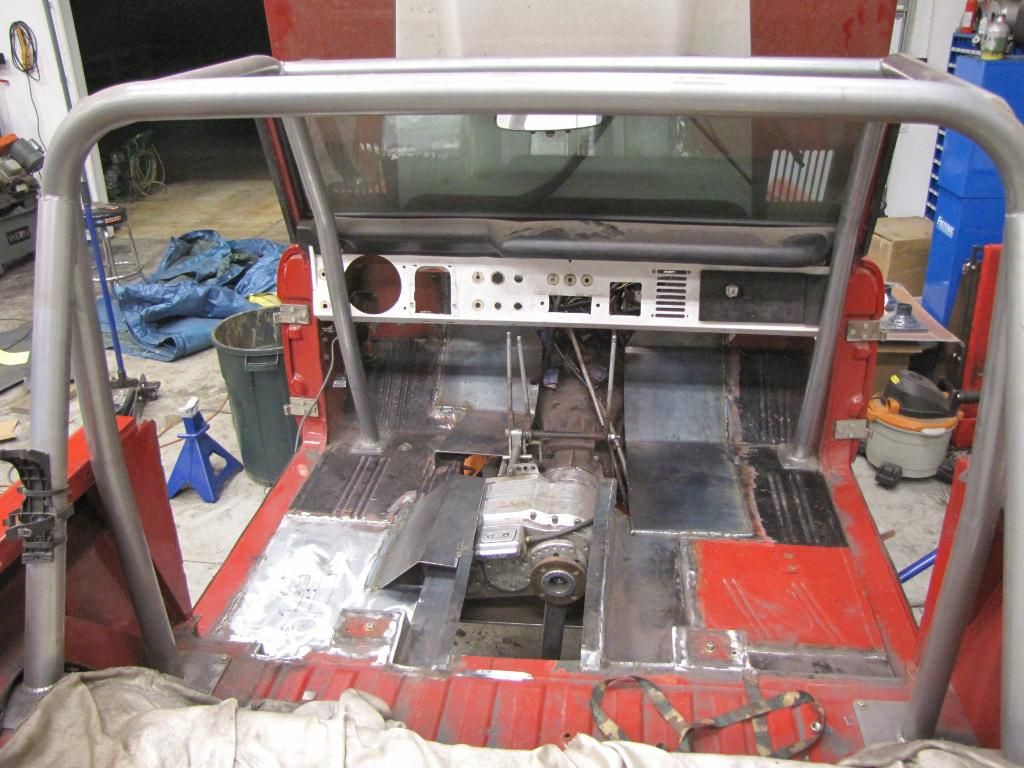
Well to be honest the floor and firewall are kicking my but. I'm good at laying out the angles and all but welding it in and making the seams match isn't my strong suit. I've ran excess laps, folds, and 90's where ever possible to add strength though. Clearances all look good and the shifters, linkages, seats, and center console are all going to fit back in. The toughest part was getting the seats to mount lower. They were mounted before at the level of the rear deck. The passenger seat was easy to drop, but on the driver side I ran into problems with the huge Stak transfer case. I didn't want to have it sticking way below the frame so I had to bring it up into the cab, in turn taking up room for the driver seat. In all I was able to get the seats about two inches lower which is way better than before cause my head was at roll cage hight with the seat fully compressed down. A 12" section over the transfer case linkage and Trans to T case area will be removable to make linkage adjustment and transfer case removal easy. The motor ended up sitting a couple inches farther forward so a lot of what I cut out of the fire wall can be put back, but it's okay that I cut it out cause now I can lay it out to leave plenty of room for the fuel lines, wiring, and ECM. And add an access panel for fuse block and ECM mounting. After I get everything welded in, I'll pull the body off, ground down the welds, and Line X the tub, firewall, and under side.
")
Making it. Flattened OE arm and tacked it to a piece a 1" flat steel. Cut out splines with a 2 1/4" hole saw. Marked hole for drag link, outlined it allowing for some more meat, separated them, and cut the hole for spline piece out of the new flat stock. Notched the blind splines with a pipe saw to allow 180 degrees of adjustment. Cut the two angles on the cold saw and notched the corners off to have less grinding to round the them off. Ground angles in the new piece to stack welds, slid in the splined piece, and tacked it.
Bulletproof Steering told me it was my only option. No body makes a custom flat for us Ford guys. There are a couple that come close but I needed to run a 1 ton Chevy BJ drag link from Ballistic Fab so my hand were tied. But for drops, 180 splined, and other options Bulletproof Steering has a lot of knowledge and options. Just not flat this is the only way.
What would it cost to make one more?
OP
OP
houseofdiesel
Full Member
- Joined
- Dec 26, 2008
- Messages
- 253
What would it cost to make one more?
I don't have the right tools. If I could find someone to cut the new pitman for me out of 1" flat stock with a CNC would be best. You can do it yourself double sheering some flat stock. Double sheering works fine for up to 35" tires. Sorry it just took us way too long about 4-5 hours total to cut the angles on a cold saw, notch the corners, grind it down, and then TIG weld it.
OP
OP
houseofdiesel
Full Member
- Joined
- Dec 26, 2008
- Messages
- 253
Update 2/12/10
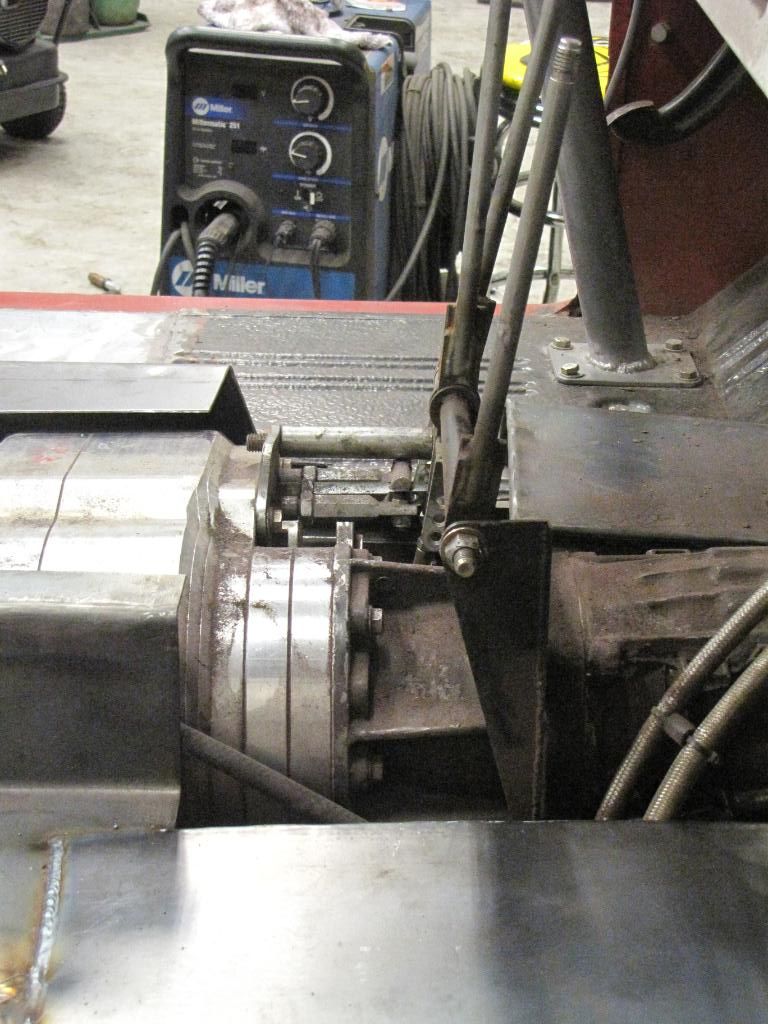
Well progress has been slow. Need to take some brakes to stay motivated. When down to the Hammers last weekend to check out some of the rigs for KOH and heading off to Pismo/Oceano for this weekend. Things should pick up next week though, cause we'll pull the motor to start reassembling the Ported Charger and setting up and fabricating the accessory/crank setup. So I got the last major tunnel panel bent to where I can finish welding, grinding, and cleaning everything up next week while my buddy is assembling the motor stuff. Here's the tunnel. The center section will be removable to access the T-case Transmission bolts for easy access and serviceability. And ease of shifter linkage adjustment.
Well progress has been slow. Need to take some brakes to stay motivated. When down to the Hammers last weekend to check out some of the rigs for KOH and heading off to Pismo/Oceano for this weekend. Things should pick up next week though, cause we'll pull the motor to start reassembling the Ported Charger and setting up and fabricating the accessory/crank setup. So I got the last major tunnel panel bent to where I can finish welding, grinding, and cleaning everything up next week while my buddy is assembling the motor stuff. Here's the tunnel. The center section will be removable to access the T-case Transmission bolts for easy access and serviceability. And ease of shifter linkage adjustment.
OP
OP
houseofdiesel
Full Member
- Joined
- Dec 26, 2008
- Messages
- 253
Update 2/18/10
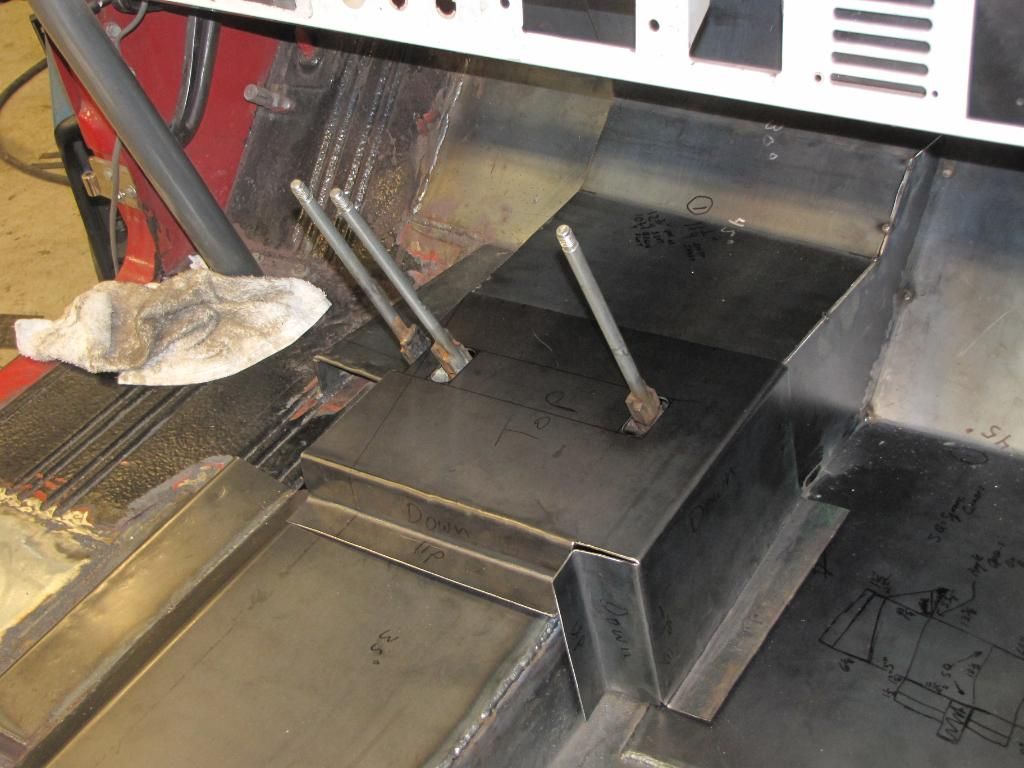
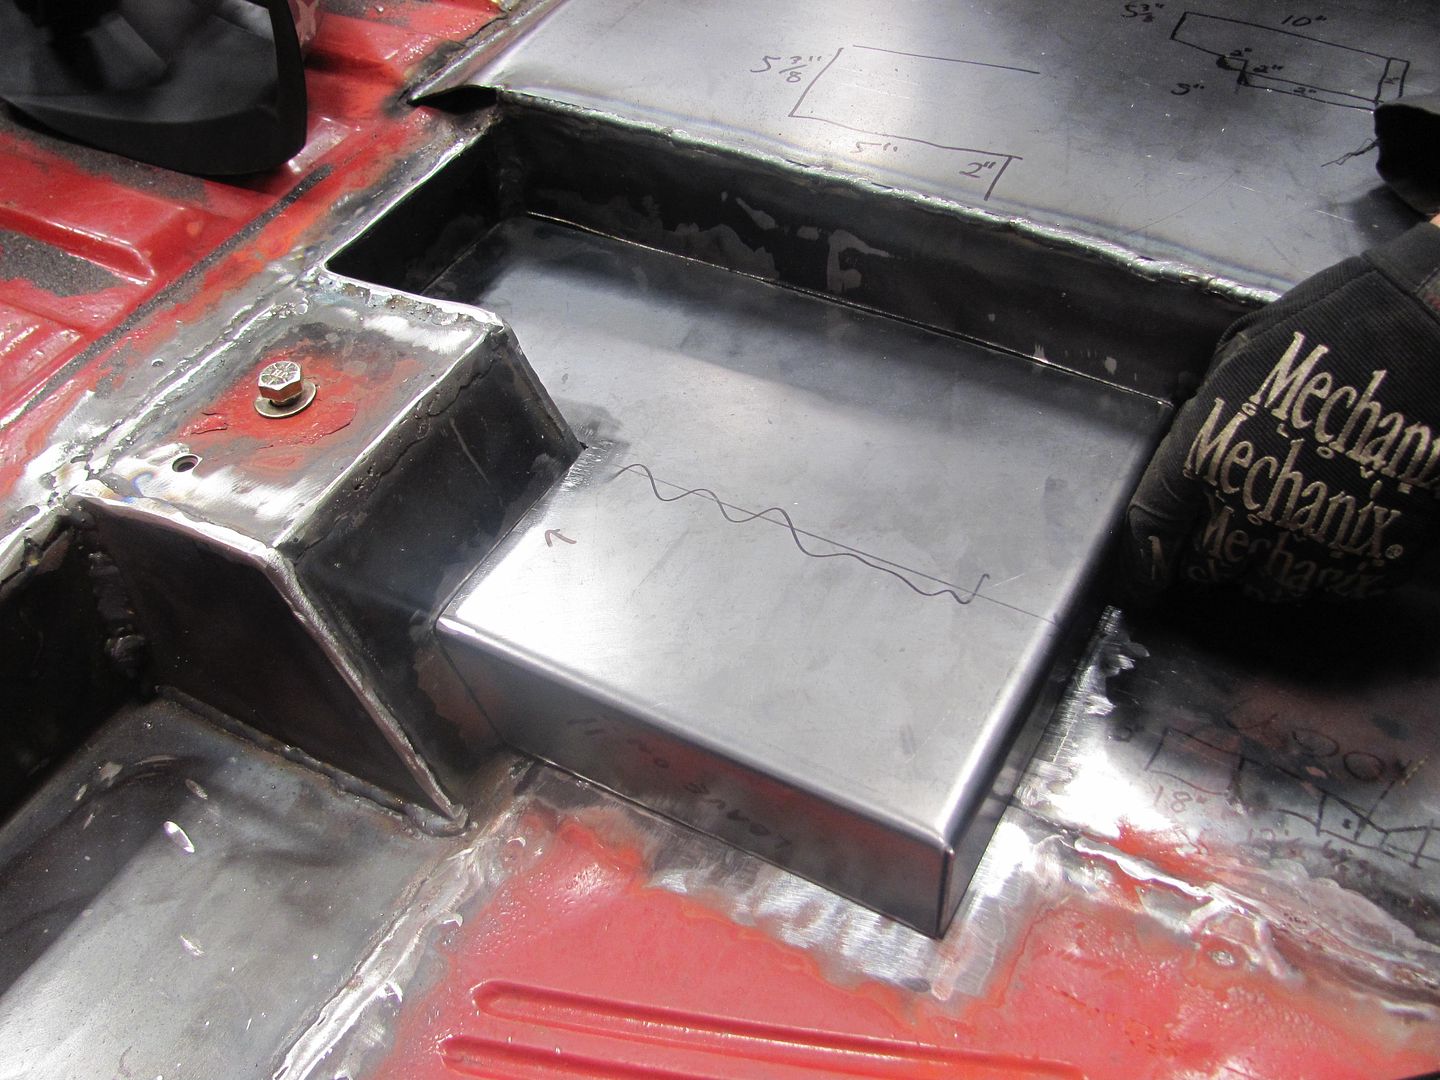
Well I'm finally finished with the tunnel firewall for the most part. I've got a couple small fill pieces to throw in and some trimming, but other than that it's done. The removable tunnel came out great, and fits and removes cleanly, no hassle. Now I can finally get to the fun stuff. Next on the list is the motor and links. 3 Link front and 4 link rear. As for the motor, the Stiegemeier Ported Eaton is back with their Snake Bite setup, and Injectors to go with the Aeromotive Pump and Rails I was already running on the motor. Also final fitting and modifications needed to move the Alternator in, eliminate the lower accessory mount bracket with the use of some Metco tensioners and pulleys. I'll try to use their replacement plate but it might not work, so I may need to have one made. I had them throw in extra post so I can relocate one of the tentioners to my own location due to the alternator. Here's some pics of the finished tunnel.


Well I'm finally finished with the tunnel firewall for the most part. I've got a couple small fill pieces to throw in and some trimming, but other than that it's done. The removable tunnel came out great, and fits and removes cleanly, no hassle. Now I can finally get to the fun stuff. Next on the list is the motor and links. 3 Link front and 4 link rear. As for the motor, the Stiegemeier Ported Eaton is back with their Snake Bite setup, and Injectors to go with the Aeromotive Pump and Rails I was already running on the motor. Also final fitting and modifications needed to move the Alternator in, eliminate the lower accessory mount bracket with the use of some Metco tensioners and pulleys. I'll try to use their replacement plate but it might not work, so I may need to have one made. I had them throw in extra post so I can relocate one of the tentioners to my own location due to the alternator. Here's some pics of the finished tunnel.
OP
OP
houseofdiesel
Full Member
- Joined
- Dec 26, 2008
- Messages
- 253
Update 2/22/10
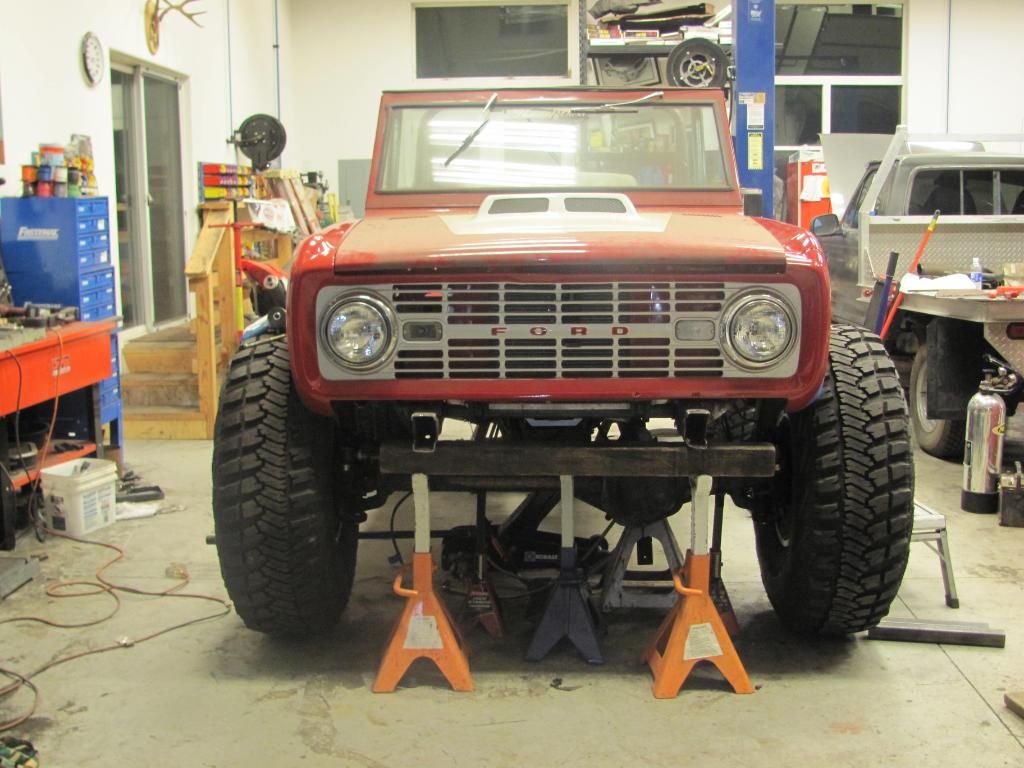
Well got all of the frame brackets tacked up. I don't want to tack the axle brackets until I get the motor and trans back in to be sure that my pinion angles are correct. Had to make some room for the two upper rear bracket where I lowered the tub. Both will be under the seats but actually worked out kinda clean anyways. I'm still confused by the hole 3 and 4 link calculator mess. I've spent days over the past few weeks crunching numbers and reading endless threads on link setups and the calc. I really wish people would spend less time and space trying to act like a know it all instead of just posting fact. It'd be nice if they got rid of the old thread on Pirate with all of it's meaningless crap and posted a specific post just stating the definitions of what the basics mean and where you want your numbers to land. That's it, nothing else about theories or what if's. We are build extreme travel off-road rigs. All the calc does is tell us what our basic characteristics are at ride hight on the street. Beyond that during articulation and coil/strut/sway characteristics are all a different topic. The only way to truly test the cycled suspension is to cycle it. As for body sway and roll, only perfectly tuned suspension setup can solve that. The smallest amount of too little or too much spring rate or PSI can ruin a perfectly good link design. It's a fine since and weighing the vehicle is the only way to come close right off the bat without pure luck. Oh well sorry I got side tracked, here are the pics:
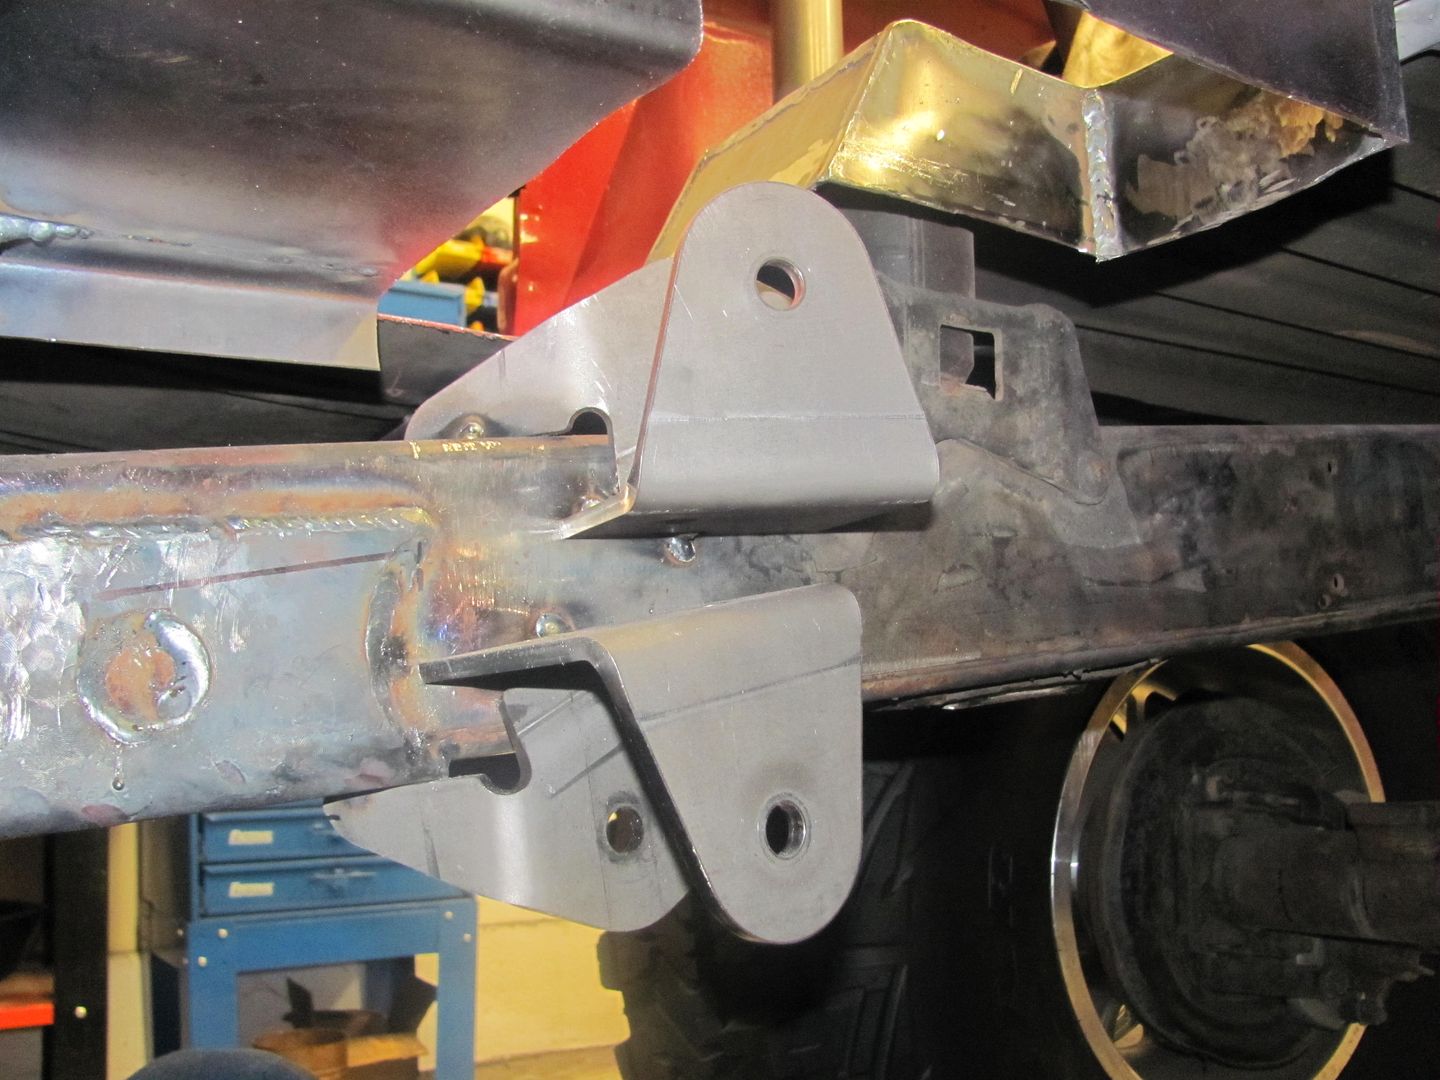
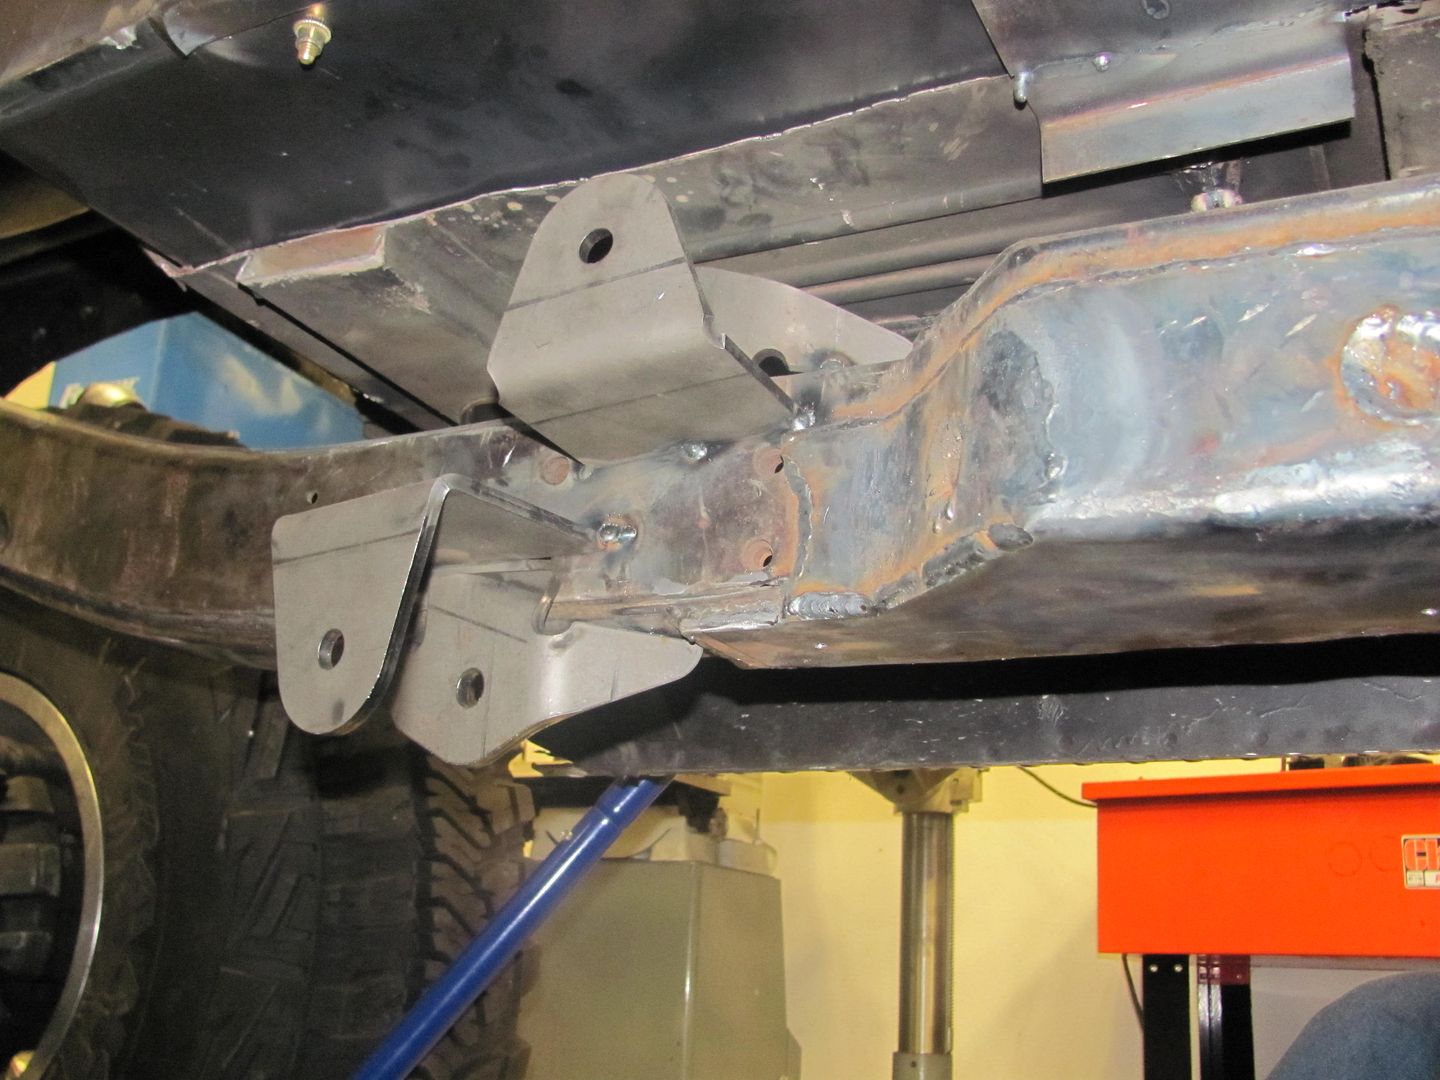
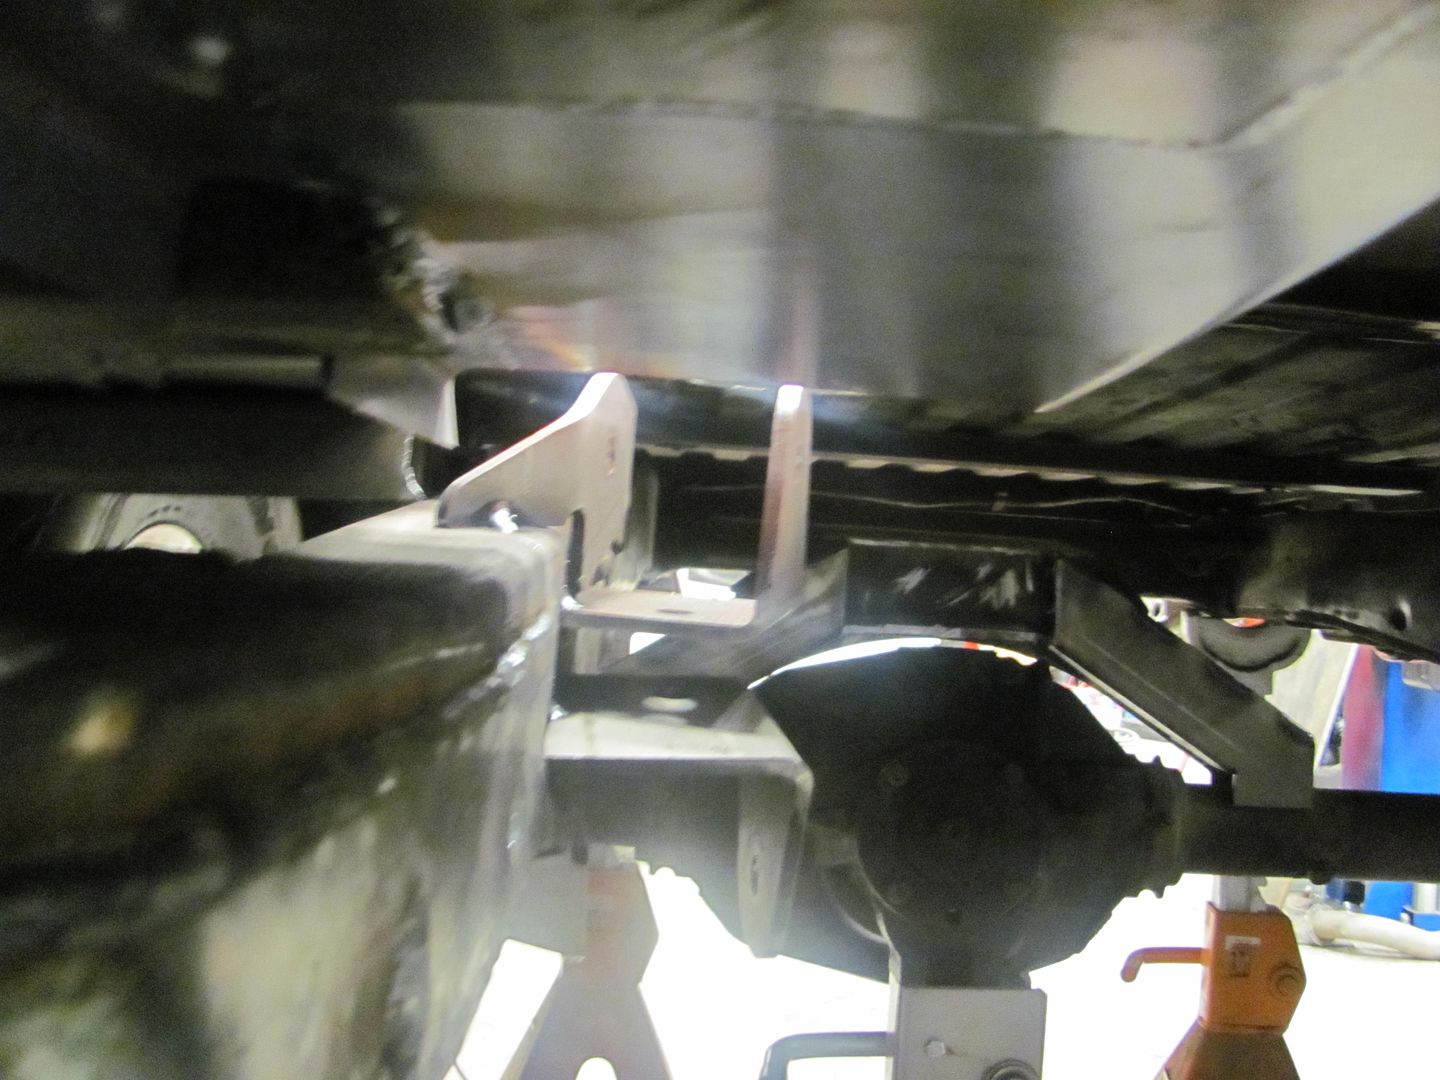
Well got all of the frame brackets tacked up. I don't want to tack the axle brackets until I get the motor and trans back in to be sure that my pinion angles are correct. Had to make some room for the two upper rear bracket where I lowered the tub. Both will be under the seats but actually worked out kinda clean anyways. I'm still confused by the hole 3 and 4 link calculator mess. I've spent days over the past few weeks crunching numbers and reading endless threads on link setups and the calc. I really wish people would spend less time and space trying to act like a know it all instead of just posting fact. It'd be nice if they got rid of the old thread on Pirate with all of it's meaningless crap and posted a specific post just stating the definitions of what the basics mean and where you want your numbers to land. That's it, nothing else about theories or what if's. We are build extreme travel off-road rigs. All the calc does is tell us what our basic characteristics are at ride hight on the street. Beyond that during articulation and coil/strut/sway characteristics are all a different topic. The only way to truly test the cycled suspension is to cycle it. As for body sway and roll, only perfectly tuned suspension setup can solve that. The smallest amount of too little or too much spring rate or PSI can ruin a perfectly good link design. It's a fine since and weighing the vehicle is the only way to come close right off the bat without pure luck. Oh well sorry I got side tracked, here are the pics:
mustangtoby
Bronco Guru
Wow! Nice work, this thing is gonna rock! Kudo's to you, great job!
av bronco
Bronco Guru
I think they make lower pulleys for those things that get rid of all that support bearing stuff, I had one for my 03 lightning that was larger then the stock giving me lots more boost.
OP
OP
houseofdiesel
Full Member
- Joined
- Dec 26, 2008
- Messages
- 253
I think they make lower pulleys for those things that get rid of all that support bearing stuff, I had one for my 03 lightning that was larger then the stock giving me lots more boost.
Thanks. It's Metco. I'm using their stuff. It comes with a plate that eliminates the OE lower bracket. I might need to either modify it or have a more custom one cut for my application. It's designed to simply eliminate the bracket and relocating one pulley. With me tucking the Alternator in tighter, I might need to relocate two of the pulleys. As for a different size pulley I've talked extensively with Stiegemeier to make sure I run the right setup and with the porting I need to run an OE size crank pulley.
OP
OP
houseofdiesel
Full Member
- Joined
- Dec 26, 2008
- Messages
- 253
Update 2/25/10
Well got a lot done last night. Put most of the top of the motor back together and modified the universal truss from Poly Performance. It's a great piece but the heim mounts are angled at like 25 degrees for Jeeps so they aren't totally universal, but I like it a lot better than the flat channel design most use. So I had to cut everything out and reposition them at 10 Degrees. As for all the performance parts everything went in pretty flawless except the boost blow off at the driver side of the blower was contacting the Aeromotive fuel rail so we had to notch the rail a little to give it clearance. Not pretty but it works.
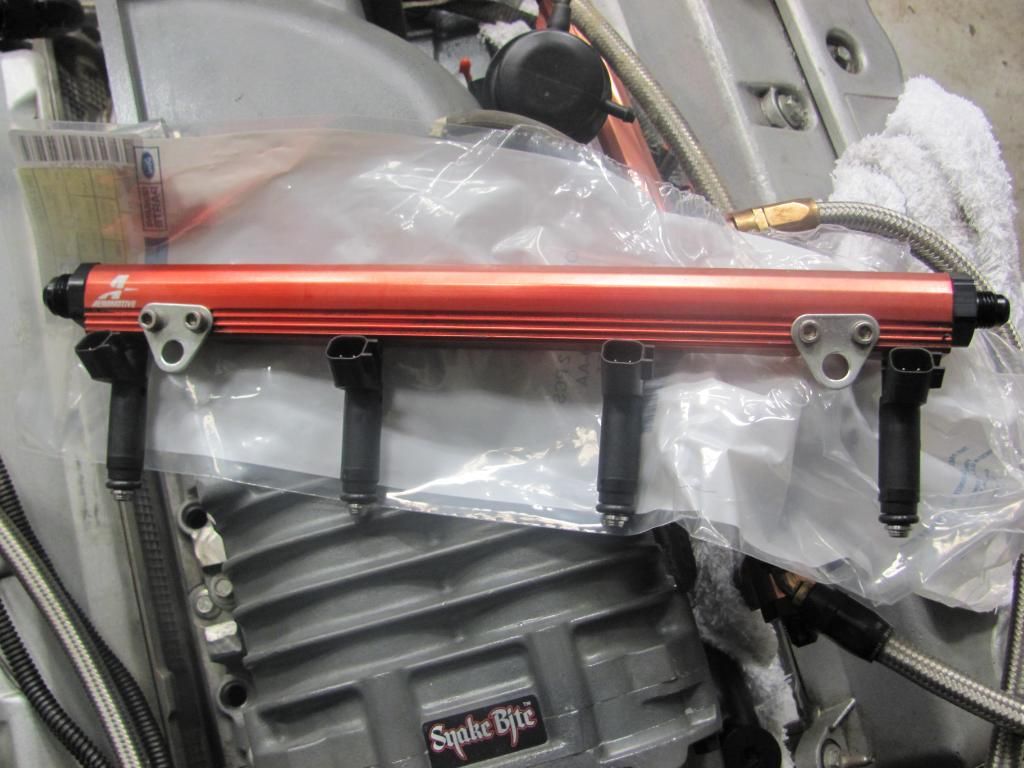
Well got a lot done last night. Put most of the top of the motor back together and modified the universal truss from Poly Performance. It's a great piece but the heim mounts are angled at like 25 degrees for Jeeps so they aren't totally universal, but I like it a lot better than the flat channel design most use. So I had to cut everything out and reposition them at 10 Degrees. As for all the performance parts everything went in pretty flawless except the boost blow off at the driver side of the blower was contacting the Aeromotive fuel rail so we had to notch the rail a little to give it clearance. Not pretty but it works.
OP
OP
houseofdiesel
Full Member
- Joined
- Dec 26, 2008
- Messages
- 253
Update 2/26/10
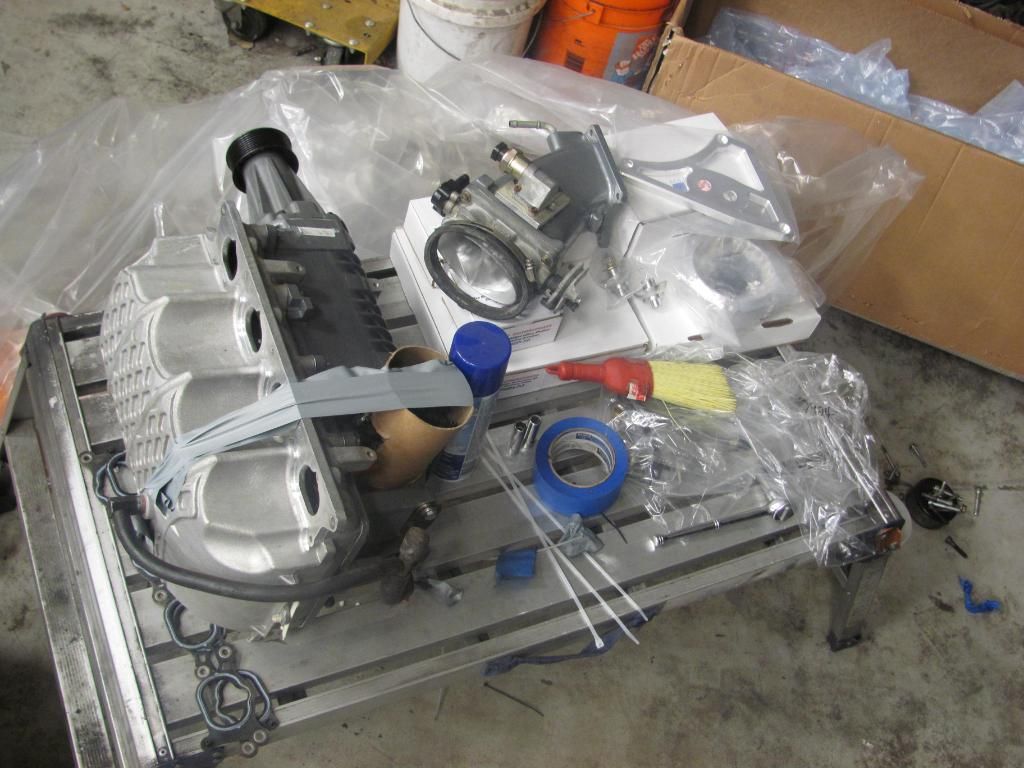
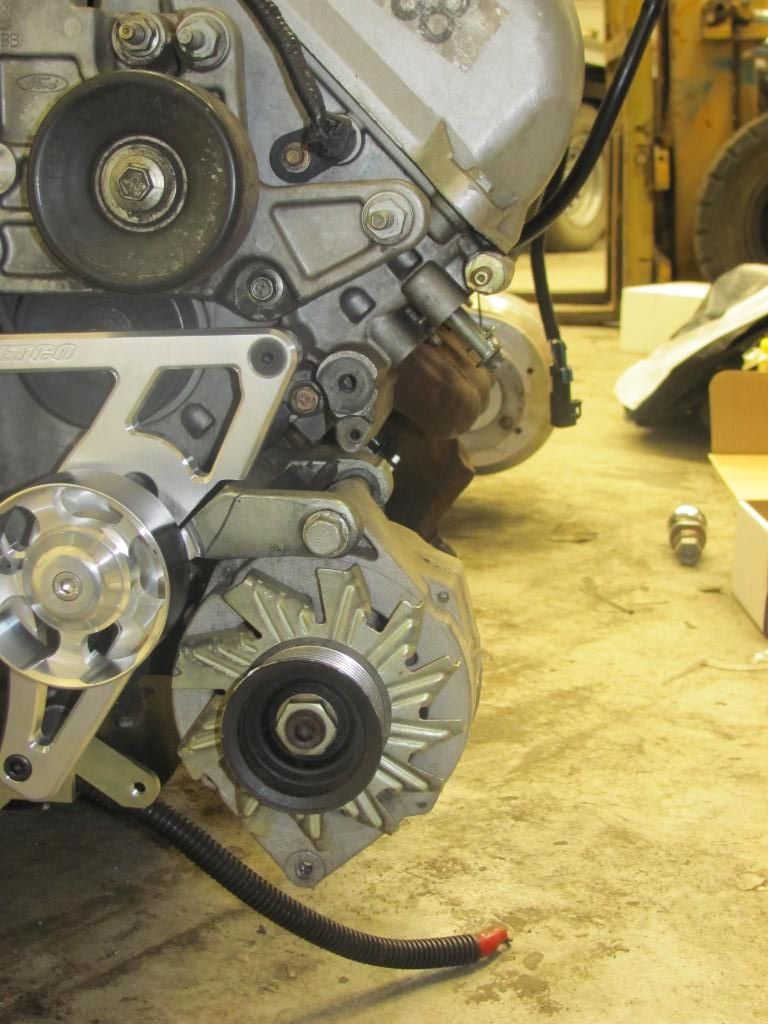
Well it was a late night but took our time to reroute some wires and lines, and re-tape some of the harness. Trying to make sure I get things right this time. Kinda nice I got to run the setup for a while before doing it like this cause I've already gotten to work a lot of the bugs out and now improve one things I had issues with over the past couple years. Lots of pics so for now I'll just post some pics of the goodies and then later tomorrow update pics on the modifications made tonight to make the pulley setup work with the tighter alternator setup. Here is some pics of Stiegemeier's awesome craftsmanship on the ported Eaton Snake Bite package. I was really happy with how flawless the whole process was, and really pleased with the time they gave me to make sure that I understood exactly what other accessories to get to compliment the setup, from correct pulleys to sticks.
Well it was a late night but took our time to reroute some wires and lines, and re-tape some of the harness. Trying to make sure I get things right this time. Kinda nice I got to run the setup for a while before doing it like this cause I've already gotten to work a lot of the bugs out and now improve one things I had issues with over the past couple years. Lots of pics so for now I'll just post some pics of the goodies and then later tomorrow update pics on the modifications made tonight to make the pulley setup work with the tighter alternator setup. Here is some pics of Stiegemeier's awesome craftsmanship on the ported Eaton Snake Bite package. I was really happy with how flawless the whole process was, and really pleased with the time they gave me to make sure that I understood exactly what other accessories to get to compliment the setup, from correct pulleys to sticks.
OP
OP
houseofdiesel
Full Member
- Joined
- Dec 26, 2008
- Messages
- 253
UPDATE 2/26/10 continued
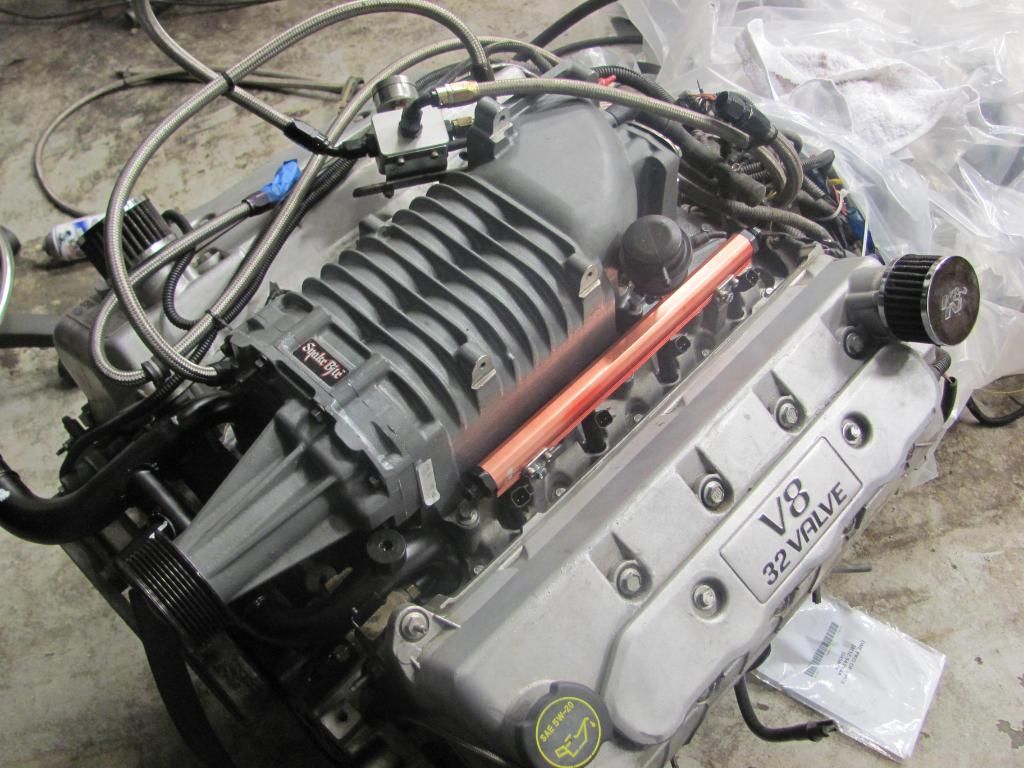
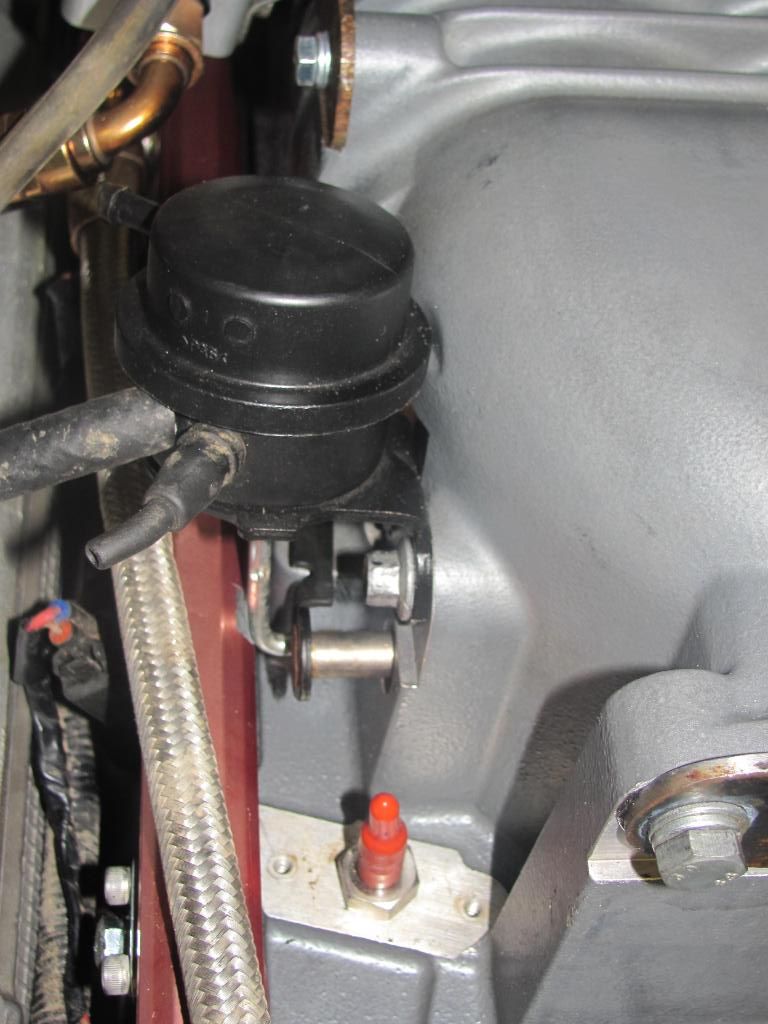
Okay now for the front accessory setup and cleaning up the wiring. I let the gauges go with the chassis when I traded out the buggy frame to have less crap laying around and it made figuring some of the wiring a complete pain in the rear. If you use tape to mark your wires, be sure to use good quality dark colors. Over the past 6 months that the motor's been here and there in the shop some of the tagged stuff had become pretty un-legible. DON"T use white tape. Someone that was helping me used some white tape on a couple and those were now blank. Still glad I did tag the connectors those, cause is saved hours. Now as for the pulley setup. To move the Alternator in, you need to delete the lower accessory bracket that spans the whole lower end of the motor. At first I was looking at having to have a custom crank outer pulley made cause the OE unit is made up of 4 pieces and uses the bracket to spin true. After much search I found the answer thanks to the SVTP crew. Metco Motorsports makes a lower bracket delete kit, and luckily they are one of the top brands that are recommended for replacement underdrive pulleys anyways so I was able to get all my pulleys from one place and they were great and even very quick with the main crank that was on back order. Now their bracket delete is designed for the Alternator to still go in the factory location. There were actually two holes a little lower and in on the block that lined up to use the top factory Alternator bracket. A lower bracket still has to be made. Now putting everything on the Metco Bracket for the relocated underdrive pulley needed to be notched slightly to clear the alt. bracket. With the Metco bracket on the OE alt bracket then had to be shaved slightly to clear the underdrive pulley. Wallah everything fit beautifully. It was way easier than I was expecting and really went smooth, luuuuucky. So for reference the modular motor accessory setup now measures 26"s and 29"s at the valve covers across. The OE frame width was around 23" so it still wouldn't have fit but probably could with some notching, a smaller power steering pump, and custom headers. Oh ya and here is a really good picture of a 4.6 SVT Cobra terminator 4V pulley diagram, accessory drive, cause that was a #*&^$ to find last night. Oh and I almost forgot, that is the factory belts.
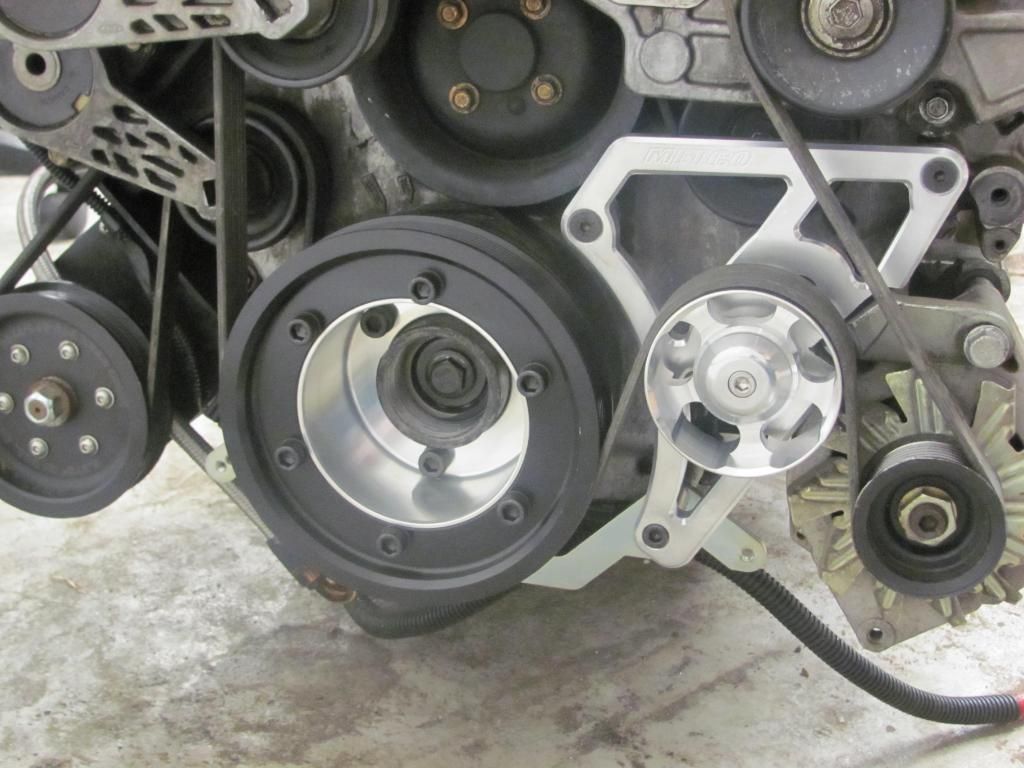
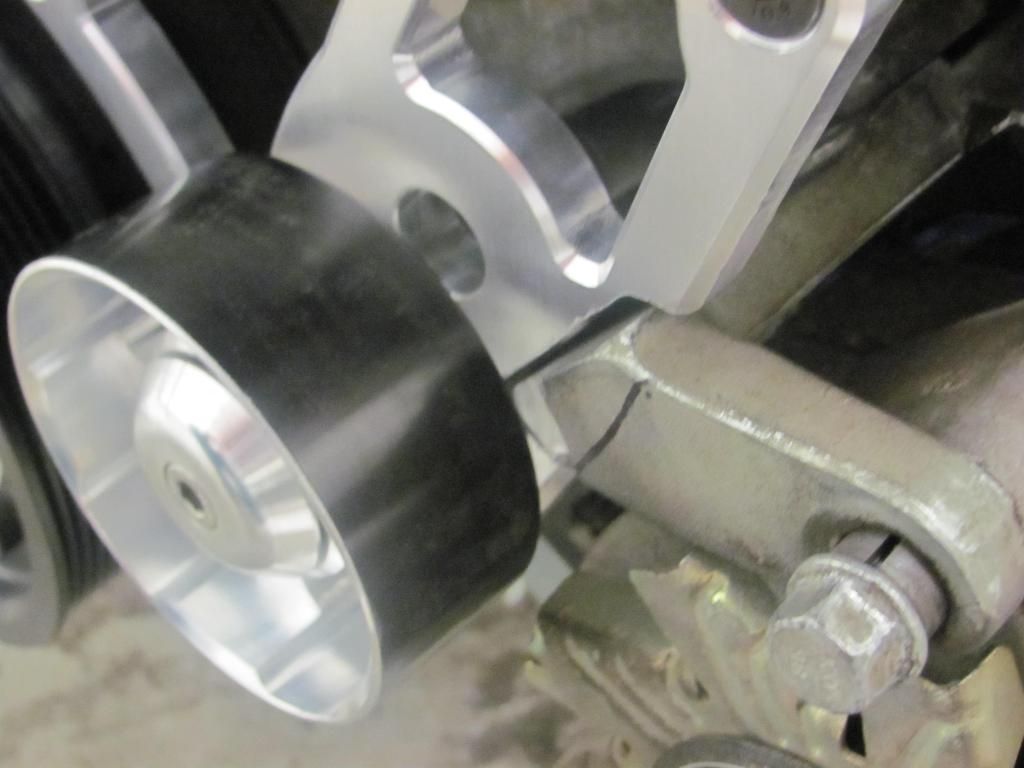
Okay now for the front accessory setup and cleaning up the wiring. I let the gauges go with the chassis when I traded out the buggy frame to have less crap laying around and it made figuring some of the wiring a complete pain in the rear. If you use tape to mark your wires, be sure to use good quality dark colors. Over the past 6 months that the motor's been here and there in the shop some of the tagged stuff had become pretty un-legible. DON"T use white tape. Someone that was helping me used some white tape on a couple and those were now blank. Still glad I did tag the connectors those, cause is saved hours. Now as for the pulley setup. To move the Alternator in, you need to delete the lower accessory bracket that spans the whole lower end of the motor. At first I was looking at having to have a custom crank outer pulley made cause the OE unit is made up of 4 pieces and uses the bracket to spin true. After much search I found the answer thanks to the SVTP crew. Metco Motorsports makes a lower bracket delete kit, and luckily they are one of the top brands that are recommended for replacement underdrive pulleys anyways so I was able to get all my pulleys from one place and they were great and even very quick with the main crank that was on back order. Now their bracket delete is designed for the Alternator to still go in the factory location. There were actually two holes a little lower and in on the block that lined up to use the top factory Alternator bracket. A lower bracket still has to be made. Now putting everything on the Metco Bracket for the relocated underdrive pulley needed to be notched slightly to clear the alt. bracket. With the Metco bracket on the OE alt bracket then had to be shaved slightly to clear the underdrive pulley. Wallah everything fit beautifully. It was way easier than I was expecting and really went smooth, luuuuucky. So for reference the modular motor accessory setup now measures 26"s and 29"s at the valve covers across. The OE frame width was around 23" so it still wouldn't have fit but probably could with some notching, a smaller power steering pump, and custom headers. Oh ya and here is a really good picture of a 4.6 SVT Cobra terminator 4V pulley diagram, accessory drive, cause that was a #*&^$ to find last night. Oh and I almost forgot, that is the factory belts.
TTTGOWYO
Tyler T. - EB Obsessed
Wow, can't wait to see the next round of pics.. I am now motivated to get off this chair adn do some more work to my old pony..
OP
OP
houseofdiesel
Full Member
- Joined
- Dec 26, 2008
- Messages
- 253
Update 3/3/10
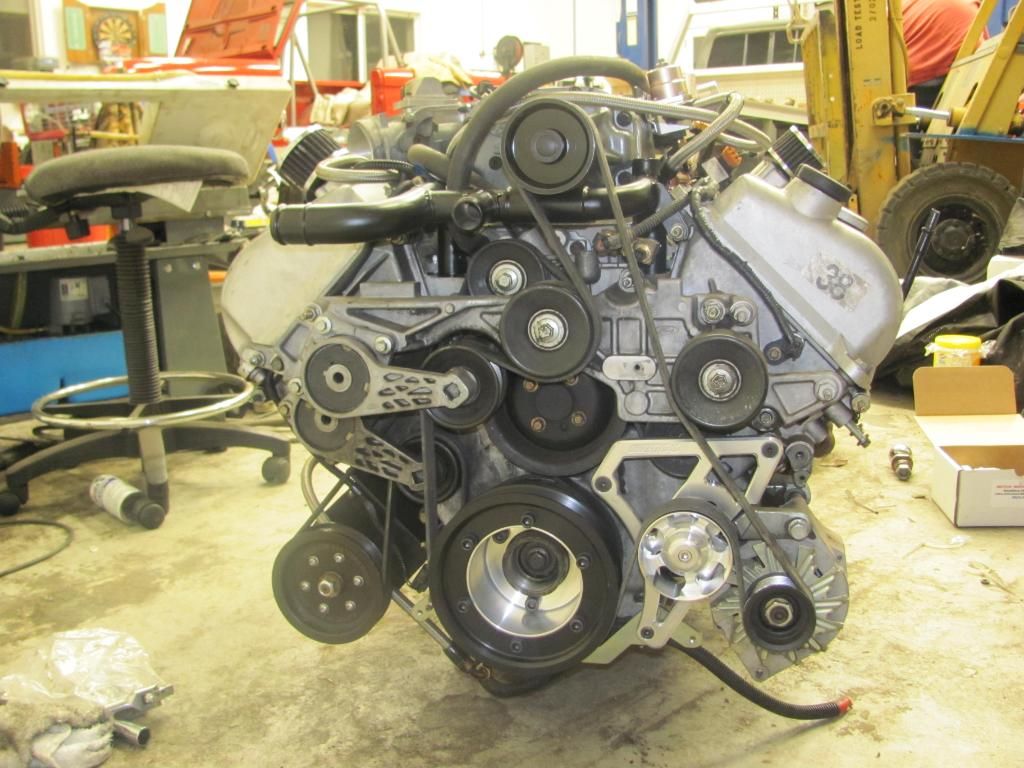
Well she's getting there. We laid the motor back in tonight to see how everything fits with the top back on and the link brackets in. Tons of room in the engine bay. I even cut out the area behind the glove box on the firewall for two red top Optima's. Finally made up my mind on how and where to mount my rear shocks/struts. I'm still leaning toward the ORI's. I just need to research and get some feedback on those versus non-reservoir coilovers. But going to have to bucket the front inner corners of the rear wells. Then make mount brackets that bolt under to the roll cage bolts. This way I don't have to pass the shocks through into the cab. It's looking like it's going to be 14" travel shocks front and rear. I'm still going to try like hell though to sneak 16" travelers in the rear, though that would be seriously cutting into the uptravel since there is way more room in the rear than in the front. Front up travel is really limited by how far I dropped the motor in the frame to get things as level as possible. Major issue though is the lower front link is right in the way of the front driveline so I'm going to have to hit the calculator again. Oh well here's some pics. The Metco pulleys came out sweet. Too bad they'll be behind the radiator, which actually fit in the factory brackets now that I widened the frame.
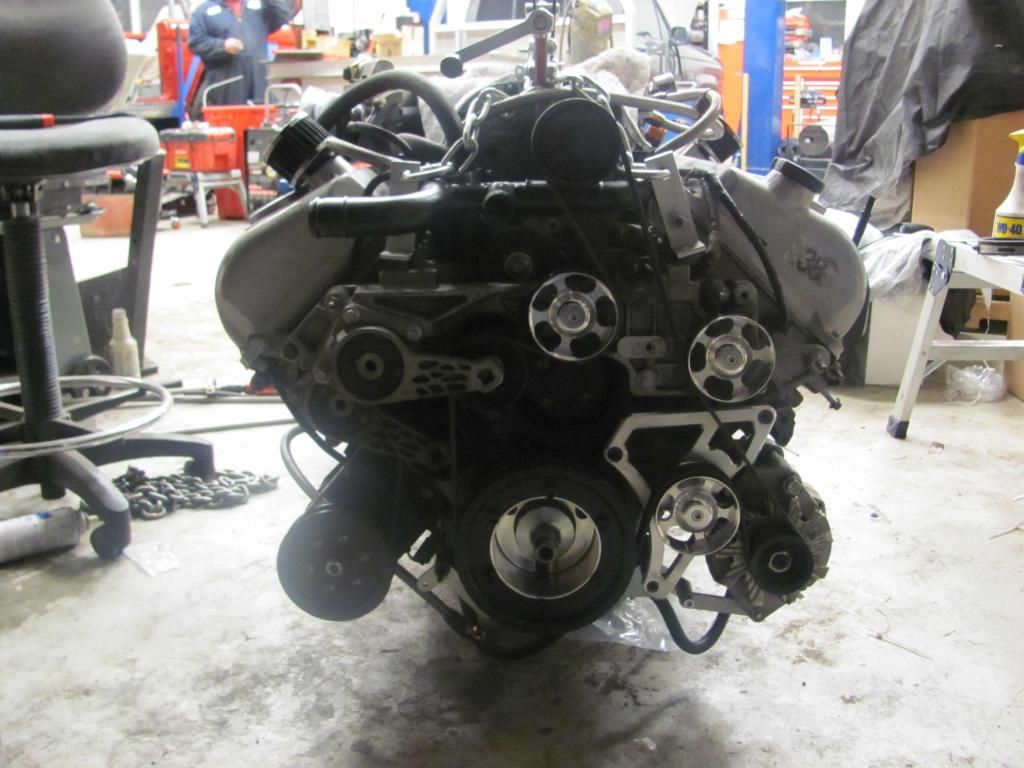
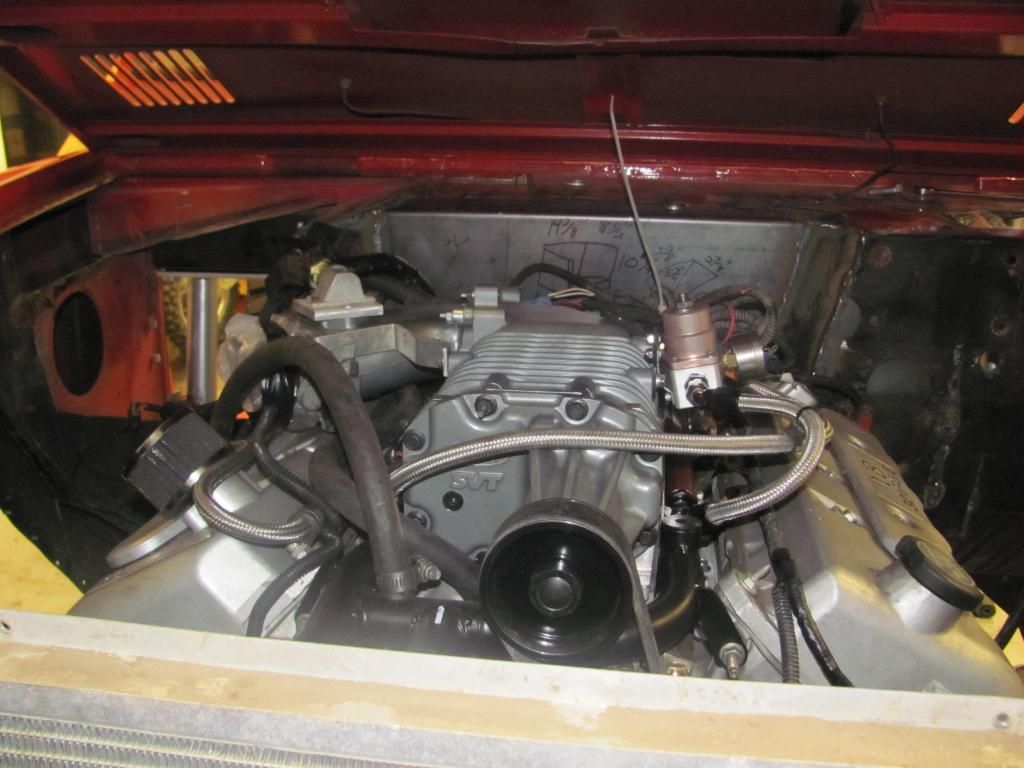
Well she's getting there. We laid the motor back in tonight to see how everything fits with the top back on and the link brackets in. Tons of room in the engine bay. I even cut out the area behind the glove box on the firewall for two red top Optima's. Finally made up my mind on how and where to mount my rear shocks/struts. I'm still leaning toward the ORI's. I just need to research and get some feedback on those versus non-reservoir coilovers. But going to have to bucket the front inner corners of the rear wells. Then make mount brackets that bolt under to the roll cage bolts. This way I don't have to pass the shocks through into the cab. It's looking like it's going to be 14" travel shocks front and rear. I'm still going to try like hell though to sneak 16" travelers in the rear, though that would be seriously cutting into the uptravel since there is way more room in the rear than in the front. Front up travel is really limited by how far I dropped the motor in the frame to get things as level as possible. Major issue though is the lower front link is right in the way of the front driveline so I'm going to have to hit the calculator again. Oh well here's some pics. The Metco pulleys came out sweet. Too bad they'll be behind the radiator, which actually fit in the factory brackets now that I widened the frame.
Similar threads
- Locked
- Replies
- 18
- Views
- 5K
- Replies
- 20
- Views
- 5K
- Locked
City: Turlock
Price: $150
- Replies
- 2
- Views
- 196