• Welcome to ClassicBroncos! - You are currently viewing the forums as a GUEST. To take advantage of all the site features, please take a moment to register. It's fast, simple and absolutely free. So please join our community today!
    If you have problems registering or can't log into your account, please contact Admin.

"Flying Tiger" New Video 8/5/18

OP
OP
BoureeOne

BoureeOne

Contributor
Bronco Guru
Joined
Mar 28, 2011
Messages
3,068
Loc.
Madisonville, La
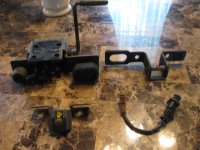
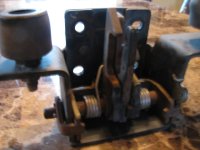
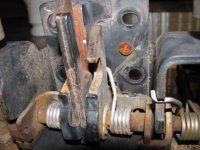
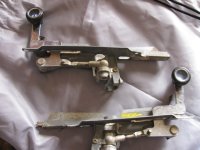
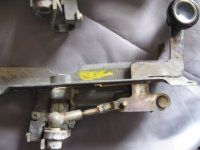
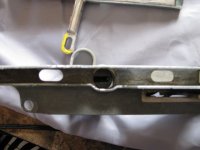
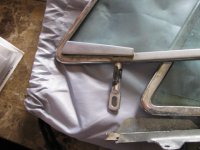
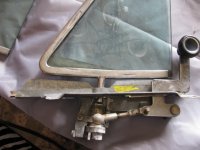
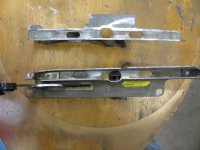
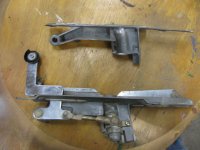
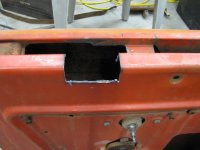
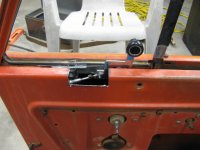
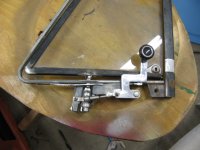
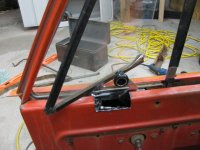
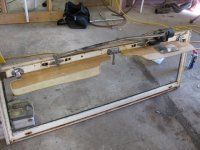
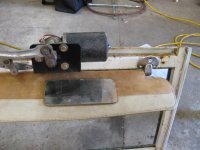
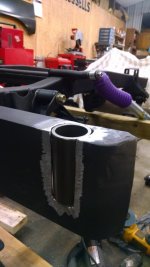
Here are the pics of the latest mod I am working on. Vent window handle and mechanism out of a 1971 Mercedes 280.
 

Attachments

  • IMG_2084.JPG
    IMG_2084.JPG
    102 KB · Views: 104
  • IMG_2085.JPG
    IMG_2085.JPG
    89.9 KB · Views: 101
  • IMG_2086.JPG
    IMG_2086.JPG
    78.4 KB · Views: 98
  • IMG_2087.JPG
    IMG_2087.JPG
    98.4 KB · Views: 93
  • IMG_2088.JPG
    IMG_2088.JPG
    104.8 KB · Views: 98
  • IMG_2101.JPG
    IMG_2101.JPG
    114.2 KB · Views: 93
  • IMG_2100.JPG
    IMG_2100.JPG
    108.7 KB · Views: 94
  • IMG_2104.JPG
    IMG_2104.JPG
    87.7 KB · Views: 95
  • IMG_2105.JPG
    IMG_2105.JPG
    94.9 KB · Views: 119
  • IMG_2110.JPG
    IMG_2110.JPG
    84.3 KB · Views: 103
  • IMG_2111.JPG
    IMG_2111.JPG
    104.9 KB · Views: 122
  • IMG_2112.JPG
    IMG_2112.JPG
    108.6 KB · Views: 141
OP
OP
BoureeOne

BoureeOne

Contributor
Bronco Guru
Joined
Mar 28, 2011
Messages
3,068
Loc.
Madisonville, La
Worked on the new drivers side seat mounting area this weekend. I am running seats out of an explorer, but when a mocked them up, I just felt like I was sitting too tall, and I am only 5'10". So I cut out the floor and lowered it 2" in the front and sloping to 3" in the rear. Made all the difference in the world.
 

Attachments

  • IMG_2500.JPG
    IMG_2500.JPG
    119 KB · Views: 166
  • IMG_2498.JPG
    IMG_2498.JPG
    103.4 KB · Views: 162
  • IMG_2497.JPG
    IMG_2497.JPG
    121.9 KB · Views: 188
OP
OP
BoureeOne

BoureeOne

Contributor
Bronco Guru
Joined
Mar 28, 2011
Messages
3,068
Loc.
Madisonville, La
Work on the mods needed to get electric wipers on my 66 windshield. Got the existing holes bigger. Mocked up the wiper arms so I could cut and extend the bar going to the driver side wiper. I also started mocking up the sun visors that I got out of a 1963 Thunderbird. Using the rear view mirror bracket that was in the rig when I bought it. I am assuming its a 66, but I have seen so many different ones. The T-bird visors will be recovered.
 

Attachments

  • IMG_3133.JPG
    IMG_3133.JPG
    119.6 KB · Views: 126
  • IMG_3134.JPG
    IMG_3134.JPG
    122 KB · Views: 111
  • IMG_3135.JPG
    IMG_3135.JPG
    105.9 KB · Views: 101
  • IMG_3136.JPG
    IMG_3136.JPG
    111.2 KB · Views: 104

69LUBR

Jr. Member
Joined
Jun 14, 2011
Messages
83
I did same modification on my early 69. I located a 67 ford pickup at Pick N Pull (Junk yard) and low and behold, the linkage was the same dimension as our beloved Broncos. The linkage has the exact same profile. I just cut the 4 1/8" and added it to my linkage for the modification. Saved cutting a good set of linkage for the modification. Your build looks great!
 
OP
OP
BoureeOne

BoureeOne

Contributor
Bronco Guru
Joined
Mar 28, 2011
Messages
3,068
Loc.
Madisonville, La
I did same modification on my early 69. I located a 67 ford pickup at Pick N Pull (Junk yard) and low and behold, the linkage was the same dimension as our beloved Broncos. The linkage has the exact same profile. I just cut the 4 1/8" and added it to my linkage for the modification. Saved cutting a good set of linkage for the modification. Your build looks great!

Actually mine is a 66 and had the vaccume wipers so the hole spacing is different. They are further apart. I took a stock wiper set, cut it, then took an extra wiper linkage, cut a piece out, and welded it into place.
 

69LUBR

Jr. Member
Joined
Jun 14, 2011
Messages
83
Actually mine is a 66 and had the vaccume wipers so the hole spacing is different. They are further apart. I took a stock wiper set, cut it, then took an extra wiper linkage, cut a piece out, and welded it into place.

Yes, mine too was vacuum. They didn't switch to electric until late 69. Mine were spaced further apart and smaller holes in the windshield too. I was just referencing the use of the 67 ford pu linkage to save a stock bronco linkage. We did the same modifications. Brad
 
OP
OP
BoureeOne

BoureeOne

Contributor
Bronco Guru
Joined
Mar 28, 2011
Messages
3,068
Loc.
Madisonville, La
Yes, mine too was vacuum. They didn't switch to electric until late 69. Mine were spaced further apart and smaller holes in the windshield too. I was just referencing the use of the 67 ford pu linkage to save a stock bronco linkage. We did the same modifications. Brad

I used all EB linkage...
 
OP
OP
BoureeOne

BoureeOne

Contributor
Bronco Guru
Joined
Mar 28, 2011
Messages
3,068
Loc.
Madisonville, La
Got most of the front suspension put on.......
 

Attachments

  • IMG_3828.JPG
    IMG_3828.JPG
    117.2 KB · Views: 169
  • IMG_3827.JPG
    IMG_3827.JPG
    112.2 KB · Views: 180
  • IMG_3826.JPG
    IMG_3826.JPG
    129.2 KB · Views: 194
  • IMG_3832.JPG
    IMG_3832.JPG
    114.5 KB · Views: 137
  • IMG_3831.JPG
    IMG_3831.JPG
    117.5 KB · Views: 148
  • IMG_3830.JPG
    IMG_3830.JPG
    132.1 KB · Views: 154
  • IMG_3829.JPG
    IMG_3829.JPG
    115.6 KB · Views: 178

SP66

Bronco Guru
Joined
Feb 26, 2012
Messages
1,363
The frame and suspension look great. Is that LSU purple? Nice work.
 
OP
OP
BoureeOne

BoureeOne

Contributor
Bronco Guru
Joined
Mar 28, 2011
Messages
3,068
Loc.
Madisonville, La
Thought I would also include what I did to my frame. Put together a special fitting on the end of my pressure washer hose to be able to run the hose down the inside of the frame make sure I got everything out. I then had the frame sandblasted. I coated the inside of the frame with two different coats using an Eastwood system for treating an inner frame, then I primed it and then painted it.
 

Attachments

  • IMG_2792.JPG
    IMG_2792.JPG
    116.5 KB · Views: 124
  • IMG_3179.JPG
    IMG_3179.JPG
    144.2 KB · Views: 125
  • IMG_3180 (2).jpg
    IMG_3180 (2).jpg
    174.2 KB · Views: 113
  • Coatings.jpg
    Coatings.jpg
    140.9 KB · Views: 153
  • IMG_3186.JPG
    IMG_3186.JPG
    65.2 KB · Views: 142
  • IMG_3184.JPG
    IMG_3184.JPG
    67.5 KB · Views: 152
  • IMG_3183.JPG
    IMG_3183.JPG
    157.1 KB · Views: 116
  • IMG_3188.JPG
    IMG_3188.JPG
    156.4 KB · Views: 116
  • IMG_3189.JPG
    IMG_3189.JPG
    160.6 KB · Views: 99

BluebroncoNC

Bronco Guru
Joined
Jul 30, 2007
Messages
1,717
Loc.
Asheville, NC
Like what you're doing. That vent mod... I kept thinking to myself, when I saw you're pictures.. "Why didn't I think of that..." Way cool.
 
OP
OP
BoureeOne

BoureeOne

Contributor
Bronco Guru
Joined
Mar 28, 2011
Messages
3,068
Loc.
Madisonville, La
Like what you're doing. That vent mod... I kept thinking to myself, when I saw you're pictures.. "Why didn't I think of that..." Way cool.

Its crazy what you see and think of when walking around the pull-a-parts. I actually stopped at the Mercedes to look at the side marker lights. Opened the door, saw that it had some cool bucket seats, then noticed the vent window handles. Was not a whole lot of work to get them out... Have found my seats, my aluminum side steps, my rear seats, my a/c vents, my sun shades, overhead console, spare tire latch mechanism, all were found in the pull-a-parts
 
OP
OP
BoureeOne

BoureeOne

Contributor
Bronco Guru
Joined
Mar 28, 2011
Messages
3,068
Loc.
Madisonville, La
Started on my spare tire carrier. Here are the first steps of cutting the hole in my existing bumper. Wow is this channel iron thick. The latching mechanism is from an early 90's Pathfinder. The hinge is from Comp 4x4. I really like this spindle/hinge because you actually weld on the sleeve and not the actual spindle....
 

Attachments

  • Hinge Build 4.jpg
    Hinge Build 4.jpg
    98.4 KB · Views: 111
  • Hinge Build 3.jpg
    Hinge Build 3.jpg
    43.7 KB · Views: 105
  • Hinge build.jpg
    Hinge build.jpg
    57.7 KB · Views: 113
  • Hinge Build 2.jpg
    Hinge Build 2.jpg
    51.3 KB · Views: 111
  • heavy-duty-1750-lb-rated-tire-carrier-hinge-kit-03[1].jpg
    heavy-duty-1750-lb-rated-tire-carrier-hinge-kit-03[1].jpg
    74.7 KB · Views: 111
  • IMG_2541.JPG
    IMG_2541.JPG
    116.5 KB · Views: 101
  • IMG_2548.JPG
    IMG_2548.JPG
    86.4 KB · Views: 94
  • IMG_2552.JPG
    IMG_2552.JPG
    124.6 KB · Views: 93
  • IMG_2559.JPG
    IMG_2559.JPG
    133.5 KB · Views: 91
OP
OP
BoureeOne

BoureeOne

Contributor
Bronco Guru
Joined
Mar 28, 2011
Messages
3,068
Loc.
Madisonville, La
Rebuilt my rear end, all new bearings and seals. New suspension, WH 2 1/2 11 pack, 6 degree shims, 1"blocks, Bilstein Shocks, new brakes all got installed this weekend.
 

Attachments

  • IMG_3923.jpg
    IMG_3923.jpg
    90.1 KB · Views: 74
  • IMG_3930.jpg
    IMG_3930.jpg
    123.9 KB · Views: 83
  • IMG_3931.jpg
    IMG_3931.jpg
    107.8 KB · Views: 70
  • IMG_3932.jpg
    IMG_3932.jpg
    115.7 KB · Views: 72
  • IMG_3933.jpg
    IMG_3933.jpg
    121.5 KB · Views: 83
Top