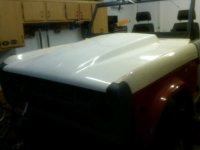
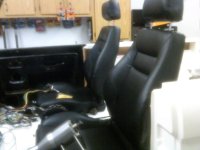
• Welcome to ClassicBroncos! - You are currently viewing the forums as a GUEST. To take advantage of all the site features, please take a moment to register. It's fast, simple and absolutely free. So please join our community today!
    If you have problems registering or can't log into your account, please contact Admin.

* Jersey Shore Build* aka Jersey Jalopy Updated-FIRST RIDE

OP
OP
ryoungbronco

ryoungbronco

Bronco Guru
Joined
Jul 4, 2007
Messages
1,748
Loc.
Belmar, NJ
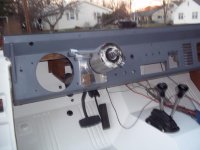
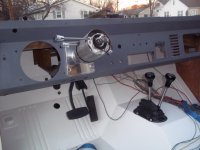
Does the steering column still fit through the opening? I dont know if your new column has the gear shift lever at the bottom??? Also how strong is the metal you welded to on the dash board?

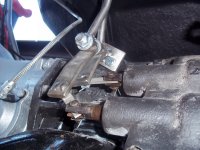
Steering column doesn't have any levers. I am going with a floor shifter and it does fit through the hole with no problem. The metal is the actual bracket that holds on the steering column under the dash. I took it from my metal body before I scrapped it. It seems to be strong but I will probably box it in just to be stronger.

After dinner I was able to go fix another problem. When I drilled the holes for the door striker I made a mistake and was off by 1/4 inch. That made the door close too far. Instead of cutting new holes I just made a new striker post (the one on the right) and moved the striker 1/4 inch. It worked and now my doors are looking better at the gaps.
 

Attachments

  • 3-attachment.aspx.jpg
    3-attachment.aspx.jpg
    111.3 KB · Views: 49
Last edited:
OP
OP
ryoungbronco

ryoungbronco

Bronco Guru
Joined
Jul 4, 2007
Messages
1,748
Loc.
Belmar, NJ
I just noticed that I hadn't posted some pics in this thread from last month.

Last month I had asked a question about the Winters Shifter. A member PM'd me saying he had one to sell. I didn't think it was worth the drive until he then told me that he had new in the box a hood, seats, and tilt column. So I took the two hour drive and came home with the following.

Getting these parts has put a fire under my butt. So like my avatar says, "Springtime or Bust" is going to be my motto.
 

Attachments

  • getcolumn-attachment.aspx.jpg
    getcolumn-attachment.aspx.jpg
    119.3 KB · Views: 75
  • gethood-attachment.aspx.jpg
    gethood-attachment.aspx.jpg
    66.6 KB · Views: 77
  • getseats-attachment.aspx.jpg
    getseats-attachment.aspx.jpg
    124.6 KB · Views: 84
  • getshifter-attachment.aspx.jpg
    getshifter-attachment.aspx.jpg
    125.3 KB · Views: 79

shamu

Lucky as the day is long.
Joined
Jun 18, 2009
Messages
5,290
Loc.
Sachse,Tx
All I want for Christmas is your shifter. LOL Looking good Rob. We all want to see the Christmas goodie pics.;)
 

Heus33

Bronco Guru
Joined
Jun 1, 2005
Messages
7,407
Looks like it was worth the 2 hr drive!

Hell yeah! I loved those seats in my last bronco. You really scored there - tilt column, pro flow hood (SWEET) and a shifter. Thats good karma at work!
 
OP
OP
ryoungbronco

ryoungbronco

Bronco Guru
Joined
Jul 4, 2007
Messages
1,748
Loc.
Belmar, NJ
First package came, can you guess what it is? How's a ss windshield frame to start? Still more on it's way. Holy packing!! Even with all the packing a corner lip of the drip rail bent. Not a biggie should bend back.
 

Attachments

  • getframe-attachment.aspx.jpg
    getframe-attachment.aspx.jpg
    138.3 KB · Views: 47
  • getpack-attachment.aspx.jpg
    getpack-attachment.aspx.jpg
    163.4 KB · Views: 34
OP
OP
ryoungbronco

ryoungbronco

Bronco Guru
Joined
Jul 4, 2007
Messages
1,748
Loc.
Belmar, NJ
It has been exactly one year since I started this thread. In that year I've done very little to the bronco. Got the second box today. Looks like I'll be busy next week. Thanks Tom's Bronco parts: Power steering pump, hoses, belt; SS twin stick and boot; windshield gaskets; hood hinges, door handles, tilt column bracket, dash cover, drop pitman, adjustable trac bar, steering shaft.
 

Attachments

  • 100_1570.jpg
    100_1570.jpg
    105 KB · Views: 52
  • 100_1573.jpg
    100_1573.jpg
    74.9 KB · Views: 57
OP
OP
ryoungbronco

ryoungbronco

Bronco Guru
Joined
Jul 4, 2007
Messages
1,748
Loc.
Belmar, NJ
I was more productive yesterday than I have been all year. First was the twin sticks and cutting the hole into the fiberglass body. I always get nervous adding holes but it turned out good. Next was drilling out the hole on top of the transfercase for the 1/2 bolt supplied with the twin stick. It was all going good until my angle drill broke. In turn, I had to lift the body to have enough room to use another drill. Luckily, I did lift the body because pulling the pins and cotter pins would have been a big pain in the rear. One last issue was the sticks rubbed up against the hole I had drilled. Instead of making the hole bigger I bent the twin sticks so that it would not rub. I was please with the results.

Next in line was the adjustable trac bar. No issues and looks clean.

Finally, was the steering column. It took me months to figure out how I would mount the bracket that holds the column. I had welded it to the dash itself but the column bezel/plate didn't fit correct. With a little persuasion with a hammer, I was rocking and rolling.

It was raining today so my plans were shot. Hopefully tomorrow I will add the power steering pump and steering shaft. After that is the stainless steel window frame and the hood.
 

Attachments

  • 100_1628.jpg
    100_1628.jpg
    74.6 KB · Views: 76
  • 100_1627.jpg
    100_1627.jpg
    64.2 KB · Views: 78
  • 100_1626.jpg
    100_1626.jpg
    71.3 KB · Views: 83
  • 100_1624.jpg
    100_1624.jpg
    119.6 KB · Views: 78
  • 100_1623.jpg
    100_1623.jpg
    85.4 KB · Views: 77
  • 100_1622.jpg
    100_1622.jpg
    89.3 KB · Views: 87
  • 100_1621.jpg
    100_1621.jpg
    66.4 KB · Views: 76
  • 100_1620.jpg
    100_1620.jpg
    62.6 KB · Views: 79
  • 100_1625.jpg
    100_1625.jpg
    87.6 KB · Views: 80
  • 100_1629.jpg
    100_1629.jpg
    67.2 KB · Views: 78
  • 100_1630.jpg
    100_1630.jpg
    68.9 KB · Views: 73
Top