• Just a reminder that you won't be able to start new posts or reply to existings posts in the Archive forum.

    This is where all the old posts go so they can still be used for reference and searched.
  • Welcome to ClassicBroncos! - You are currently viewing the forums as a GUEST. To take advantage of all the site features, please take a moment to register. It's fast, simple and absolutely free. So please join our community today!
    If you have problems registering or can't log into your account, please contact Admin.

2000 Explorer OBD II Transplant

OP
OP
surfer-b

surfer-b

Contributor
Bronco Guru
Joined
Sep 7, 2006
Messages
2,972
For the reservoir I didnt want to drop it too low because the pump is gravity feed, so I cut a plate large enough to move it back 3.75" and down .250" this gave me plenty of room once I got it away from the rib on the hood. I went to a local hydraulic supply and got the fittings and hose I needed to make the pressure hose. Both fittings are 45*
 

Attachments

  • DSC00530.jpg
    DSC00530.jpg
    113.2 KB · Views: 289
  • DSC00545.jpg
    DSC00545.jpg
    95.1 KB · Views: 265
  • DSC00594.jpg
    DSC00594.jpg
    99.4 KB · Views: 257
OP
OP
surfer-b

surfer-b

Contributor
Bronco Guru
Joined
Sep 7, 2006
Messages
2,972
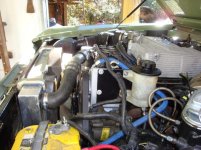
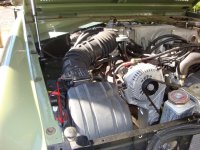
I had got the hood to close for now but I wanted to use the factory Explorer airfilter box, so it was time to move the battery to the pass side, truth be told I had moved the battery before I did any of the other mods. Anyway, this was another small project but time consuming. Once I got the batt moved I started placing the airbox in the battery location to see what was needed to get this thing to fit. The first thing I was going to have to do was cut the front mounting tabs off of the box. The 1st pic shows the tabs and the blue lines show about where I cut them.
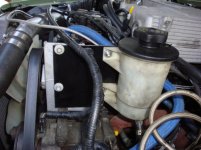
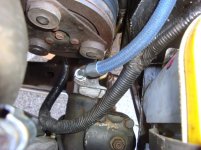
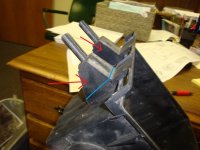
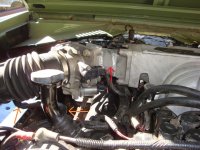
Once I got it to sit down where I wanted it I had to check for hood clearence, and yes it hit, but not by much. I placed the airfilter in the box to see where I could cut the box down, I needed the latches to work for the top so that was also took into consideration. I then marked 2 lines around the box and cut it out with a cutting disc, I removed about 7/8". Now that I got everthing removed I temp added the top piece back and placed the cover of the box on and the airboot to the TB in place, I checked for hood clearence, hey it worked, everything cleared. I took the box back out and used an epoxy to hold it together, after the epoxy dried I applied some permatex "ultra black" rtv around the seam just to make sure it was sealed. I need to mention that before I epoxied the top piece back on I rotated the bottom 180*, this would allow the intake for the air to be placed in the back left corner if you are standing over it looking back at the firewall. The last pic will give you an idea
 

Attachments

  • airbox cut.jpg
    airbox cut.jpg
    251.9 KB · Views: 260
  • DSC00553.JPG
    DSC00553.JPG
    267.1 KB · Views: 255
  • DSC00554.jpg
    DSC00554.jpg
    100.9 KB · Views: 274
  • airbox outlet.jpg
    airbox outlet.jpg
    285.9 KB · Views: 311

oharris

New Member
Joined
Jun 3, 2013
Messages
1
Any update on the wiring portion of this swap? I'm considering using a Explorer computer in my Mustang. I'd like to know how yours turned out.
 

forester2504

Jr. Member
Joined
Apr 13, 2007
Messages
117
Loc.
Georgia
Wiring schematic diagrams - obdii explorer

Surfer-B sent me copies and I had them scanned. Large format scanners are not cheap. Here are the scans if any of the brotherhood needs them.
Pass it on.;D
 

Attachments

  • TEMP007.PDF
    593.6 KB · Views: 128
  • TEMP006.PDF
    120.4 KB · Views: 92
  • TEMP005.PDF
    122.2 KB · Views: 90
  • TEMP004.PDF
    128.1 KB · Views: 101
  • TEMP003.PDF
    123.6 KB · Views: 109
  • TEMP002.PDF
    134.3 KB · Views: 141
  • TEMP001.PDF
    125.1 KB · Views: 298

Tom Dummer

Sr. Member
Joined
Nov 8, 2003
Messages
957
Loc.
Scappoose, Or
This is great and right where we are with the swap now. I had decided to just redraw these the same as they are so we could enlarge the print. Thanks for saving me all that time!
 
OP
OP
surfer-b

surfer-b

Contributor
Bronco Guru
Joined
Sep 7, 2006
Messages
2,972
Sorry for the late response, there were a few others that did the conversion and had write-ups on them so I never finished this. Yes it went good, runs great and I do recommend this swap. There are a couple of things I will do diff next time.
1: use "EFI GUY" for the programming on the computer
2: do away with the PATS, and EGR. "EFI GUY" can do this in his programming, I had this done after I had it up and running however I left it installed at first because I was not sure how it would work without it and didn't want to throw anymore variables into the startup.
3: By doing away with the EGR it eliminates cutting the throttle body neck and rewelding it, not a deal breaker just one less step and less time spent, see pic
4: Now that I know what is the minimum that is needed for it run proper I will be able to eliminate a lot more of the wiring harness.

Gary "EFI GUY" is the man you want to do the programming, I would also recommend him for the harness if you do not want to tackle it, I have heard he does really nice work on this also.
 

Attachments

  • THB weld.jpg
    THB weld.jpg
    291.1 KB · Views: 221

EB70

Sr. Member
Joined
Jun 9, 2006
Messages
696
Just curious, but to the OP, how's the MPG with it under what conditions?
 
OP
OP
surfer-b

surfer-b

Contributor
Bronco Guru
Joined
Sep 7, 2006
Messages
2,972
Just curious, but to the OP, how's the MPG with it under what conditions?
I get an honest 16mpg on hwy with c4, 3.50 gears and 33x10.5x15 bfg AT tires, but I keep it bout 65, if you cruise on up to 70+ it starts to use the fuel, just no aerodynamics to these Broncos. Gonna install the 4R70W this summer, however I really don't expect the mpg to increase any.
 

Tiko433

Contributor
I know just enough to be dangerous
Joined
Jul 9, 2014
Messages
1,797
Loc.
South West Florida
Thanks for sharing , nice work . Did you notice much difference from your old motor to this one? Im currently gathering parts for a 97 Explore swap . Garry is working my harness
 
OP
OP
surfer-b

surfer-b

Contributor
Bronco Guru
Joined
Sep 7, 2006
Messages
2,972
No comparison between the 2 motors, old wore out non roller to a fresh modern 5.0 with EFI, yep there is difference but it all depends on how good your old motor is.
 

EB70

Sr. Member
Joined
Jun 9, 2006
Messages
696
OK that helps with the MPG. It kinda looks like a lot of people say when they say EFI to carb isn't that huge of a difference if everything is tuned right.

But walking outside at 10 degrees and starting the Bronco is kinda priceless where I live.

Thank you for the info. I have a couple of EFI Explorers for donors so this will help.
 

DirtDonk

Contributor
Bronco Guru
Joined
Nov 3, 2003
Messages
47,483
Little bit of a different setup here. Running 4.56 gears with the 4R70w and tires with an effective height of 29 inches (31 x 10.50 BFG).

At an approximate average of 65 mph on the freeway, plus another 15 or so around town and I saw 15.4.
Keeping the speed to between 55 and 60 with less than 5 miles around town and the mileage went up to 19.4 mpg. A best ever for me and an EB!

So it's capable of getting some decent numbers if you keep the speed down.
These numbers might be approximate too, as I'm sometimes a little skeptical of the whole filling up process with the 23 gallon tank. Seems mostly consistent, but will only know for sure over a longer period of time.

Paul
 
Top