• Just a reminder that you won't be able to start new posts or reply to existings posts in the Archive forum.

    This is where all the old posts go so they can still be used for reference and searched.
  • Welcome to ClassicBroncos! - You are currently viewing the forums as a GUEST. To take advantage of all the site features, please take a moment to register. It's fast, simple and absolutely free. So please join our community today!
    If you have problems registering or can't log into your account, please contact Admin.

Body Off - Crunch Time

1strodeo

Squirrel Watcher
Joined
Sep 15, 2016
Messages
3,596
Loc.
Wisconsin
Alright folks, the time is drawing near, thought about doing a build thread but if you don't follow them from the start they're just too damn long to read through, I prefer to chop it up.

25 March I will deliver my pride and joy to a guy that came highly recommended by a very reputable contractor (they do exist) friend of mine, he's got tons of experience with metal/body/paint and his father even does graphics, pinstriping you name it.

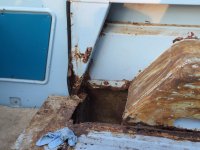
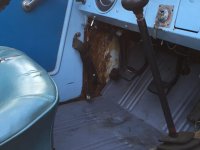
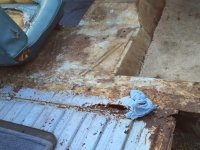
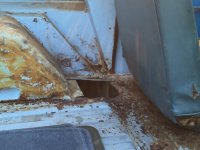
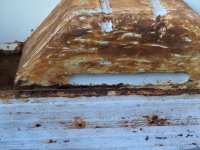
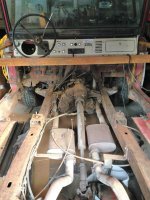
Anyway his first order of business will be to brace up the tub, remove the tub and have it blasted, going to blast the top as well. My main concern after trolling this site daily for 7 months straight is the fact that it has no front floors. The PO's young and ambitious son cut the front floors out some time ago, and I've been driving it with the replacement front floor sections basically wedged in and bolted to the body mounts.

I first just wanted to confirm that the front floors should be welded in before tub removal correct? To minimize body movement?

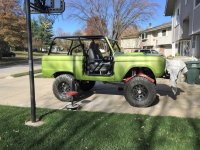
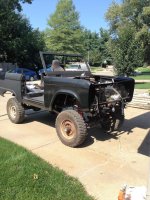
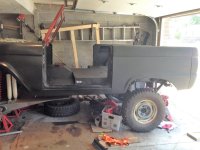
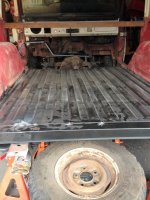
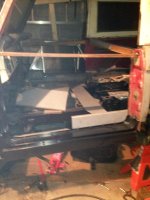
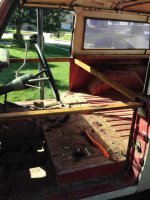
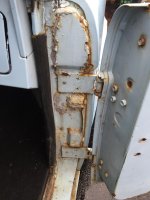
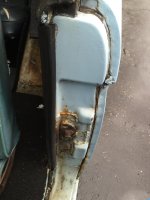
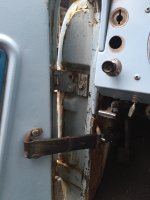
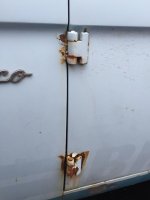
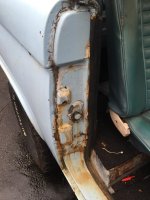
Here are pics of my poor girl to give an idea of her current condition...thanks for any insight

Jeff
 

Attachments

  • Tub1.jpg
    Tub1.jpg
    98.6 KB · Views: 87
  • Tub6.jpg
    Tub6.jpg
    64.9 KB · Views: 95
  • Tub5.jpg
    Tub5.jpg
    128.5 KB · Views: 86
  • Tub4.jpg
    Tub4.jpg
    86.4 KB · Views: 81
  • Tub3.jpg
    Tub3.jpg
    111.5 KB · Views: 81
  • Tub2.jpg
    Tub2.jpg
    114.8 KB · Views: 88

Crawdad

Bronco Guru
Joined
Feb 16, 2011
Messages
3,635
I suggest doing a lot of bracing. Your tub could be out of whack as we speak. There lots of measurements out there that you need to keep before and after panel replacement. Once you remove it from the frame it wants to flex. You can fix the flex by getting it square with braces. So when you go back to install renewed tub on the frame with brand new body mounts it will be close to square are you can get.
I will be starting my tub fixes in the coming months. But I have been reading for years about how to tackle panel replacements. By no means am I an expert, but measurements and bracing seem to come up all the time in some of the best builds. Good luck and I look forward to your build! Matt
 
OP
OP
1strodeo

1strodeo

Squirrel Watcher
Joined
Sep 15, 2016
Messages
3,596
Loc.
Wisconsin
oh it's outta whack alright, both the rearmost body mounts (which appeared to be square plates, original?) pretty much fell out so I have 2 hockey pucks, 1" billet and body mount stacked on each side.
 

Crawdad

Bronco Guru
Joined
Feb 16, 2011
Messages
3,635
That's where a spare frame has it's advantages. Throw your tub on a spare frame and start squaring it up to close to factory specs. While you are doing that start cleaning up your drivetrain, find your stamped VINs and preserve them, and make any frame repairs.

Not everyone has a spare frame sitting around so there is a wooden dolly some have built. If built right it will work just like a bronco frame. Good luck!
 

jmangi62

Bronco Guru
Joined
Jul 28, 2013
Messages
2,469
AHHH I remember those days LOL. Yours is in a lot better shape than mine was,I had to replace the WHOLE FLOOR front to back on my rig,tons of bracing is needed for sure,regardless of how the shop goes about this resto,you will want bracing between the doors side to side and front to back.IIRC I kept the tailgate on till I got to that area,by then I could put the doors back on and work that area.Many ways to do this so I'm sure the shop knows some tricks too. Good LUCK. ;D:eek::):cool:
 

Attachments

  • IMG_0150.jpg
    IMG_0150.jpg
    203.1 KB · Views: 53
  • IMG_0711.jpg
    IMG_0711.jpg
    176.5 KB · Views: 47
  • IMG_0644.jpg
    IMG_0644.jpg
    101.5 KB · Views: 46
  • IMG_0389.jpg
    IMG_0389.jpg
    112.6 KB · Views: 45
  • IMG_0285.jpg
    IMG_0285.jpg
    119 KB · Views: 46
  • IMG_0198.jpg
    IMG_0198.jpg
    131 KB · Views: 49
  • IMG_0341.jpg
    IMG_0341.jpg
    99 KB · Views: 47
  • IMG_0184.jpg
    IMG_0184.jpg
    129.6 KB · Views: 56
OP
OP
1strodeo

1strodeo

Squirrel Watcher
Joined
Sep 15, 2016
Messages
3,596
Loc.
Wisconsin
Going to be able to save that transfer case boot ? :)

What does that mean?

Beautiful work jmangi! I don't see how my floor looks 'alot better' than yours in your first pic though. How much time elapsed between the first and last pic?
 

okie4570

Contributor
Bronco Guru
Joined
Jul 16, 2012
Messages
9,247
Loc.
NW OK
What does that mean?

Beautiful work jmangi! I don't see how my floor looks 'alot better' than yours in your first pic though. How much time elapsed between the first and last pic?

Looks like the original rubber transfer case boot still in place, and in fairly good shape. Looks about the same condition as one of mine but it has started to crack some this last year.
 
OP
OP
1strodeo

1strodeo

Squirrel Watcher
Joined
Sep 15, 2016
Messages
3,596
Loc.
Wisconsin
Oh ok gotcha, I better give it an Armor All treatment tonight!

After you said it I noticed there was a 66 shift boot thread
 
OP
OP
1strodeo

1strodeo

Squirrel Watcher
Joined
Sep 15, 2016
Messages
3,596
Loc.
Wisconsin
Here are more pics

My biggest concern is the door pillars/posts because some PO welded the upper door hinges on both sides, you can even see the weld between the hinge and fender. So Im thinking the door gaps will not matter until these are addressed, or do they just look bad from all the welding or whatever goop someone put on the strikers etc?
 

Attachments

  • RFpillar.jpg
    RFpillar.jpg
    86.3 KB · Views: 23
  • RHinge.jpg
    RHinge.jpg
    46.8 KB · Views: 17
  • LRpillar.jpg
    LRpillar.jpg
    83.3 KB · Views: 17
  • LFpillar.jpg
    LFpillar.jpg
    82.1 KB · Views: 20
  • LHinge.jpg
    LHinge.jpg
    42 KB · Views: 18
  • RRpillar.jpg
    RRpillar.jpg
    93.2 KB · Views: 18

englewoodcowboy

Lick Creek Restorations
Joined
Jul 25, 2010
Messages
4,200
It's rough but not terrible. Mine looked decent when I bought it and I went over it pretty well knowing there was rot in the floors etc. but the series that hide under the paint are waaaayyy different than what the surface tells. I would replace your body mount bushings on the frame and get it squared up, use jacks etc. at the door posts, seat and so on, work it till you get the gaps decent, then make your braces. It is highly recommended to do as much panel replacement with it on frame and on its tires so when it is all painted and goes back together, things fit like they should. Being it is a 66, the tolerances will be much tighter on that than say if it was a 77. From what I know, ford only made 1 set of jigs (unsure exactly on the number of sets for lines but the first gen was only supposed to run from 66 thru 72 being replaced by the FSB so as the years went on, the bodies got worse due to worn out jigs) so with that in mind start right before it is tore down and brace. I even cut holes in my floors so I could run bracing from the dash to the frame and tacked them in place etc. They move a lot more than you expect but the work that he puts in up front will pay off big time at the end. So what are your plans with this? Keeping it stock, making it your own or making it your dream?
 
Top